
**Understanding Network Namespaces**
A network namespace is a fundamental Linux kernel feature that provides isolation of network resources. Each namespace has its own separate network stack, which includes its own interfaces, routing tables, and firewall rules. This means that processes running in one network namespace cannot communicate with processes in another unless explicitly configured to do so. In Kubernetes, each pod is assigned a unique network namespace, allowing it to manage its network interfaces independently of other pods.
**The Role of Network Namespaces in Kubernetes**
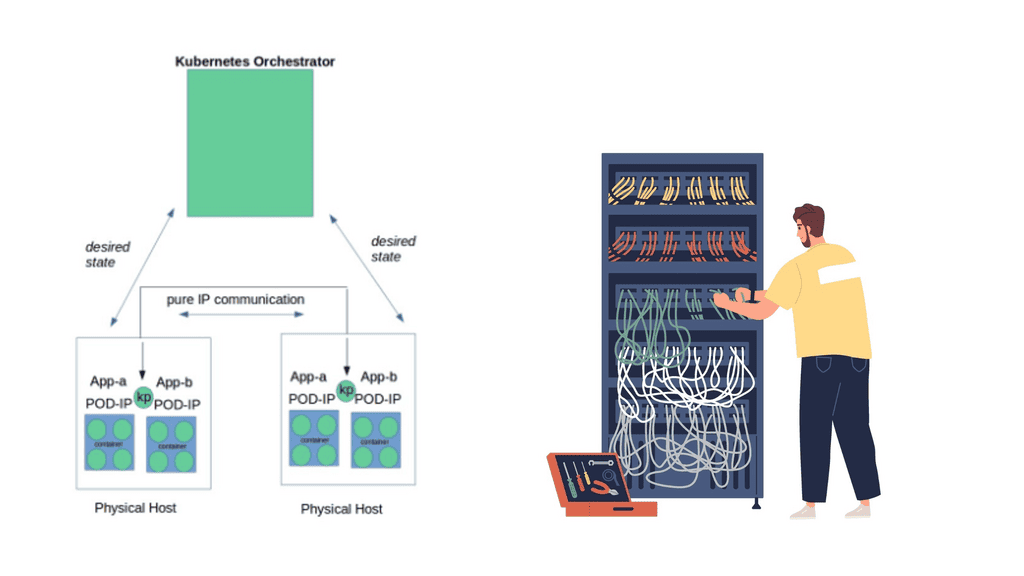
In Kubernetes, network namespaces play a pivotal role in achieving the platform’s goal of providing a “flat” network. This approach ensures that every pod in a cluster can communicate with any other pod without NAT (Network Address Translation). The network namespace allows Kubernetes to assign each pod a unique IP address, simplifying the communication process. This isolation also enhances security, as it limits the network attack surface by preventing unauthorized access across different namespaces.
Understanding Kubernetes Network Namespace
Kubernetes Network Namespace is a mechanism that allows multiple pods to have their own isolated network stack. It provides a separate network environment for each pod, enabling them to communicate securely and efficiently. By utilizing Network Namespace, you can easily define network policies, control traffic flow, and enhance the security of your applications.
Key Considerations:
1. Microservices Architecture: With Kubernetes Network Namespace, you can encapsulate different microservices within their own network namespaces. This isolation ensures that each microservice operates independently, preventing any interference or unauthorized access.
2. Testing and Development: Network Namespace is also useful for testing and development purposes. By creating separate namespaces for different stages of the development lifecycle, you can simulate real-world scenarios and identify potential issues before deploying to production.
3. Multi-Tenancy: Kubernetes Network Namespace allows you to achieve multi-tenancy by providing isolated network environments for different tenants or teams. This segregation ensures that each tenant or team has its own dedicated network resources and prevents any cross-communication or security breaches.
4. Network Segmentation: By utilizing Network Namespace, Kubernetes allows for the segmentation of network resources. This means that different pods can reside in their own isolated network environments, preventing interference and enhancing security.
5. Traffic Shaping and QoS: With Kubernetes Network Namespace, administrators can finely tune and shape network traffic for specific pods or groups of pods. This allows for better Quality of Service (QoS) management and optimized network performance.
 Managing Kubernetes Network Namespace
To implement Network Namespace in Kubernetes, one can leverage the powerful networking capabilities provided by container runtimes like Docker or CRI-O. By configuring the network plugin and defining network policies, pods can be assigned to specific network namespaces.
1. Creating a Network Namespace: To create a Network Namespace in Kubernetes, you can use the “kubectl” command-line tool or define it in YAML manifest files. By specifying the network policies, IP addresses, and other configuration parameters, you can create a customized namespace to suit your requirements.
2. Network Policy Enforcement: Kubernetes Network Namespace supports network policies that enable fine-grained control over traffic flow. By defining ingress and egress rules, you can restrict communication between pods within and across namespaces, enhancing the overall security of your cluster.
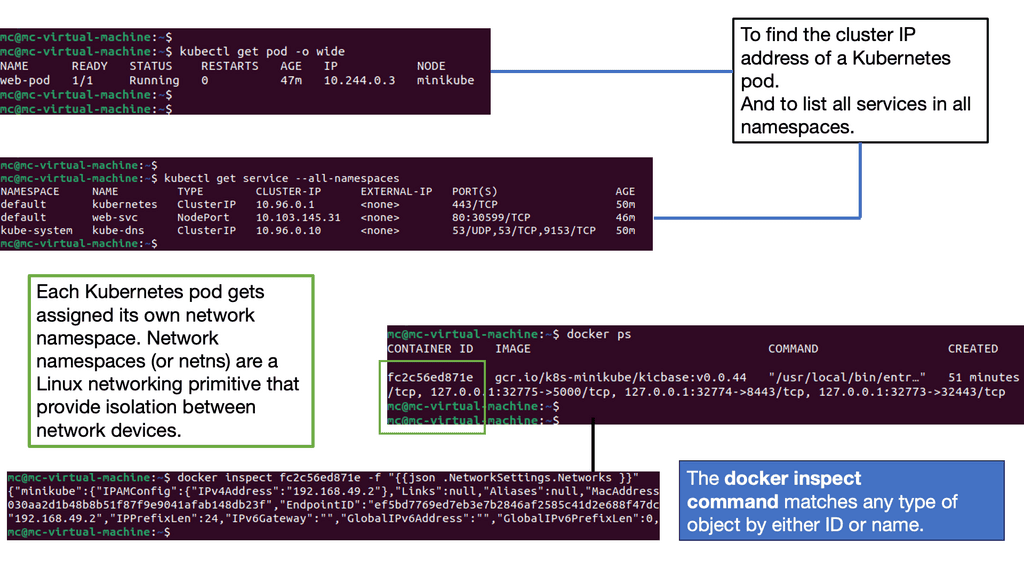
Kubernetes Pods & Services
To comprehend the deployment process in Kubernetes, we must first grasp the concept of pods. A pod is the smallest unit of deployment in Kubernetes, representing a group of one or more containers that share resources and network. Pods are designed to work together and are scheduled onto nodes, forming the building blocks of your application.
Now that we have a solid understanding of pods let’s dive into the process of deploying one. To deploy a pod in Kubernetes, you need to define its specifications in a YAML file. This includes specifying the container image, resource requirements, environment variables, and any necessary volume mounts. Once the YAML file is ready, you can use the `kubectl` command-line tool to create the pod.
Introducing Services: While pods provide a scalable and manageable deployment unit, they are temporary, making them unsuitable for long-term accessibility. This is where services come into play. Services in Kubernetes provide a stable network endpoint to access a set of pods, allowing for seamless communication between components within a cluster.
Deploying a service in Kubernetes involves defining a service YAML file that specifies the service type, port mappings, and the selector to determine which pods the service should target. Once the service YAML file is configured, you can create the service using the `kubectl` command-line tool. This will ensure your application’s components are discoverable and accessible within the cluster.
 Benefits of Kubernetes Network Namespace:
1. Enhanced Network Isolation: Kubernetes Network Namespace provides a robust framework for isolating network resources, ensuring that pods do not interfere with each other’s network traffic. This isolation helps prevent unauthorized access, reduces the attack surface, and enhances overall security within a Kubernetes cluster.
2. Efficient Resource Utilization: Kubernetes optimizes network resource utilization by utilizing network namespaces. Pods within a namespace can share the same IP address range while maintaining complete isolation, resulting in more efficient use of IP addresses and reduced network overhead.
3. Simplified Networking Configuration: Kubernetes Network Namespace simplifies the configuration of network policies and routing rules. Administrators can define network policies at the namespace level, allowing for granular control over inbound and outbound traffic between pods and external resources.
4. Scalability and Flexibility: With Kubernetes Network Namespace, organizations can scale their applications without worrying about network conflicts. By encapsulating each pod within its network namespace, Kubernetes ensures that the network resources can scale seamlessly, enabling the deployment of complex microservices architectures.
Container Network Interface (CNI)
The Container Network Interface (CNI) is a crucial component that enables different networking plugins to integrate with Kubernetes. We will delve into the inner workings of CNI and discover how it facilitates communication between Pods and the integration of external networks. Understanding CNI will empower you to choose the right networking solution for your Kubernetes cluster.
The Role of Docker
In addition to my theoretical post on container networking – Docker & Kubernetes, the following hands-on series examines Linux Namespaces and Docker Networking. The advent of Docker makes it easy to isolate the Linux processes so they don’t interfere with one another. As a result, users can run various applications and dependencies on a single Linux machine, all sharing the same Linux kernel. This abstraction is made possible using Linux Namespaces, which form the docker container security basis.
Related: Before you proceed, you may find the following helpful post for pre-information.
Moving from physical to virtual networks using software-defined networks (SDNs) and virtual interfaces involves a slight learning curve. The principles remain the same despite the differences in specifications and best practices. Understanding how Kubernetes networking works is helpful when dealing with containers and the cloud.
There are a few general rules to keep in mind when using the Kubernetes Network Model:
- Every pod’s IP address is unique, so There should be no need to create links between pods or map container ports to host ports.
- It is not necessary to use NAT: Pods on a node should be able to communicate with Pods on all nodes without using NAT.
- Agents (system daemons, Kubelets) can contact Pods in a node.
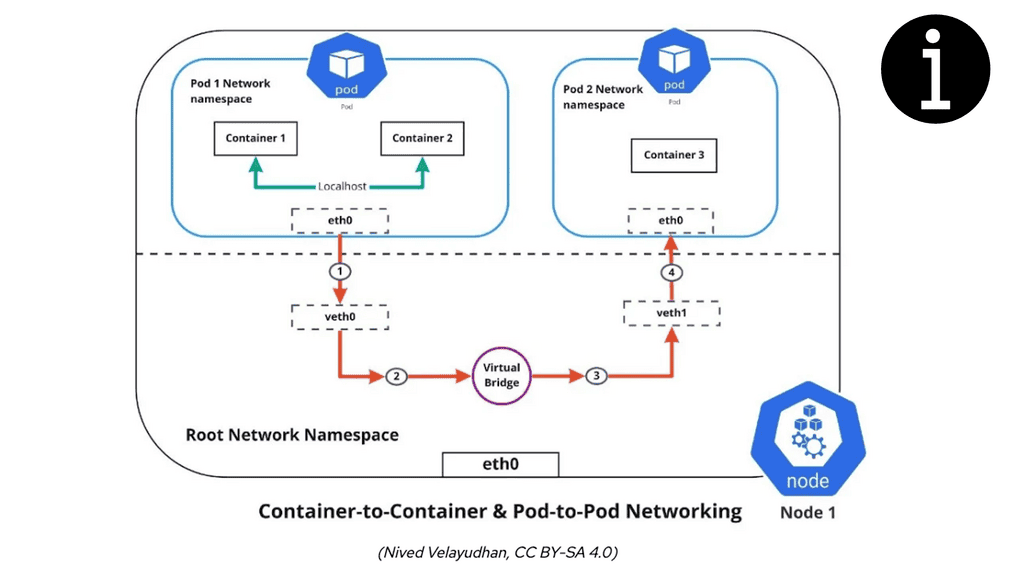
- Containers within a pod share an IP address and MAC address, allowing them to communicate using the loopback address.
In Kubernetes, networking ensures communication between different entity types. Separation is built into the infrastructure by design. A highly structured communication plan is necessary to keep namespaces, containers, and pods distinct.
Understanding Container Networking Models
There are various container networking models, each offering distinct advantages and use cases. Let’s explore two popular models:
1. Bridge Networking: The bridge networking model creates a virtual network bridge that connects containers running on the same host. Containers within the same bridge network can communicate directly with each other, whereas containers in different bridge networks require additional configuration for communication.
2. Overlay Networking: The overlay networking model allows containers running on different hosts to communicate seamlessly. It achieves this by encapsulating network packets within existing network protocols, effectively creating a virtual network overlay across multiple hosts.
Kubernetes Networking
Kubernetes users generally do not create pods directly. Instead, they make a high-level workload, such as a deployment, which organizes pods according to some intended specifications. In the case of deployment, users specify a template for pods and how many pods (often called replicas) they want to exist.
Several additional ways to manage workloads exist, such as ReplicaSets and StatefulSets. Remember that pods are temporary, so they are suggested to be deleted and replaced with new versions.
How Kubernetes Network Namespace Works:
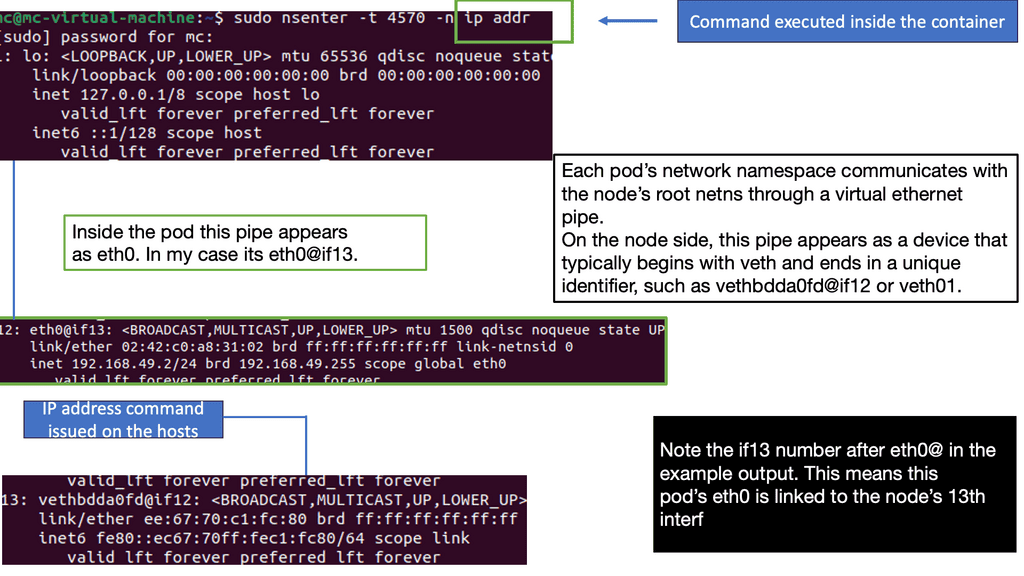
Kubernetes Network Namespace leverages the underlying Linux kernel’s network namespace feature to create separate network environments for each pod. When a pod is created, Kubernetes assigns a unique network namespace, isolating the pod’s network stack from other pods in the cluster.
Each pod has network interfaces, IP addresses, routing tables, and firewall rules within a network namespace. This isolation allows each pod to operate as if it were running on its virtual network, even though it shares the same underlying physical network infrastructure.
Administrators can define network policies at the namespace level, controlling traffic flow between pods within the same namespace and across different namespaces. These policies enable fine-grained control over network traffic, enhancing security and allowing for the implementation of complex networking scenarios.
Docker Default Networking 101 & Linux Namespaces
Six namespaces are implemented in the Linux kernel, enabling the core of container-based virtualization. The following diagram displays per-process isolation: IPC, MNT, NET, PID, USER, and UTS. The number on the right in the square brackets is each namespace’s unique proc inode number.
A structure called nsproxy was added to implement namespaces in the Linux kernel. As the name suggests, it’s a namespace proxy. We have several userspace packages to support namespaces: util-linux, iproute2, ethtool, and wireless iw. This hands-on series will focus on the iproute2 userspace, which allows network namespace (NET) management with the IP NETNS and IP LINK commands.

Docker networking, essentially a namespacing tool, can isolate processes into small containers. Containers differ from VMs that emulate a hardware layer on the operating system. Instead, they use operating system features like namespaces to provide similar isolation without emulating the hardware layer.
Each namespace has an individual and isolated view, allowing sharing of the same host but with separate routing tables and interfaces.
Users may create namespaces, assign ports, and connect for external connectivity. A virtual interface type known as a virtual Ethernet (veth) interface is set to namespaces. They act as pairs and resemble an isolated tube—what comes in one end must go back out the other.
The pairing enables namespace connectivity. Users may also connect namespaces using Open vSwitch. The following screenshot displays the creation of a namespace called NAMESPACE, a veth pair, and adding a veth interface to the newly created namespace. As discussed, the IP NET and IP LINK commands enable interaction with the network namespace.

The following screenshot displays IP-specific parameters for the previously created namespace. The routing table will only show specific namespace parameters, not information from other namespaces. For example, the following ip route list command does not display the 192.168.1.1/24 interface assigned to the NAMESPACE-A.
This is because the ip route list command looks into the global namespace, not the routing table assigned to the new namespace. Instead, the command will show different route table entries, including different default gateways for each namespace.

Kubernetes Network Namespace & Docker Networking
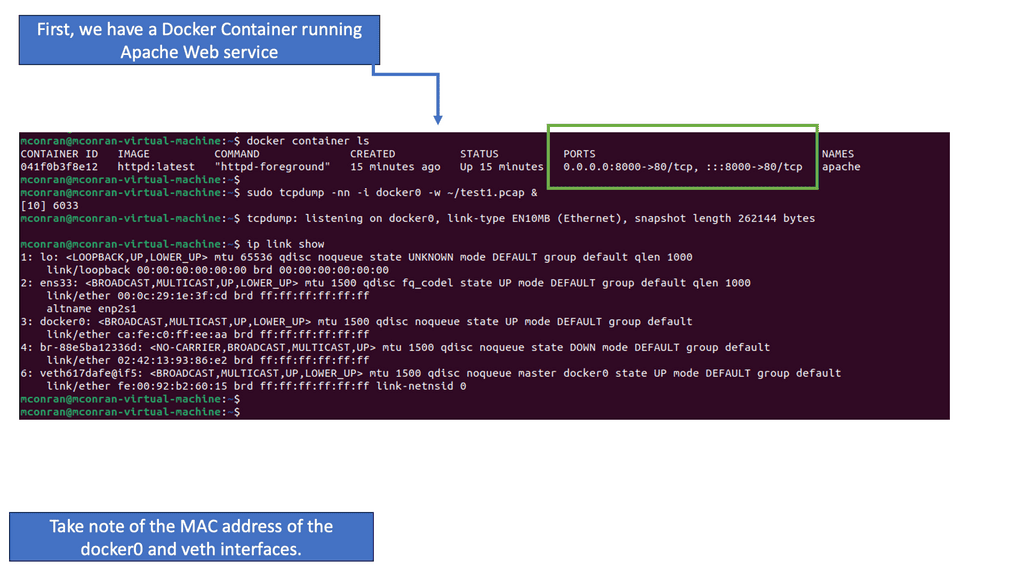
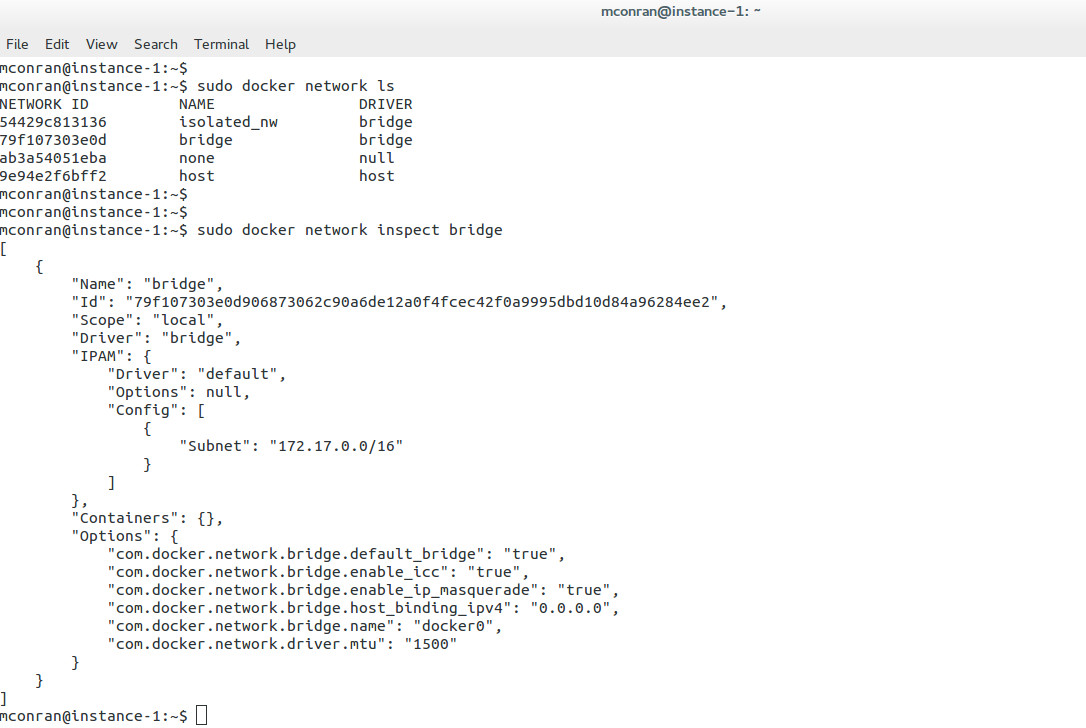
Installing Docker creates three networks that can be viewed by issuing the docker network ls command: bridge, host, and null. Running containers with a specific –net flag highlights the network in which you want to run the container. The “none” flag puts the container in no network, so it’s completely isolated. The “host” flag puts the container in the host’s network.

Leaving the defaults places the container into the bridge default network. The default docker bridge is what you will probably use most of the time. Any containers connected to the default bridge, like a flat VLAN, can communicate freely. The following displays the networks created and any containers attached. Currently, no containers are attached.
The image below displays the initiation of the default Ubuntu image pulled from the Docker public registry. There are plenty of images up there that are free to pull down. As you can see, Docker automatically creates a subnet and a gateway. The docker run command starts the container in the default network.
With this setup, it will stop running if you don’t use crtl+p + ctrl +q to exit the container. Running containers are viewed with the docker ps command, and users can connect to a container with the Docker attach command. \

IPTables
IPtables operate by examining network packets as they traverse through the network stack. Each packet is analyzed against a series of rules defined by the administrator. These rules can be based on parameters such as source/destination IP addresses, protocols, port numbers, etc. When a packet matches a rule, the specified action, such as accepting or dropping the packet, is carried out.
Communication between containers can be restricted with IPTables. The Linux kernel uses different IPtables according to the protocol in use:
- IPtables for IPv4 – net/ipv4/netfliter/ip_tables.c
- IP6table for IPv6 -net/ipv6/netfliter/ip6_tables.c
- arptables for ARP -net/ipv4/netfliter/arp_tables.c
- ebtables for Ethernet – net/bridge/netfilter/ebtables.c
Docker Security Options
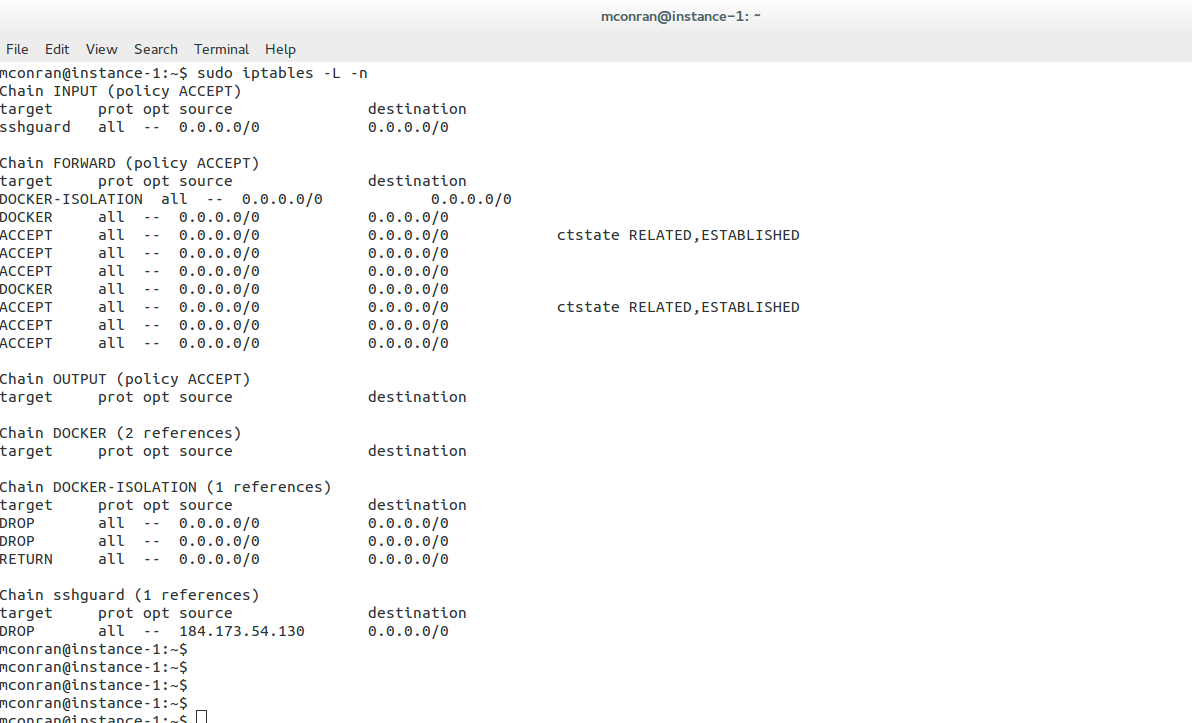
They are essentially a Linux firewall before the Netfilter, providing a management layer for adding and deleting Netfilter rules and displaying statistics. The Netfilter performs various operations on packets traversing the network stack. Check the FORWARD chain; it has a default policy of ACCEPT or DROP.
All packets reach this hook point after a lookup in the routing system. The following screenshot shows the permit for all sources of the container. If you want to narrow this down, restrict only source IP 8.8.8.8 access to the containers with the following command – iptables -I DOCKER -i ext_if! -s 8.8.8.8 -j DROP
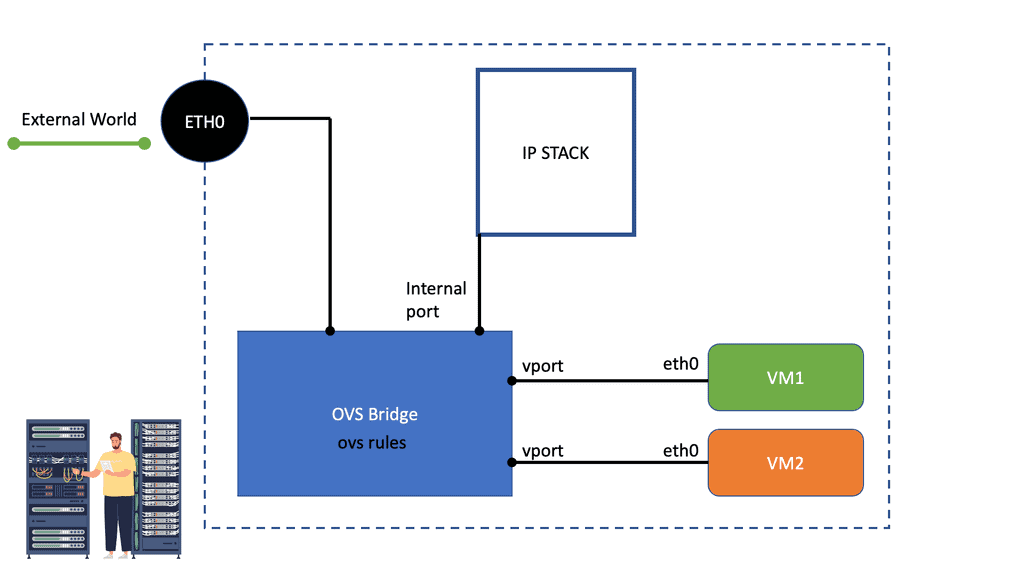
In addition to the default networks created during Docker installation, users may create user-defined networks. User-defined networks come in two forms – Bridge and Overlay networks. Bridge networks support single-host connectivity, and containers connected to an overlay network may reside on multiple hosts.
The user-defined bridge network is similar to the docker0 bridge. An overlay network allows containers to span multiple hosts, enabling a multi-host connectivity model. However, it has some prerequisites, such as a valid data store.

- DMVPN - May 20, 2023
- Computer Networking: Building a Strong Foundation for Success - April 7, 2023
- eBOOK – SASE Capabilities - April 6, 2023