
### Understanding Docker Networking Basics
Docker’s networking capabilities are one of its most powerful features, allowing containers to communicate with each other and the outside world. At its core, Docker provides users with a default networking setup that simplifies the process of managing container interactions. This default network ensures that containers can access each other and external networks effortlessly, making it an ideal starting point for beginners.
### Exploring Docker’s Bridge Network
When you install Docker, a default bridge network is created automatically. This network allows containers to communicate with each other using private IP addresses. By understanding how the bridge network operates, users can effectively manage container interactions without needing advanced networking knowledge. It acts as a virtual switch, connecting containers in a secure and isolated environment, which is perfect for testing and development purposes.
### Connecting Containers to External Networks
One of the most crucial aspects of Docker networking is connecting containers to external networks, such as the internet. Docker’s default network configuration allows containers to access external networks via Network Address Translation (NAT). This means that while your containers have private IP addresses, they can still initiate outbound connections to the internet, enabling updates, downloads, and communication with external services.
### Advanced Networking with User-Defined Networks
While Docker’s default networking is sufficient for many use cases, there are scenarios where you might need more control over your network configuration. Docker allows users to create custom networks with specific settings, such as defining subnets and IP address ranges. This flexibility is invaluable when building complex, multi-container applications that require specific network configurations for optimal performance and security.
Understanding Docker Default Networking
1 – Docker Default Networking is a built-in networking driver that allows containers to communicate with each other using a shared network. By default, Docker creates a bridge network named “bridge” and assigns it to newly created containers. This bridge network acts as a virtual switch, allowing containers to connect and communicate seamlessly.
2 – One of the key advantages of Docker Default Networking is its simplicity. With a few simple commands, containers can be connected to the default bridge network, enabling them to communicate with each other effortlessly. Moreover, Docker Default Networking provides isolation, as containers connected to the default bridge network are isolated from the host network, ensuring better security and preventing conflicts.
3 – To effectively utilize Docker Default Networking, it’s crucial to understand how to configure and manage it. Docker offers a range of commands and options to manage the default bridge network, including creating custom bridge networks, connecting containers to specific networks, and configuring IP addressing. We will explore these concepts in detail, providing step-by-step instructions and examples.
4 – While Docker Default Networking offers convenience, it’s important to follow best practices to ensure optimal performance and security. Some recommended practices include avoiding the use of the default bridge network for production deployments, creating custom bridge networks for better isolation, and utilizing container orchestration tools like Docker Compose to manage network configurations efficiently.
**Docker Architecture**
Docker is a powerful technology, which means both tools and processes are complex. From the user’s perspective, Docker has a simple client/server architecture despite its complex underpinnings. Several pieces make up the Docker API, including containerd and runc, but the basic interaction takes place over an API between a client and a server. Docker relies heavily on kernel mechanisms, including iptables, virtual bridging, Linux control groups (cgroups), Linux namespaces, secure computing mode, and various filesystem drivers, in addition to its simple appearance.
**Client/Server Model**
A Docker image, along with its metadata and images, is stored in the Docker registry. Using the client, you specify how containers should be built, run, and managed. Docker allows clients to address any number of servers, and the Docker daemon can run on any number. Clients interact directly with image registries when requested by Docker servers, but clients control all communication. Containerized applications are hosted and managed by servers, and clients control them.
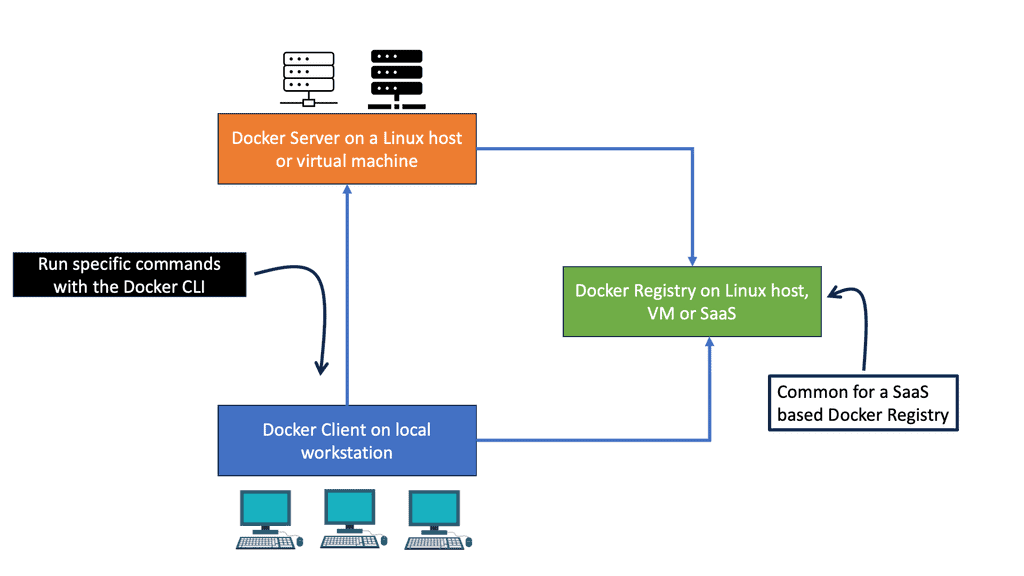
Docker differs from some other client/server software in a few ways. The server orchestrates several components behind the scenes, including containerd-shim-runc-v2, which interfaces with runc, rather than being entirely monolithic. In most cases, Docker is just a simple client and server, hiding any complexity behind a simple API. It is common for Docker hosts to run one Docker server that is capable of managing any number of containers. To communicate with the server, the docker command-line tool can be used either from the server or, if properly secured, from a remote client.
Understanding Docker Networks
Docker networks provide a virtual bridge that connects containers, enabling communication between them. We will explore the various types of Docker networks, including the default bridge network, user-defined bridge networks, and overlay networks. Understanding these networks is essential for comprehending the nuances of Docker network connectivity.
Network Ports and Unix Sockets
A ) Dockerd and the command-line tool use Unix sockets and network ports to communicate. For docker daemons and clients, Docker, Inc., has registered three ports with the Internet Assigned Numbers Authority (IANA): TCP port 2375 for unencrypted traffic, TCP port 2376 for encrypted SSL connections, and TCP port 2377 for Docker Swarm mode.
B ) You can use a different port if you need different settings. By default, the Docker installer uses a Unix socket to communicate with the Docker daemon.
C ) Security is configured by default on the system. Due to the lack of user authentication and role-based access controls, Docker should not be used with network ports. Depending on the operating system, the Unix socket is usually located in /var/run/docker.sock.
D ) You can specify this at installation time or change it later by changing the server configuration and restarting the daemon if you have strong preferences. If you don’t, you might be able to get away with the defaults. You’ll save time and hassle if you don’t need to change the defaults.
Docker Orchestration
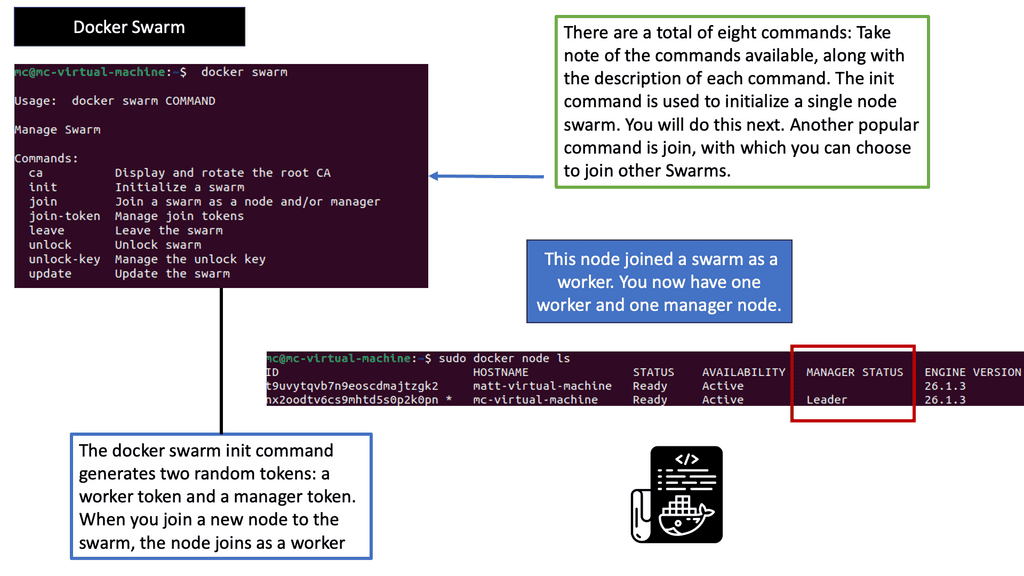
Understanding Docker Swarm
Docker Swarm, built upon the Docker Engine, allows you to create and manage a cluster of Docker nodes, forming a swarm. These nodes collaborate to run and scale applications across the swarm. With Docker Swarm, you can seamlessly distribute workloads, ensuring high availability and fault tolerance. The swarm manager acts as the control plane while the worker nodes execute the tasks the manager assigns.
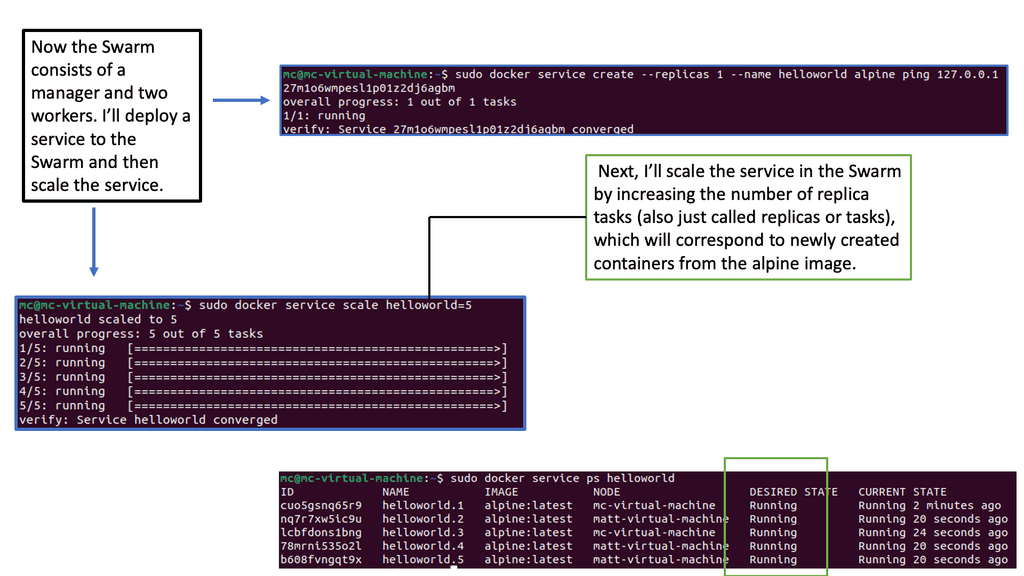
One of Docker Swarm’s key advantages is its ability to effortlessly scale applications. By leveraging the swarm’s power, you can easily scale your services up or down based on demand. Docker Swarm intelligently distributes the workload across multiple nodes, ensuring efficient resource utilization. With its built-in load balancing and service discovery mechanisms, scaling becomes seamless and transparent.
Achieving Resilience with Docker Swarm
Resilience is crucial for modern applications, and Docker Swarm excels. By deploying services across multiple nodes, Docker Swarm ensures that the application continues without disruption, even if a node fails. The swarm manager automatically reschedules tasks on healthy nodes, maintaining the desired state of the application. This fault tolerance mechanism and automated health checks guarantee high availability for your services.
Apart from scalability and resilience, Docker Swarm offers a range of advanced features. It supports rolling updates, allowing you to update your services without downtime. Constraints and placement preferences enable you to control where services are deployed within the swarm. Additionally, Docker Swarm integrates with other Docker tools, such as Docker Compose, allowing you to define complex multi-container applications.
Docker Orchestration: Kubernetes
### Why Choose Google Cloud for Your Kubernetes Deployment?
Google Cloud offers a fully managed Kubernetes service called Google Kubernetes Engine (GKE), which simplifies the complex world of Kubernetes. GKE provides a powerful, scalable, and reliable platform that lets you focus on your applications rather than the underlying infrastructure. Its seamless integration with other Google Cloud services, such as Google Cloud Storage and BigQuery, enhances its capabilities, making it an attractive choice for businesses looking to leverage cloud-native architectures.
### Setting Up Your Kubernetes Cluster on Google Cloud
Setting up a Kubernetes cluster on Google Cloud is straightforward with GKE. Begin by creating a Google Cloud project and enabling the Kubernetes Engine API. The next step involves configuring your cluster settings, such as the number of nodes and machine types, through the Google Cloud Console or the gcloud command-line tool. GKE takes care of provisioning the necessary resources and deploying the cluster, allowing you to start deploying your applications within minutes.
### Optimizing Kubernetes Clusters for Performance and Cost
Once your cluster is up and running, optimizing it for performance and cost becomes crucial. Google Cloud offers tools like Stackdriver for monitoring and logging, which help in identifying bottlenecks and anomalies. Additionally, GKE’s autoscaling features ensure that your application can handle varying loads efficiently by automatically adjusting the number of nodes in your cluster. Implementing best practices for resource requests and limits, as well as leveraging preemptible VMs, can significantly reduce costs without sacrificing performance.
### Security Best Practices for Kubernetes on Google Cloud
Security is a top priority when operating Kubernetes clusters. Google Cloud provides several features to enhance the security of your clusters. Role-Based Access Control (RBAC) allows you to define fine-grained permissions, ensuring that users have only the access necessary for their roles. Network policies can be used to control traffic flow between pods, protecting sensitive data from unauthorized access. Regularly updating your clusters and using Google’s Container Registry for vulnerability scanning further bolster your security posture.

**The Starting Points**
Initially, application stacks consisted of per-application server deployments. Single applications require a dedicated server, wasting server resources. Physical servers were never fully utilized, requiring upfront Capex and ongoing Opex costs. Individual servers need management, maintenance, security patches, antivirus software, and licenses, all of which require human intervention and ongoing expenses.
Introducing Virtualization:
Virtualization systems and container based virtualization helped the situation by allowing the Linux kernel and operating systems to run on top of a virtualized layer using virtual machines (VM). The Linux Kernel and the use of namespace and control groups form the base for Docker container security and Docker security options.
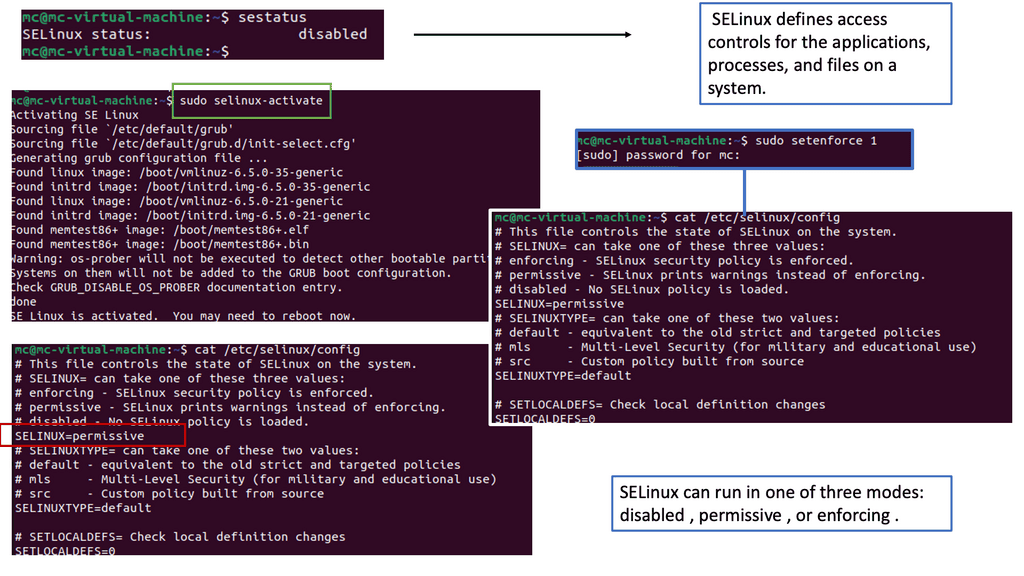
**Understanding SELinux**
– SELinux, or Security-Enhanced Linux, is a security module integrated into the Linux kernel. It provides a mandatory access control mechanism beyond traditional discretionary access controls. SELinux enforces strict policies, defining what actions are allowed or denied for processes, files, and other system resources.
– Before delving into SELinux’s role in Docker networking security, it is essential to grasp the basics of Docker networking. Docker allows containers to communicate with each other through virtual networks, enabling seamless interaction. However, this convenience raises concerns about potential security vulnerabilities.
– SELinux plays a crucial role in mitigating security risks within Docker networking. By enforcing policies at the kernel level, SELinux restricts container actions and interactions, minimizing the potential for unauthorized access or malicious activities. It provides an additional layer of defense, complementing Docker’s built-in security features.
Before you proceed, you may find the following helpful:
Understanding Docker Default Network
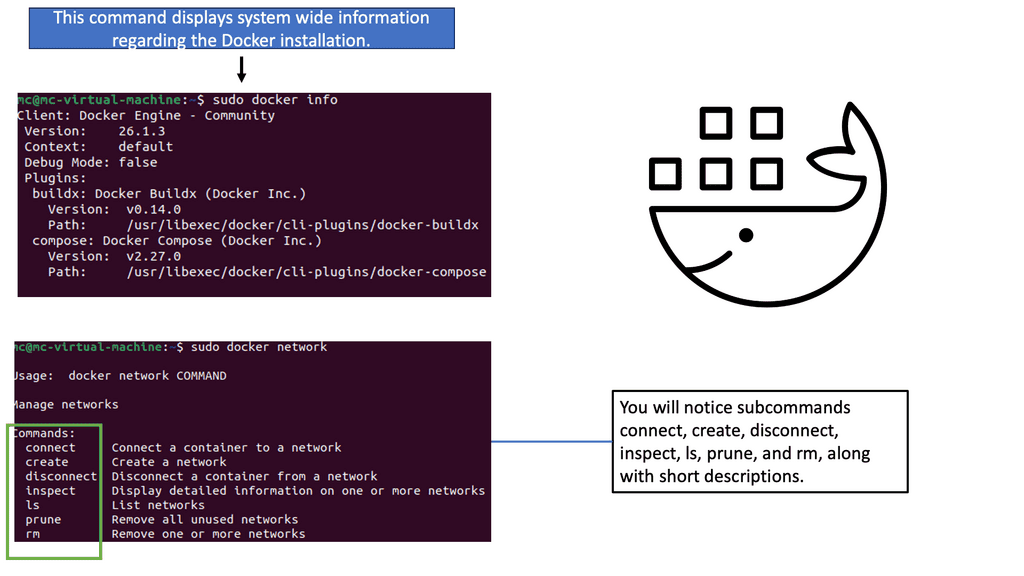
Docker is software that runs on Linux and Windows. It creates, manages, and can even orchestrate containers. When most people speak about Docker, they’re guided to the technology that runs containers. However, there are at least three things to be mindful of when referring to Docker as a technology:
- The runtime
- The daemon (a.k.a. engine)
- The orchestrator
Docker runs applications inside containers, which must communicate over many networks. This means Docker needs networking capabilities. Fortunately, Docker has solutions for container-to-container networks and connecting to existing networks and VLANs. The latter is essential for containerized applications interacting with functions and services on external systems such as VMs and physical servers.
Guide on Docker Default Networking
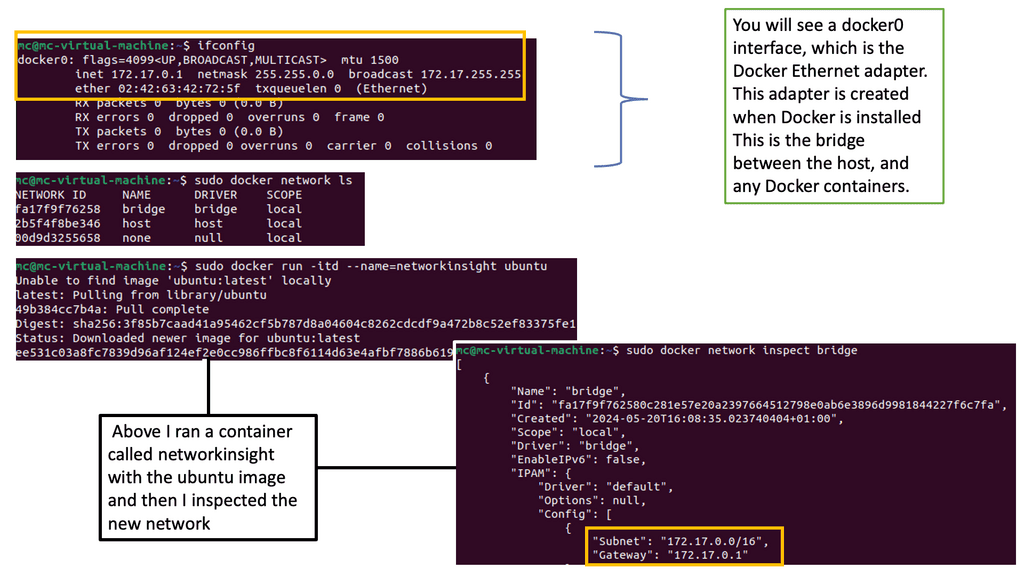
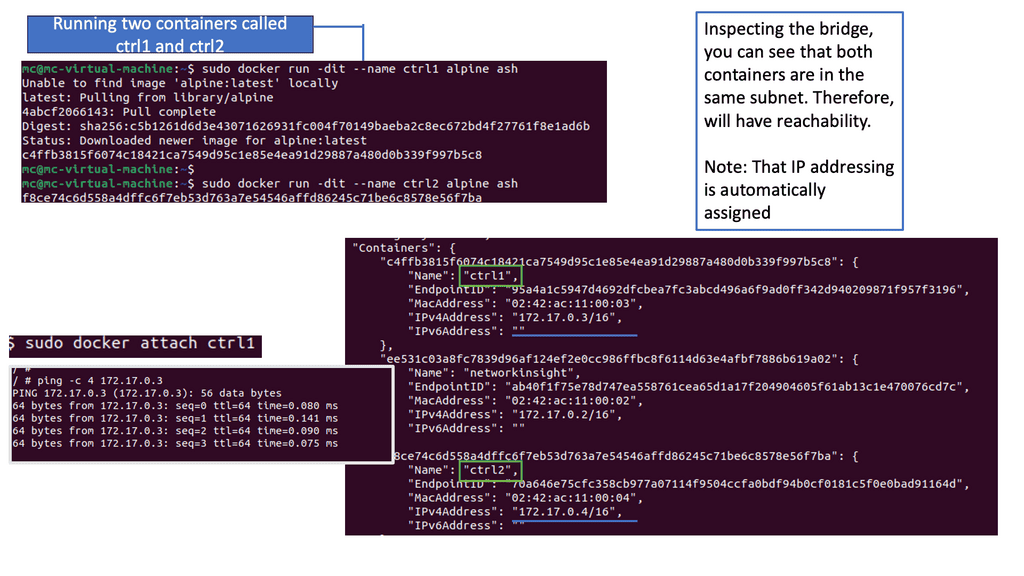
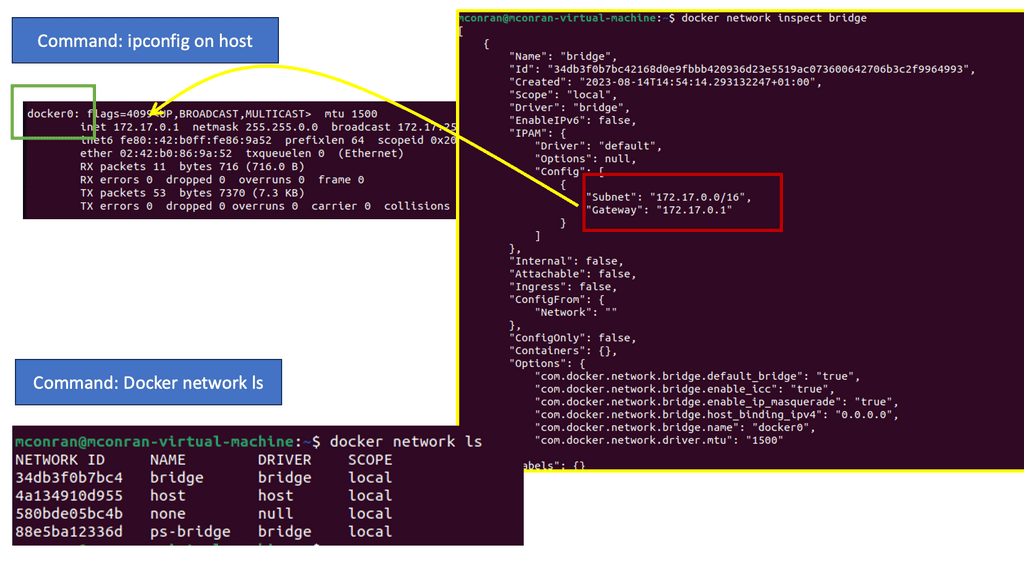
In the following example, notice the IP assignment to Docker0 when we issue the ipconfig command on the docker host. So, this docker host is a Ubuntu server with a fresh install of Docker. The default network, which is “bridge,” has a subnet with the default gateway pointing to the docker0
Docker0 is a virtual Ethernet bridge that serves as Docker’s default bridge network interface. It is created automatically when Docker is installed on a host machine. The docker0 bridge is a central point for communication between containers, allowing them to connect and share information.
Docker0 plays a vital role in container networking by providing a default bridge network for containers to connect. When a container is created, it is attached to the docker0 bridge by default, allowing it to communicate with other containers on the same bridge. This default bridge network enables containers to access the host machine and external networks.
Docker Default Networking:
When a container is created, Docker assigns it a unique IP address and adds it to a default network called “bridge.” The bridge network driver is the default networking driver used by Docker, providing a private internal network for the containers running on the same host. This default networking setup allows containers to communicate with each other using IP addresses within the bridge network.
Container Communication:
Containers within the same bridge network can communicate with each other using their respective IP addresses. Docker automatically assigns a hostname to each container, making it easy to reference and establish communication between containers. This seamless communication between containers is crucial for building microservices architectures, where different containers work together to deliver a complete application.
Exposing Container Ports:
By default, containers within the bridge network can communicate with each other, but they are isolated from the outside world. Docker provides port mapping functionality to expose a container’s services to the host or external networks. With port mapping, you can bind a container’s port to a specific port on the host machine, allowing external systems to access the container’s services.
Container Isolation:
One of Docker’s key features is container isolation, which ensures that containers running on the same host do not interfere with each other. Docker achieves this isolation by assigning unique IP addresses to each container and restricting network access between containers unless explicitly configured. This isolation prevents conflicts and ensures the smooth operation of applications running inside containers.
Custom Networking with Docker:
While Docker’s default networking is sufficient for most use cases, there are scenarios where custom networking configurations are required. Docker provides various networking options that allow you to create custom networks, such as overlay networks for multi-host communication, macvlan networks for assigning MAC addresses to containers, and host networks where containers share the host’s network stack. These advanced networking features offer flexibility and cater to complex networking requirements.
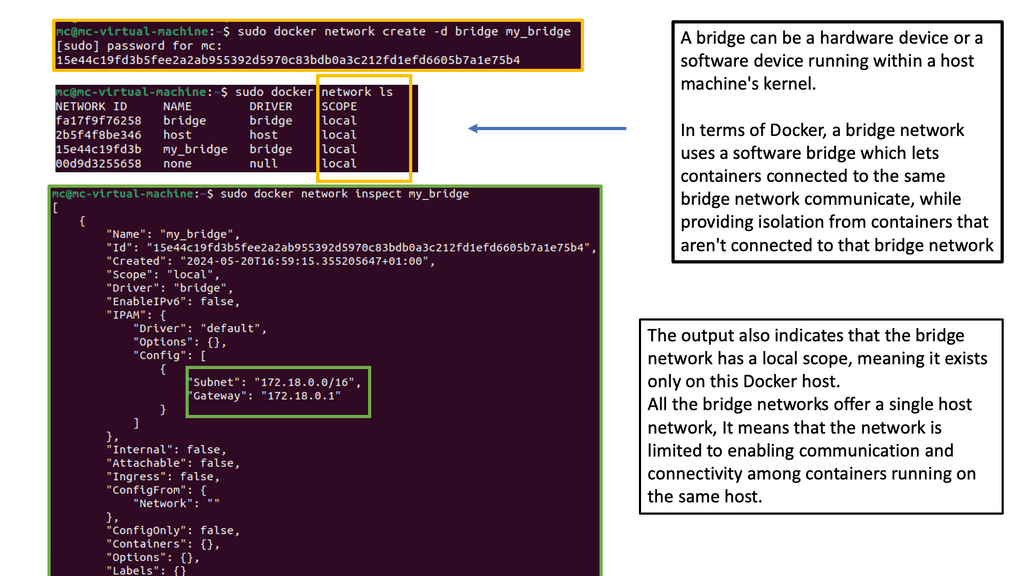
Bridge Network Driver:
By default, Docker uses the bridge network driver, which creates a virtual network bridge on the host machine. This bridge allows containers to communicate with each other and the outside world. Containers within the same bridge network can communicate with each other using their IP addresses or container names.
Understanding Container Connectivity:
When a container is started, it is automatically connected to the default bridge network. Containers on the same bridge network can communicate with each other using their IP addresses or container names. Docker also assigns each container a hostname, making it easier to refer to them within the network.
Exposing Container Ports:
Docker allows you to expose specific container ports to the host machine or the outside world. This is achieved by mapping the container port to a port on the host machine. Docker assigns a random port on the host machine by default, but you can specify a specific port if needed. This enables external access to services running inside containers.
Container Isolation:
Docker default networking provides isolation between containers by assigning each container a unique IP address. This ensures that containers can run independently without interfering with each other. It also adds a layer of security, as containers cannot access each other’s resources by default.
Custom Networks:
While Docker default networking is suitable for most scenarios, Docker also allows you to create custom networks with your desired configurations. Custom networks provide more control over container communication and will enable you to define network policies, assign IP addresses, and manage DNS resolution.
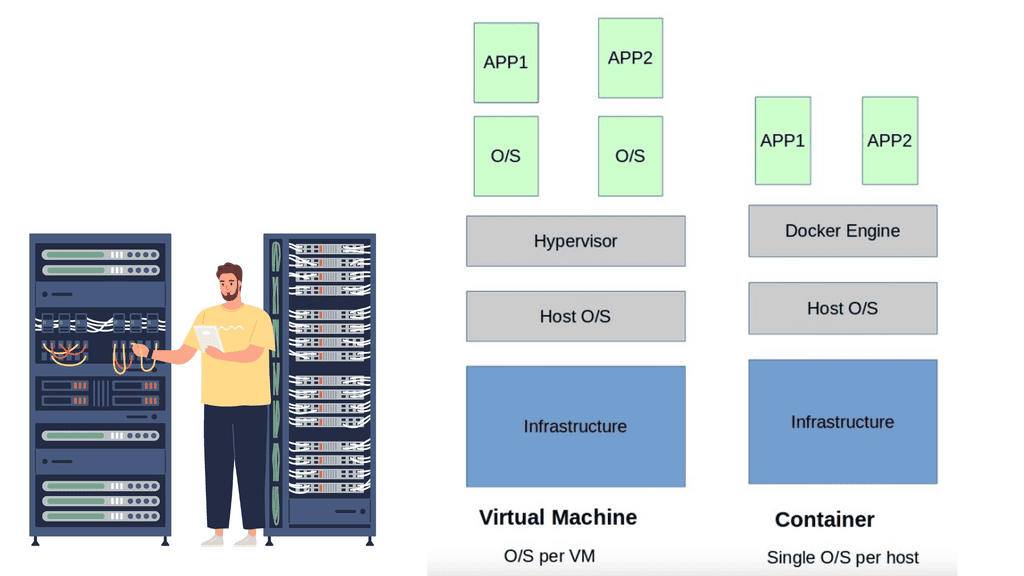
**The Virtualization Layer**
The virtualization layer holding the VM is called the Hypervisor. The VM / Hypervisor approach enables multiple applications to be installed on the same server, which is better for server resources. The VM has no idea. It shares resources with other VMs and operates like a physical server.
Compute virtualization brings many advantages to IT operations and increases the flexibility of data centers. However, individual applications still require their operating system, which is pretty resource-heavy. A new method was needed, and the container with container networking came along.
The hypervisor method gives each kernel distinct resources and defined entry points into the host’s physical hardware. Containers operate differently because they share the same kernel as the host system. You don’t need an operating system as a whole for each application, resulting in one less layer of indirection and elements to troubleshoot when things go wrong.

Knowledge check for container Orchestration
Within the native multi-host capabilities, we need an orchestrator. There are two main ones, Kubernetes and Docker Swarn. Both Kubernetes network namespace and Docker Swarm create what is known as a cluster.
A cluster consists of Docker hosts acting as giant machines and Swarm or Kubernetes schedules based on resources. Swarm or Kubernetes presents a single interface to the Docker client tool, with groups of Docker hosts represented by a container cluster.
Containers – Application Philosophy
Linux containers challenge application philosophy. Many isolated applications now share the underlying host operating system. This was leap years better than a single application per VM, maximizing server resources. Technology has a crazy way of going in waves; for containers, we see old technologies revolutionizing applications.
Containers have been around for some time but were initially hindered by layers of complexity. Initially, we had batch processing systems, chroot system calls, Jails, Solaris Zones, Secure Resource Partition for HP-UX, and Linux containers in kernel 2.6.24. Docker is not alone in the world of containers.
Solomon Hykes, the founder and CEO of dotCloud, introduced Docker in 2013. Prior to this, few people outside had played with it. Docker containers completely reshape the philosophy of application delivery and development.
Under the hood, this is achieved by leveraging Linux IPtables, virtual bridges, Linux namespace, cgroups, overlay networking, and filesystem-based portable images. By shrinking all dependencies to individual container images, the application footprint is reduced to megabytes, not gigabytes experienced with the VM.
A key point: Containers are lightweight
Containers are incredibly lightweight, and an image may only take 10 kilobytes of disk space. They are certainly the way forward, especially when it comes to speed. Starting a container takes milliseconds, not seconds or minutes. This is considerably faster than what we have with VMs.
We are not saying the VM is dead, but containers represent a fundamental shift in application consumption and how IT teams communicate. They are far more resource-efficient and can now be used for stateful and stateless services.
**Stateful and Stateless Applications**
Docker default networking works for both stateful and stateless applications. Initially, it was viewed as a tool for stateless applications, but now, with Dockers’ backend plugin architecture, many vendors’ plugins allow the containerization of stateful services. Stateful applications hold state and keep track of data in memory, files, or a database. Files and data can be mounted to a volume of 3rd party solutions. Stateless applications don’t keep track of information between requests.
An example of a stateless application is a web front end passing requests to a backend tier. If you are new to Docker and the container philosophy, it might be better to start with stateless applications. However, the most downloaded images from the docker hub are stateful.
You might also be interested in learning that Docker Compose is a tool for running multi-container applications on Docker that are defined using the Compose file format. A Compose file defines how one or more containers that make up your application are configured.
While the VM and container achieve the same goal of supporting applications, their use case and practicality differ. Virtual machines are often long-lived in nature and slower to boot. Containers are ephemeral, meaning they come and go more readily and are quick to start.
VM is especially useful for hot migrations and VMotion, where TCP sessions must remain intact. We don’t usually use VMotion containers, but I’m sure someone somewhere is doing this—Brent Salisbury. Containers might only exist for a couple of seconds.
For example, it starts due to a user-specific request, runs some code to a backend, and then is destroyed. This does not mean that all applications are best suited for containers. VM and containerized applications are married and will continue to live with each other for another while.
Docker Default Networking 101
Initially, Docker default networking was only suited for single-host solutions employing Network Address Translation ( NAT ) and Port Mapping techniques for any off-host communication. Docker wasn’t interested in solving the multi-hosts problem as other solutions; for example, Weave overlays tried to solve this.
The default Docker networking uses multiple containers on a host with a single IP address per host. NAT and IPtables enable forwarding an outside port to an inside container port—for example, external port 5050 on Host1 maps to internal port 80 on Container1.
Therefore, the external connection to port 5050 is directed to port 80 on Container 1. We have to use NAT/port mapping because the host only has one IP address, and multiple containers live behind this single IP address.
Bridged Network Mode
By default, the docker engine uses bridged network mode. Each container gets its networking stack based on the Linux NET namespace. All containers connecting to the same bridge on the host can talk freely by IP address.
Communicating with another Docker host requires special tricks with NAT and port mappings. However, recent Docker releases are packaged with native multi-host support using VXLAN tunnels, as discussed later. Here, we don’t need to use port mappings for host-to-host communication; we use overlays.
The diagram below shows a simple container topology consisting of two containers connected to the same docker0 bridge. The docker0 bridge acts as a standard virtual switch and passes packets between containers on a single host. It is the heart of all communication between containers.
Docker Networking 101 and the Docker Bridge
The docker0 bridge will always have an IP address of 172.17.42.1; containers are assigned an IP from this subnet. The 172.17.42.1 is the container’s default gateway. By default, all container networks are hidden from the underlay network. As a result, containers on different Docker hosts can use the same IP address. Virtual Ethernet Interfaces ( veth ) connect the container to the bridge.
In the preceding diagram, veth Eth0 is in the container namespace, and the corresponding vethxxxx is in the docker0 namespace. Linux namespaces provide that network isolation. The veths is like a pipe – what goes in one end must come out the other.
The default operation allows containers to ping each other and access external devices. Docker defaults don’t give the container a public IP address, so the docker0 bridge acts like a residential router for external access. The port mapping and NAT process has been used for external access, i.e., the host IP tables port masquerade ( aka performs Source NAT ).
Docker Flags
The docker0 bridge can be configured with several flags ( listed below ). The modes are applied at a container level so that you may see a mixture on the same docker host.
- The –net default mode is the default docker0 bridge mode. All containers are attached to the docker0 bridge with a veth.
- The –net=none mode puts the container in an isolated environment. The container has its network stack without any network interfaces. If you analyze the IP configuration on the container, it doesn’t display any interfaces, just a default loopback of 127.0.0.1.
- The –net=container:$container2 mode shares the container’s namespaces. It may also be called a “container in a container .”When you run the second container, the network mode should be set to ‘container’ and specify the container we want to map. All the port mapping is carried out on the first container. Any changes to the port mapping config on the second container have no effect. During the link operation, the docker engine creates container host entries for each container, enabling resolution by name. The most important thing to remember about linking containers is that it allows for access to the linked container on an exposed port only; communication is not freely by IP.
- The—-net=host mode shares the host’s namespace. The container doesn’t get an IP from the 172.17.0.0/16 space but uses the IP address of the actual host. The main advantage of the host mode is the native performance for high-throughput network services. Containers in host mode should experience a higher level of performance than those traversing the docker0 bridge with IPtable functions. However, it would help if you were careful about allocating port assignments. If ports are already bound, you cannot use them again.
Docker default networking 101 and container communication.
Even though the containers can cross-communicate, their network stack is in isolation. Their networks are hidden from the underlay. The host’s IPtables perform masquerade for all container traffic for outbound communication. This enables the container to initiate communication to the outside but not the other way – from outside to inside.
Similar to how Source NAT works. To enable outside initiation to an inside container, we must carry out port mappings – map the external reachability port on the host’s network stack to a local container port.
For example, we must map some ports if container A on host 1 wants to talk to anything outside the host one docker0 bridge. Each container has its network namespace in a single host scenario and is attached to the network bridge. Here, you don’t need port mapping. You only need port mapping to expose the container to an external host.
Communication among containers on the same host is enabled via the docker0 bridge. Traffic does not need to trombone externally or get natd, etc. If you have two containers, A and B, connected to the same bridge, you can PING and view each other’s ARP tables.
Containers connected to the same bridge can communicate on any port they like, unlike the “linked” container model with exposed ports. The linking mode only permits communication on exposed ports—as long as the Inter Container Communication ( ICC ) is true.
The ICC value can be changed in ‘/etc/sysconfig/docker. If you set the ICC to false and require two containers to communicate on the same host, you must link them. Once connected, the containers can talk to each other on the container’s exposed ports ONLY. Just because you link containers doesn’t mean they can ping each other.
Linking also gives names of offers and service resolutions. More recently, in Docker 1.9, the introduction of user-defined networks ( bridge and overlay drivers ) uses an embedded DNS server instead of mapping IP to names in host files. This enables the pinging of containers by name without linking them together.
Multi-host connectivity
Initially, they tried to solve multi-host capability by running Open vSwitch at the edges of the hosts. Instead of implementing a central controller, for example, an OpenDaylight SDN controller, they opted for a distributed controller.
Socketplane employed a distributed control plane with VXLAN and Open vSwitch for data forwarding. They experimented with many control planes but used SURF – a gossip protocol. SURF is an application-centric way of distributing states across a cluster of containers.
It’s relatively fast, scales, and is eventually consistent. Similar to routing protocols, SURF would, for example, map the remote VXLAN ID to the IP Next hop and MAC address. They use a key-value store for consistent management functionality ( Consul, Etcd, and ZooKeeper ).
A key-value store is a data storage paradigm; for example, it handles the VXLAN ID. Its role is to store and hold information about discovery, networks, endpoints, and IP addresses; the other type of user-defined network, “bridge,” does not require a key-value store.
Socketplane introduced an Open vSwitch data plane, VXLAN overlay, and distributed control plane, which made Docker natively support multi-host connectivity without the mess of NAT and port mappings. I believe they have now replaced Open vSwitch with Linux Bridge. Communicating externally to the cloud would require port mappings / NAT, but anything between docker hosts doesn’t need this.
User-defined networks – Bridge and overlay
User-defined networks were a significant addition to Docker 1.9. Docker introduced a “bridge driver” and an “overlay driver .”As you might expect, the bridge driver allows the creation of user-defined bridge networks, working similarly to the docker0 bridge.
The overlay driver enables multi-host connectivity. Configuration is now done with the “docker network” command, which provides more scope for configuration. For example, bypassing the ‘-internal’ flag prevents external communication from the bridge, i.e., restricts containers attached to the bridge from talking outside the host.
The Docker overlay driver supports out-of-the-box multi-host container connectivity. The overlay driver creates a new “docker gw bridge” bridge on each host. This bridge can map host ports to internal container ports that are members of the overlay network. This is used for external access, not host-to-host, as this is done via overlays.
The container now has two interfaces, one to the overlay and one to the gateway bridge.
You can include the “internal” flag during creation to prevent external connectivity to the container. Passing this flag prevents the container from getting an interface to the new “docker gw bridge.” The bridge, however, still gets created.
So now we have an internal overlay setup with the internal flag; all docker containers can communicate internally via VXLAN. We can remove the “internal” flag and configure port mapping on the docker gw bridge to enable external connectivity.
Or we can use an HAProxy container and connect to the native docker0 bridge. This will accept and direct external front-end requests to backend containers according to the load-balancing algorithm selected. Check out Jon Langemak’s posts on user-defined networks and HAProxy.
Closing Points on Docker Default Networking
By default, Docker uses a bridge network named `bridge`. This network acts as a private internal network for containers running on the same host. When a container is launched without specifying a network, Docker automatically connects it to this default bridge network. This setup allows containers to communicate with each other using their IP addresses or container names. However, it’s important to note that this network is isolated from the host machine and external networks, providing a layer of security.
Another networking option available in Docker is the host network mode. When a container is run in this mode, it shares the network stack of the host system. This means that the container can directly use the host’s network interfaces and IP address. While this can result in higher performance due to reduced overhead, it comes with security trade-offs as the container is not isolated from the host network.
Port mapping is a key concept in Docker networking that allows services running inside a container to be accessible from outside the host. By default, Docker does not expose any container ports to the host. To make a service accessible, you need to publish a container’s port to the host using the `-p` flag when starting the container. For example, `docker run -p 8080:80` maps port 80 in the container to port 8080 on the host, making the service available at `localhost:8080`.
Docker Compose simplifies the process of managing multi-container applications by allowing you to define and run them using a single YAML file. When using Docker Compose, each service is connected to a default network that is isolated from other applications. This default network provides automatic DNS resolution, which enables services to discover each other by name. Docker Compose also allows you to define custom networks, giving you more control over the network topology of your applications.

- DMVPN - May 20, 2023
- Computer Networking: Building a Strong Foundation for Success - April 7, 2023
- eBOOK – SASE Capabilities - April 6, 2023