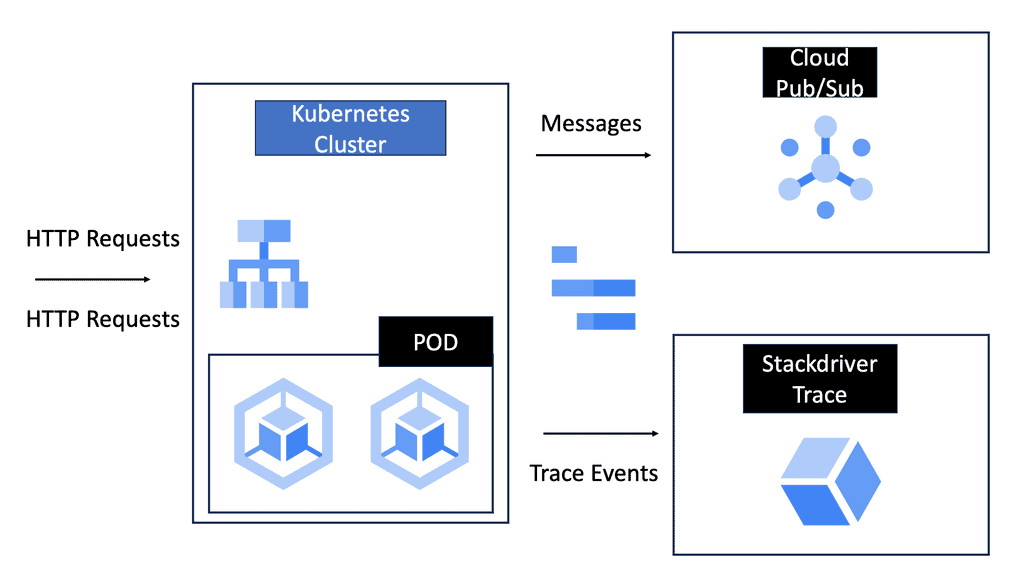
Kuberenetes Concepts
Kubernetes’ concept of a POD
As the smallest compute unit that can be defined, deployed, and managed, OpenShift leverages the Kubernetes concept of a pod. There is one or more containers deployed on one host. A pod is the equivalent of a physical or virtual machine instance to a container. Containers within pods can share their local storage and networking, as each pod has its IP address.
An individual pod has a lifecycle; it is defined, assigned to a node, and then runs until the container(s) exit or are removed for some other reason. Pods can be removed after exiting or retained to allow access to container logs, depending on policy and exit code.
In OpenShift, pod definitions are largely immutable; they cannot be modified while running. Changes are implemented by terminating existing pods and recreating them with modified configurations, base images, or both. Additionally, pods are expendable and do not maintain their state when recreated. In general, pods should not be managed directly by users but by higher-level controllers.
 Kubernetes’ Concept of Services
Kubernetes services act as internal load balancers. They identify a set of replicated pods to proxy connections to them. While the service remains consistently available, backing pods can be added or removed arbitrarily, enabling everything that depends on them to refer to them at a consistent address. This is a key abstraction layer a a Kubernetes design. Additionally, the OpenShift Container Platform uses cluster IP addresses to allow pods to communicate with each other and access the internal network.
Note: The service can be assigned additional external IP and ingress IP addresses outside the cluster to allow external access. An external IP address can also be a virtual IP address that provides highly available access to the service.
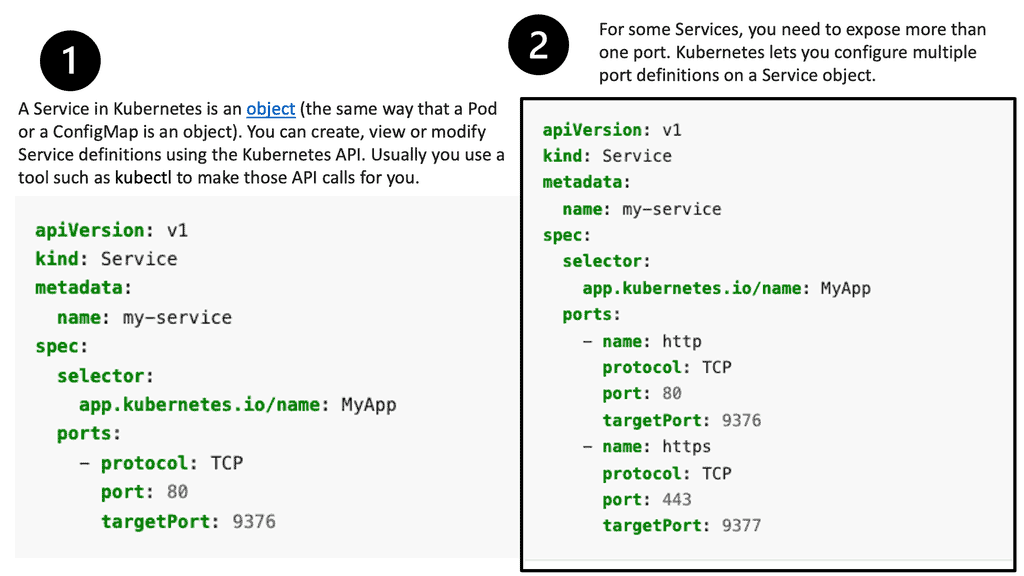
Services are assigned IP addressing and port mappings, which proxy to an appropriate backing pod when accessed. Using a label selector, a service can find all containers running on a specific port that provides a particular network service. Like pods, services are REST objects.
There are a couple of options for getting hands-on with OpenShift. You can download the CodeReady Containers for Linux, Microsoft, and MacOS or RedHat’s pre-built Sandbox Lab environment.
Configuring OpenShift Cluster
### Getting Started: Setting Up Your OpenShift Environment
Before diving into configuration, it’s essential to set up your OpenShift environment correctly. Start by installing the OpenShift CLI (oc) and setting up access to your cluster. For beginners, Red Hat offers OpenShift Online, which provides a managed cloud service to ease you into the ecosystem. Ensure your local development environment is compatible and includes the necessary tools such as Docker and Kubernetes.
—
### Configuring Your OpenShift Cluster: Step-by-Step
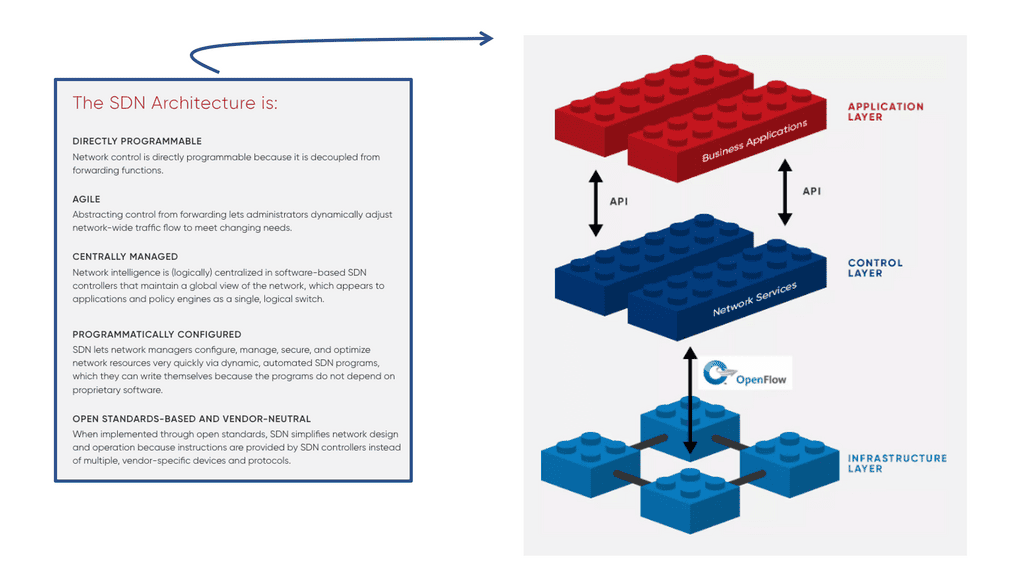
1. **Networking:** Begin by configuring the cluster networking. OpenShift uses a Software-Defined Network (SDN) to manage communication between pods. Choose a suitable network plugin, like OVN-Kubernetes or Calico, and configure the network policies to secure your application traffic.
2. **Storage:** Proper storage configuration is vital for stateful applications. OpenShift supports various storage solutions, including Persistent Volumes (PVs) and Persistent Volume Claims (PVCs). Evaluate your storage needs and select appropriate storage classes to ensure data persistence and redundancy.
3. **Security:** OpenShift offers robust security features. Configure role-based access control (RBAC) to restrict user permissions and define security contexts for your pods. Implement network security policies and enable cluster auditing to monitor and respond to potential threats.
4. **Resource Management:** Efficient resource allocation ensures optimal performance. Configure resource quotas and limits to prevent overconsumption. Utilize Horizontal Pod Autoscalers (HPAs) to automatically adjust the number of pods based on current demand.
—
### Advanced Configuration: Enhancing Your Cluster
For those looking to further optimize their OpenShift cluster, consider implementing advanced configurations:
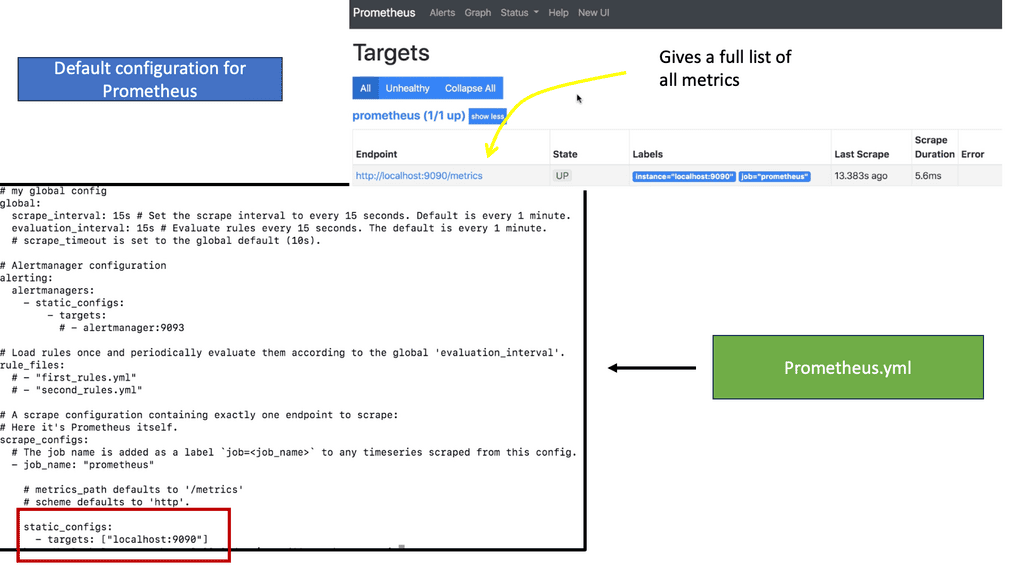
– **Monitoring and Logging:** Deploy tools like Prometheus and Grafana for monitoring, and Elasticsearch, Fluentd, and Kibana (EFK) stack for logging. These tools offer insight into cluster performance and help troubleshoot issues quickly.
– **CI/CD Integration:** Integrate OpenShift with your existing CI/CD pipeline using tools like Jenkins or GitLab. This integration allows for automated builds, tests, and deployments, enhancing your development workflow.
– **Custom Operators:** Leverage OpenShift’s Operator Framework to automate the management of complex applications. Operators can significantly reduce manual intervention and streamline application lifecycle management.
OpenShift Networking Deep Dive
### The Basics of OpenShift Networking
OpenShift networking is built on the foundation of Kubernetes, but with enhancements that cater to enterprise needs. At its core, OpenShift uses an overlay network to manage communication between pods across nodes. This network ensures seamless connectivity and scalability, allowing applications to function efficiently in a distributed environment. By default, OpenShift uses Open vSwitch (OVS) as its software-defined networking (SDN) solution, which provides flexibility and control over network traffic.
### Key Components of OpenShift Networking
Understanding the components that make up OpenShift networking is essential for effective network management. The primary components include:
1. **Pods and Services:** Pods are the smallest deployable units in OpenShift, and services provide a stable endpoint for accessing these pods.
2. **Ingress and Egress Traffic:** OpenShift manages ingress traffic via routes, which define how external users access the services. Egress traffic, on the other hand, involves controlling the outbound connections from the pods to external services.
3. **Network Policies:** These policies define the rules for communication between pods. By implementing network policies, you can enhance security by restricting the flow of traffic between different parts of your application.
### Advanced Networking Features
OpenShift offers advanced networking features that cater to specific enterprise needs. Some of these features include:
– **Multi-Cluster Networking:** OpenShift supports the deployment of applications across multiple clusters, enabling organizations to achieve high availability and disaster recovery.
– **Service Mesh Integration:** With the rise of microservices, service mesh solutions like Istio are integrated into OpenShift to manage service-to-service communication, providing observability, traffic management, and security.
– **Custom DNS and Load Balancing:** OpenShift allows for custom DNS configurations and integrates with various load balancers to distribute traffic efficiently across nodes.
Service Discovery and DNS
Applications depend on each other to deliver information to users. These relationships are complex to manage in an application spanning multiple independently scalable pods. So, we don’t access applications by pod IP. These IP addresses will change for one reason, and it’s not a scalable solution.
To make this easier, OpenShift deploys DNS when the cluster is deployed and makes it available on the pod network. DNS in OpenShift allows pods to discover the resources in the OpenShift SDN.
Layer Approach to DNS.
DNS in the Openshift is a layered approach. Originally, DNS in Kubernetes was used for service discovery. The problem was solved a long time ago. DNS was the answer for service discovery back then, and it still is. Service Discovery means an application or service inside; it can reference a service by name, not an IP address.
The deployed pods represent microservices. A Kubernetes service points to these pods and discovers them by DNS name, so the service is transparent. The internal DNS manages this in Kubernetes; originally, it was SKYDNS KubeDNS, and now it’s Core DNS.
The DNS Operator
The DNS operator runs DNS services and uses Core DNS. The pods use the internal Core DNS server for DNS resolution. The pod’s DNS name server is automatically set to the Core DNS. OpenShift provides its internal DNS, implemented via Core DNS and dnsmasq for service discovery. The dnsmasq is a lightweight DNS forwarder that provides DNS.
The DNS Operator has several roles:
- It creates the default cluster DNS name cluster. local
- Assigns DNS names to namespaces. The namespace is part of the FQDN.
- Assign DNS names to services. So, both the service and namespace are part of the FQDN name.

OpenShift SDN and the DNS processes
**The Controller nodes
The OpenShift cluster network has several components. First, we have a controller node. There are multiple controller nodes in a cluster. The controller nodes redirect traffic to the PODs. We run a route on each controller node and use Core DNS. So, in front of the Kubernetes cluster or layer, this is a hardware load balancer. Then, we have external DNS, which is outside of the cluster.
This external DNS has a wildcard domain; thus, external DNS is resolved to the frontend hardware load balancer through the wildcard. So, users who want to access a service issue the request and contact external DNS for name resolution.
Then, external resolves the wildcard domain to the load balancer, which will load balance to the different control nodes. For these control nodes, we can address the route and service.
**OpenShift and DNS: Wildcard DNS.
OpenShift has an internal DNS server that is reachable only by Pods. We need an external DNS server configured with wildcard DNS to make the service available by name to the outside. The wildcard DNS is resolved to all resources created in the cluster domain by fixing the OpenShift load balancer.
This OpenShift load balancer provides a frontend to the control nodes run as ingress controllers and part of the cluster. They have access to internal resources and are part of the internal cluster.
**OpenShift ingress operators
For this to work, we need to use the OpenShift Operators. The Ingress Operator implements the IngressController API and enables external access to OpenShift Container Platform cluster services. It does this by deploying one or more HAProxy ingress controllers to handle the routing side.
You can use the Ingress Operator to route traffic by specifying the OpenShift Container Platform route construct. You may also have heard of the Kubernetes Ingress resources. Both are similar, but the OpenShift route can have additional security features and the use case of split green deployments.
The OpenShift Route Construct and Encryption
The OpenShift Container Platform route provides traffic to services in the cluster. Routes also offer advanced features that might not be supported by standard Kubernetes Ingress Controllers, such as TLS re-encryption, TLS passthrough, and split traffic for blue-green deployments.
In Kubernetes’s words, we use Ingress, which exposes services to the external world. However, in Openshift, it is best practice to use a routing set, which is an alternative to Ingress.
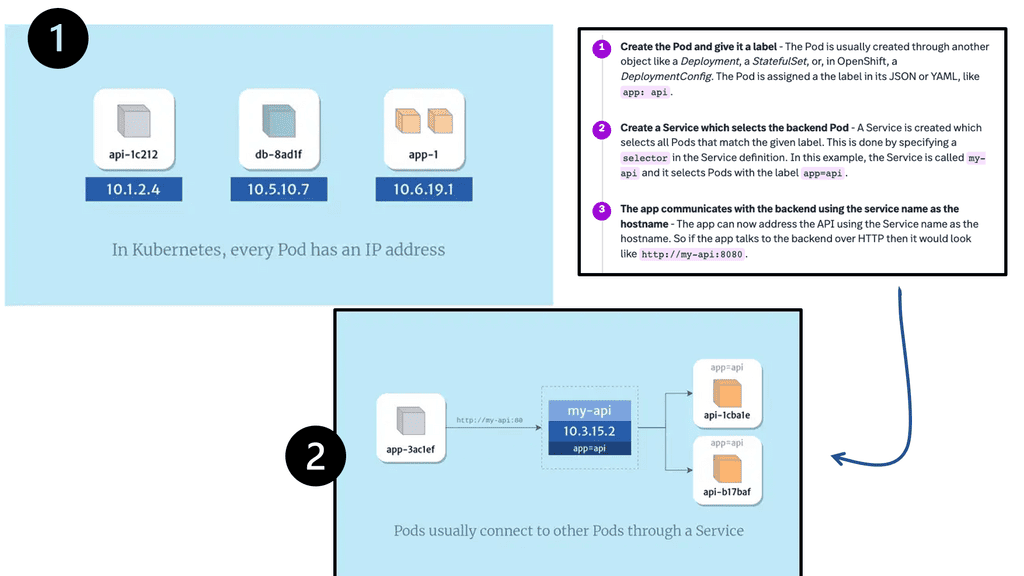
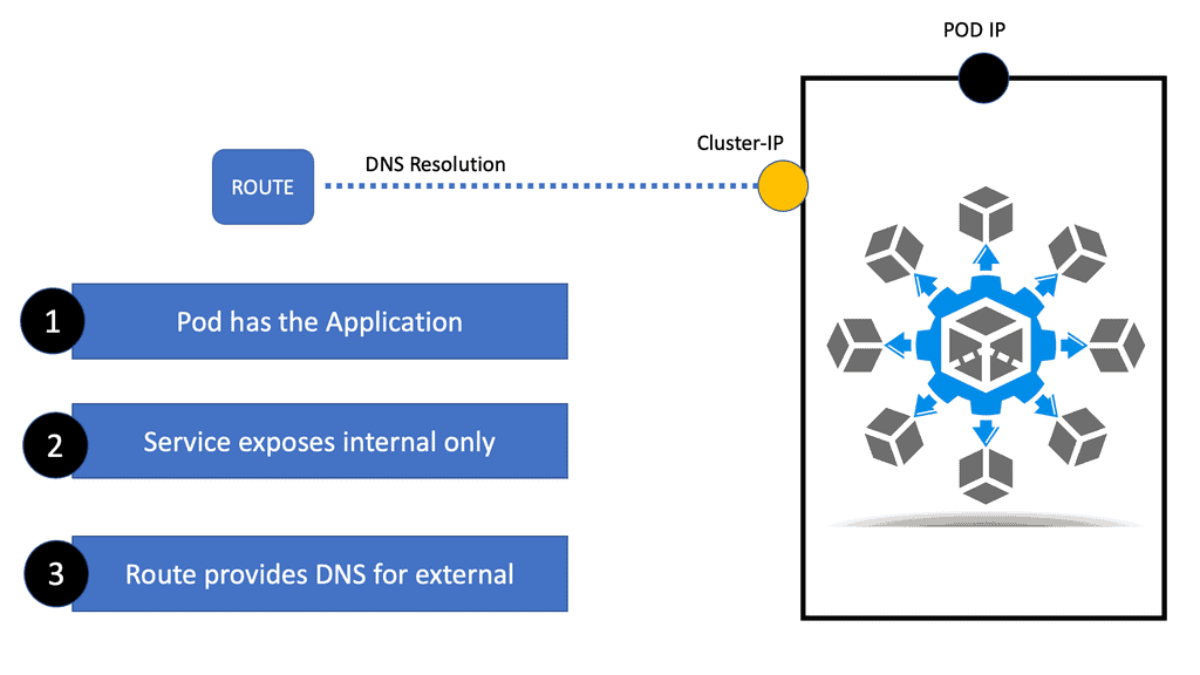
We have three Pods, each with a different IP address. To access these Pods, we need a service. Essentially, this service provides a load balancing service and distributes load to the pods using a load balancing algorithm, a round robin by default.
The service is an internal component, and in Openshift, we have routes that provide a URL for the services so they can be accessible from the outside world. So, the URL created by the Route points to the service, and the service points to the pods. In the Kubernetes world, Ingress pointed out the benefits, not routes.
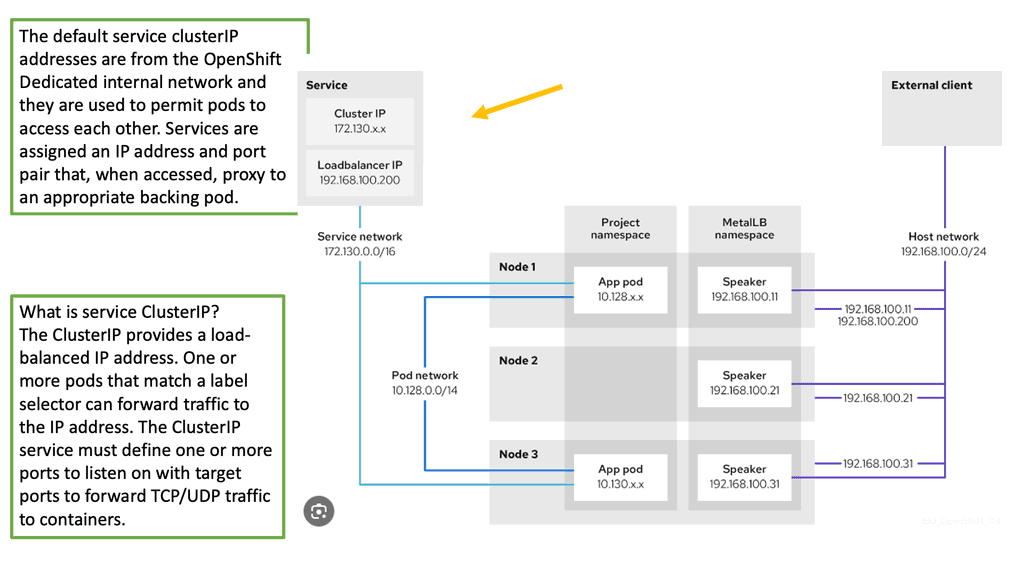
Different types of services
Type:
- ClusterIP: The Service is exposed as an IP address internal to the cluster. This is useful for a microservices design where the front end connects to the backend without exposing the service externally. These are the Default Types. The service type is ClusterIP, meaning you have a cluster-wide IP address.
- Node Port: This is a service type that exposes a port on the node’s IP address. This is like port forwarding on the physical node. However, the node port does not connect the internal cluster pods to a port dynamically exposed on the physical node. So external users can connect to the port on the node, and we get the port forwarded to the node port. This then goes to the pods and is load-balanced to the pods.
- Load Balancer: You can find a service type in public cloud environments.
Forming the network topology
OpenShift SDN networking
New pod creation: OpenShift networking SDN
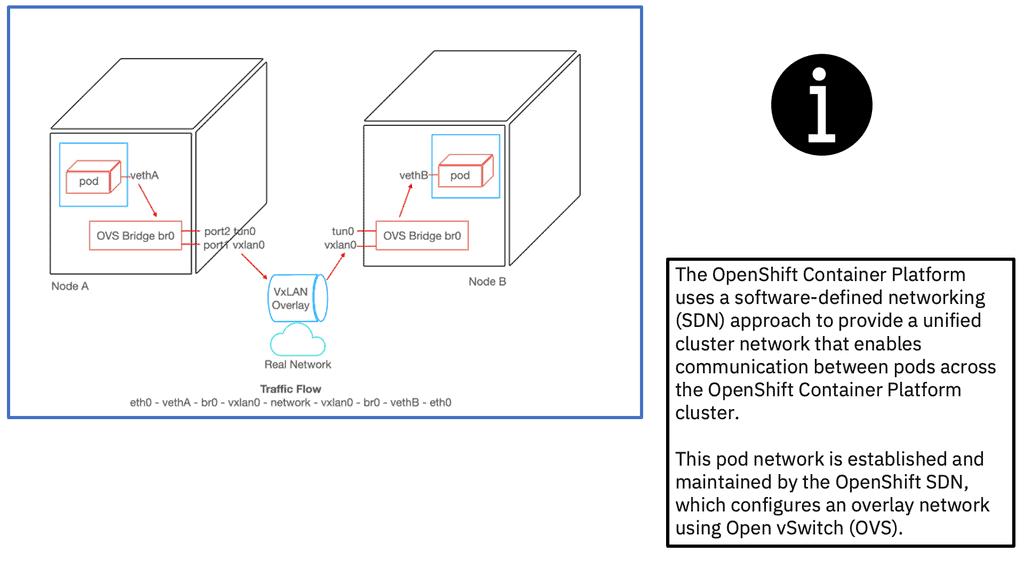
As new pods are created on a host, the local OpenShift software-defined network (SDN) allocates and assigns an IP address from the cluster network subnet assigned to the node and connects the veth interface to a port in the br0 switch. It does this with the OpenShift OVS, which programs OVS rules via the OVS bridge. At the same time, the OpenShift SDN injects new OpenFlow entries into the OVSDB of br0 to Route traffic addressed to the newly allocated IP Address to the correct OVS port connecting the pod.
Pod network: 10.128.0.0/14
The pod network defaults to use the 10.128.0.0/14 IP address block. Each node in the cluster is assigned a /23 CIDR IP address range from the pod network block. That means, by default, each application node in OpenShift can accommodate a maximum of 512 pods.
OpenFlow manages how IP addresses are allocated to each application node. The primary CNI plugin, the essence of SDN for Openshift, establishes the cluster-wide network and configures the overlay network using the OVS.
OpenShift CNI SDN Plugin
OVS is used in your OpenShift cluster as the communications backbone for your deployed pods. OVS in and out of every pod affects traffic in and out of the OpenShift cluster. OVS runs as a service on each node in the cluster. The Primary CNI SDN Plugin uses network policies using Openvswitch flow rules, which dictate which packets are allowed or denied.
Configuring OpenShift Networking SDN
When you deploy OpenShift, the default configuration for the pod network’s topology is a single flat network. Every pod in every project can communicate without restrictions. OpenShift SDN uses a plugin architecture that provides different network topologies. Depending on your network and security requirements, you can choose a plugin that matches your desired topology. Currently, three OpenShift SDN plugins can be enabled in the OpenShift configuration without significantly changing your cluster.
OpenShift SDN default CNI network provider
OpenShift Container Platform uses a software-defined networking (SDN) approach to provide a unified cluster network that enables communication between pods across the OpenShift Container Platform cluster. The OpenShift SDN establishes and maintains this pod network, configuring an overlay network using Open vSwitch (OVS).
OpenShift SDN modes:
OpenShift SDN provides three SDN modes for configuring the pod network.
- ovs-subnet— Enabled by default. Creates a flat pod network, allowing all project pods to communicate.
- ovs-multitenant—Separates the pods by project. Applications deployed in a project can only communicate with pods deployed in the same project.
- ovs-network policy: This plugin provides fine-grained Ingress and egress rules for applications. It can be more complex than the other two.
OpenShift ovs-subnet
The OpenShift ovs-subnet is the original OpenShift SDN plugin. This plugin provides basic connectivity for the Pods. This network connectivity is sometimes called a “flat” pod network. It is described as a “flat” Pod network because there are no filters or restrictions, and every pod can communicate with every other Pod and Service in the cluster. Flat network topology for all pods in all projects lets all deployed applications communicate.
OpenShift ovs-multitenant
With OpenShift ovs-multitenant plugin, each project receives a unique VXLAN ID known as a Virtual Network ID (VNID). All the pods and services of an OpenShift Project are assigned to the corresponding VNID. So now we have segmentation based on the VNID. Doing this maintains project-level traffic isolation, meaning that Pods and Services of one Project can only communicate with Pods and Services in the same project. There is no way for Pods or Services from one project to send traffic to another. The ovs-multitenant plugin is perfect if just having projects separated is enough.
Unique across projects
Unlike the ovs-subnet plugin, which passes all traffic across all pods, this one assigns the same VNID to all pods for each project, keeping them unique across projects. It also sets up flow rules on the br0 bridge to ensure that traffic is only allowed between pods with the same VNID.
VNID for each Project
When the ovs-multitenant plugin is enabled, each project is assigned a VNID. The VNID for each Project is maintained in the etcd database on the OpenShift master node. When a pod is created, its linked veth interface is associated with its Project’s VNID, and OpenFlow rules are made to ensure it can communicate only with pods in the same project.
The ovs-network policy plugin
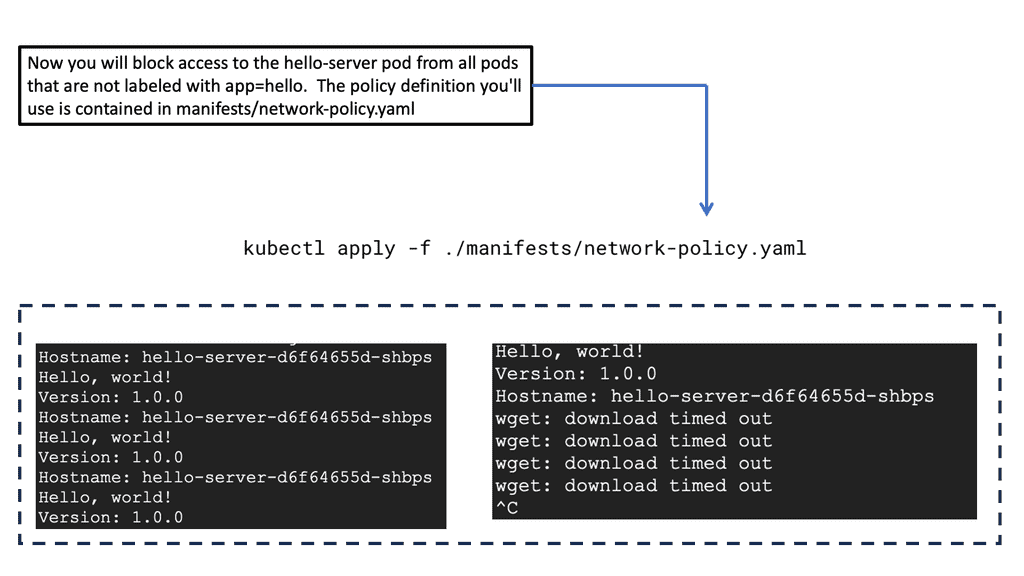
The ovs-multitenant plugin cannot control access at a more granular level. This is where the Ovs-network policy plugin steps in, add more configuration power and lets you create custom NetworkPolicy objects. As a result, the ovs-network policy plugin provides fine-grained access control for individual applications, regardless of their project. By isolating policy using network policy objects, you can tailor your topology requirement.
This is the Kubernetes Network Policy, so you map, Label, or tag your application, then define a network policy definition to allow or deny connectivity across your application. Network policy mode will enable you to configure their isolation policies using NetworkPolicy objects. Network policy is the default mode in OpenShift Container Platform 4.8.
OpenShift OVN Kubernetes CNI network provider
OpenShift Container Platform uses a virtualized network for pod and service networks. The OVN-Kubernetes Container Network Interface (CNI) plugin is a network provider for the default cluster network. OVN-Kubernetes is based on the Open Virtual Network (OVN) and provides an overlay-based networking implementation. A cluster that uses the OVN-Kubernetes network provider also runs Open vSwitch (OVS) on each node. OVN configures OVS on each node to implement the declared network configuration.
OVN-Kubernetes features
The OVN-Kubernetes Container Network Interface (CNI) cluster network provider implements the following features:
- Uses OVN (Open Virtual Network) to manage network traffic flows. OVN is a community-developed, vendor-agnostic network virtualization solution.
- Implements Kubernetes network policy support, including ingress and egress rules.
- It uses the Geneve (Generic Network Virtualization Encapsulation) protocol rather than VXLAN to create an overlay network between nodes.