## The Basics of Kubernetes Networking
At its core, Kubernetes networking ensures that your containers can communicate with each other and with the outside world. Each pod in Kubernetes is assigned its own IP address, and these addresses are used to set up direct communication paths. Unlike traditional networking, there are no port mappings required, and every pod can communicate with every other pod without any NAT (Network Address Translation). This flat networking model simplifies communication but comes with its own set of challenges and considerations.
## Network Policies: Controlling Traffic Flow
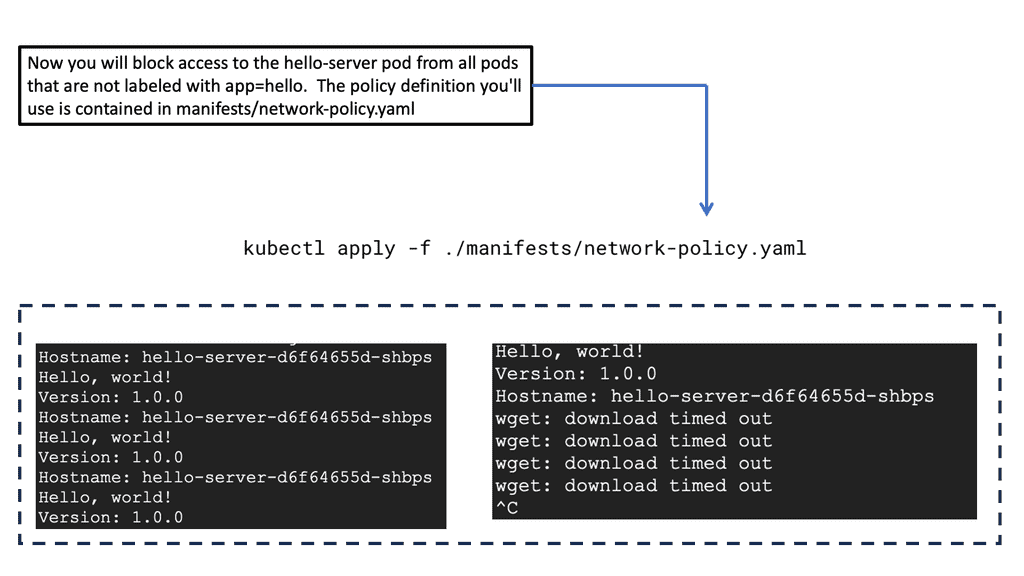
Kubernetes allows you to control the traffic flow to and from your pods using Network Policies. These policies act as a firewall for your Kubernetes cluster, enabling you to define rules that dictate how pods can communicate with each other and with external services. By default, all communications are allowed, but you can create Network Policies to restrict access based on security requirements. Implementing these policies is crucial for maintaining a secure and efficient Kubernetes environment.
## Service Discovery and Load Balancing
In Kubernetes, services are used to expose your applications to the outside world and to enable communication within the cluster. Each service is assigned a unique IP address and acts as a load balancer, distributing traffic across the pods in the service. Kubernetes provides built-in service discovery, making it easy to locate other services using DNS. This seamless integration simplifies the process of deploying scalable applications, ensuring that your services are always reachable and responsive.
## Advanced Networking: CNI Plugins and Ingress Controllers
For more advanced networking requirements, Kubernetes supports CNI (Container Network Interface) plugins. These plugins allow you to extend the networking capabilities of your cluster, providing additional features such as custom IPAM (IP Address Management) and advanced routing. In addition to CNI plugins, Ingress Controllers are used to manage external HTTP and HTTPS traffic, offering more granular control over how your services are exposed to the outside world. Understanding and configuring these advanced networking features is key to leveraging the full potential of Kubernetes.
Kubernetes Components
To comprehend Kubernetes networking, we must first delve into the world of Pods. A Pod represents the smallest unit in the Kubernetes ecosystem, encapsulating one or more containers. Despite sharing the same network namespace, each Pod possesses a unique IP address, enabling inter-Pod communication. However, it is crucial to understand how Pods communicate with each other within a cluster.
Services act as an abstraction layer, facilitating the discovery and load balancing of Pods. By defining a Service, developers can decouple applications from specific Pod IP addresses, as Services provide a stable endpoint for internal communication. Furthermore, Services enable external access to Pods through the use of NodePorts or LoadBalancers, making them an essential component for networking in Kubernetes.
Ingress, a powerful Kubernetes resource, allows for the exposure of HTTP and HTTPS routes to external traffic. By implementing Ingress, developers can define rules and routes, effectively managing inbound traffic to their applications. This flexible and scalable approach simplifies networking complexities and provides a seamless experience for end-users accessing Kubernetes services.
Kubernetes Clusters in GKE
#### Why Choose Google Cloud for Your Kubernetes Cluster?
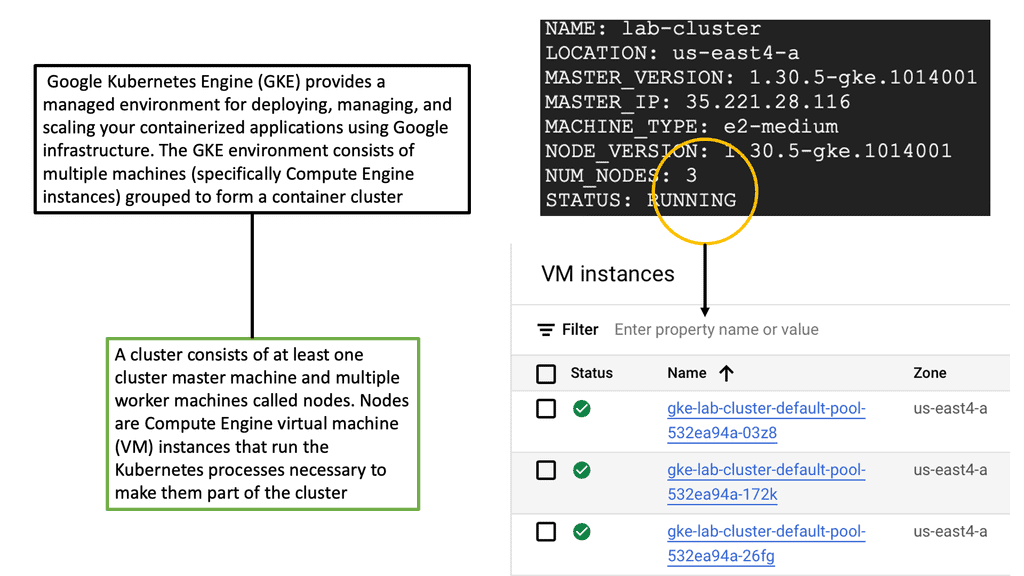
Google Cloud offers a unique advantage when it comes to running Kubernetes clusters. As the original creators of Kubernetes, Google offers deep integration between Kubernetes and its cloud services. Google Kubernetes Engine (GKE) provides a fully managed Kubernetes service, allowing developers to focus more on building and less on managing infrastructure. With GKE, you get the benefit of automatic upgrades, patching, and scaling, all backed by Google’s robust infrastructure. This ensures high availability and security for your applications, making it an ideal choice for businesses looking to leverage Kubernetes without the operational overhead.
#### Setting Up Your Kubernetes Cluster on Google Cloud
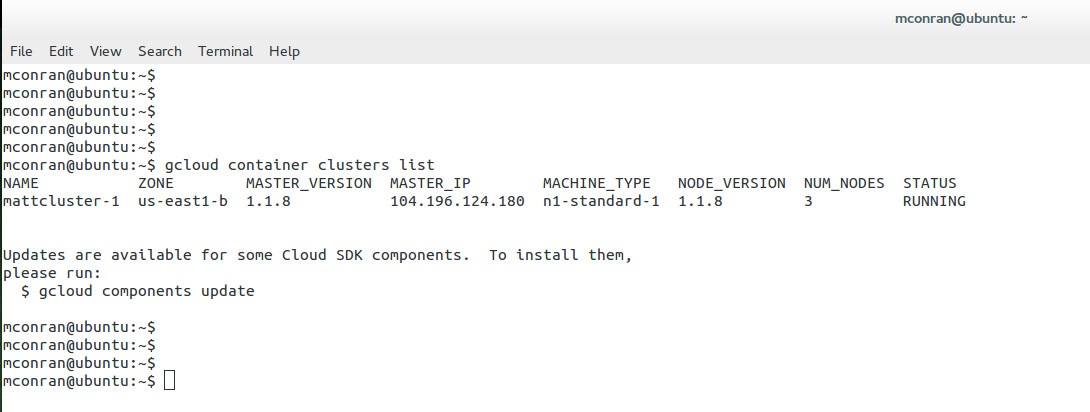
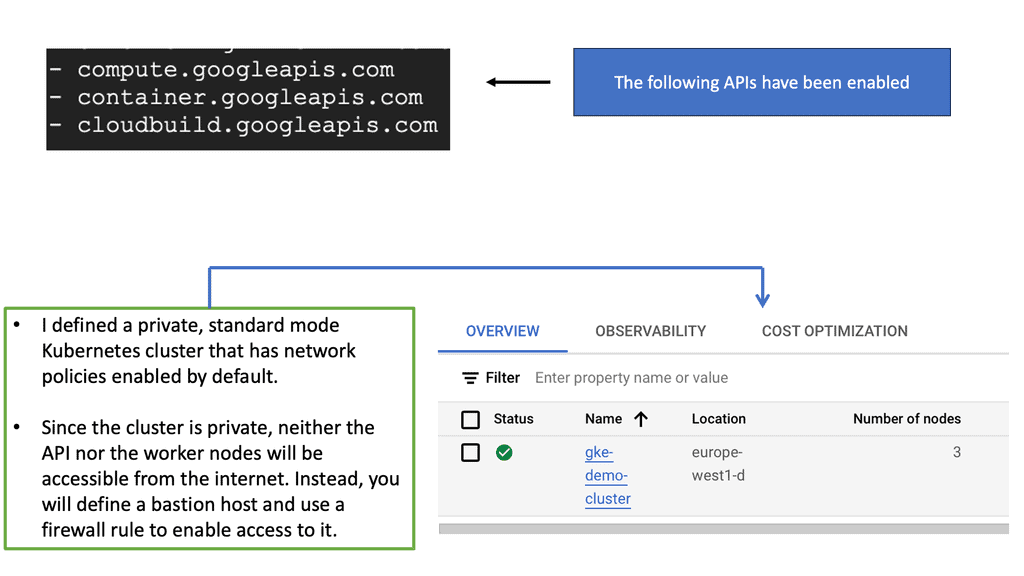
Setting up a Kubernetes cluster on Google Cloud is a straightforward process, thanks to the streamlined interface and comprehensive documentation provided by Google. First, you need to create a Google Cloud project and enable the Kubernetes Engine API. After that, you can use the Google Cloud Console or the `gcloud` command-line tool to create a new cluster. Google Cloud provides various configuration options, allowing you to customize the cluster to fit your specific needs, whether that’s optimizing for cost, performance, or a balance of both.
#### Best Practices for Managing Kubernetes Clusters
Once your Kubernetes cluster is up and running, managing it effectively becomes crucial. Google Cloud offers several tools and features to help with this. It’s recommended to use Google Cloud’s monitoring and logging services to keep track of your cluster’s performance and health. Implementing automated scaling helps you handle varying workloads without manual intervention. Additionally, consider using Kubernetes namespaces to organize your resources efficiently, enabling better resource allocation and access control across your teams.
 Understanding Pods and Services
One of the fundamental building blocks of Kubernetes networking is the concept of Pods and Services. Pods are the smallest unit in the platform and house one or more containers. Understanding how Pods communicate with each other and external entities is crucial. On the other hand, services provide a stable endpoint for accessing a group of Pods.
– Cluster Networking: A robust networking solution is required for Pods and Services to communicate seamlessly within a Kubernetes cluster. We’ll dive into the inner workings of cluster networking, discussing popular networking plugins such as Calico, Flannel, and Cilium.
– Ingress and Load Balancing: Kubernetes offers Ingress and load-balancing capabilities when exposing applications to the outside world. In this section, we’ll demystify Ingress, its role in routing external traffic to Services, and how to configure it effectively. We’ll also explore load-balancing options to ensure optimal traffic distribution across Pods.
– Network Security and Policies: With the increasing complexity of modern applications, network security becomes paramount. Kubernetes provides robust mechanisms to enforce network policies and secure communication between Pods. We’ll discuss how to define and apply network policies effectively, ensuring only authorized traffic flows within the cluster.
**Kubernetes networking aims to solve the following problems**
- Container-to-container communications with high coupling
- A pod-to-pod communication system
- Communicating from a pod to a service
- External-to-service communications
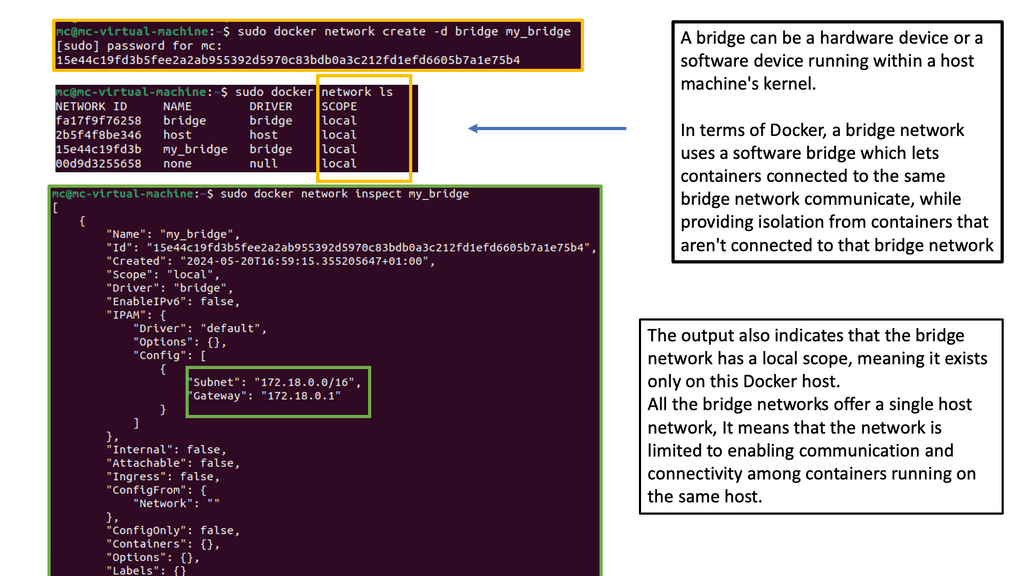
A virtual bridge network is a private network that containers attach to in the Docker networking model. Containers are allocated private IP addresses, so containers running on different machines cannot communicate. Docker allows developers to proxy traffic across nodes by mapping host ports to container ports. Docker administrators, usually system administrators, avoid port clashes in this scenario. In Kubernetes networking, it is handled differently.
The Kubernetes Networking Model
Kubernetes’ native networking model is capable of supporting multi-host cluster networking. Pods can communicate with each other by default, regardless of their hosts. Kubernetes relies on the CNI project to comply with the following requirements:
- Without NAT, all containers must be able to communicate with each other.
- Containers and nodes can communicate without NAT.
- The IP address of a container matches the IP address of those outside the container.
A pod is a unit of work in Kubernetes. Containers in pods are always scheduled and run “together” on the same node. It is possible to separate instances of a service into distinct containers using this connectivity. Developers may run services in one container and log forwarders in another. Having processes running in separate containers allows them to have separate resource quotas (e.g., “the log forwarder cannot use more than 512 MB of memory”). Reducing the scope necessary to build a container also separates container build and deployment machinery.
The Kubernetes History
Google released Kubernetes, an open-source cluster management tool, in June 2014. Google has said it launches over 2 billion containers per week, and Kubernetes was designed to control and manage the orchestration of all these containers and container networking. Initially, they built a Borg and Omega system, resulting in Kubernetes.
All lessons learned from Borg to Kubernetes are now passed to the open-source community. Kubernetes went 1.0 in July 2015 and is now at version 1.3.0. The Kubernetes deployment supports GCE, AWS, Azure, vSphere, and bare metal, and there are a variety of Kubernetes networking configuration parameters. Kubernetes forms the base for OpenShift networking.
Kubernetes information check.
For additional information, before you go with Kubernetes networking 101, the post on Kubernetes chaos engineering discusses the need to stress and break a system, which is the only way to understand and optimize fully. Chaos Engineering starts with a baseline and introduces several controlled experiments. Then we have Kubernetes security best practice discuss the Kubernetes attack vectors and how to protect against them.
Understanding Pods & Service
Before diving into deploying pods and services, it’s crucial to understand what a pod is within the context of Kubernetes. A pod is the smallest deployment unit in Kubernetes and can consist of one or more containers. Pods are designed to run a single instance of a specific application, sharing the same network and storage resources. By grouping containers, pods enable efficient communication and coordination between them.
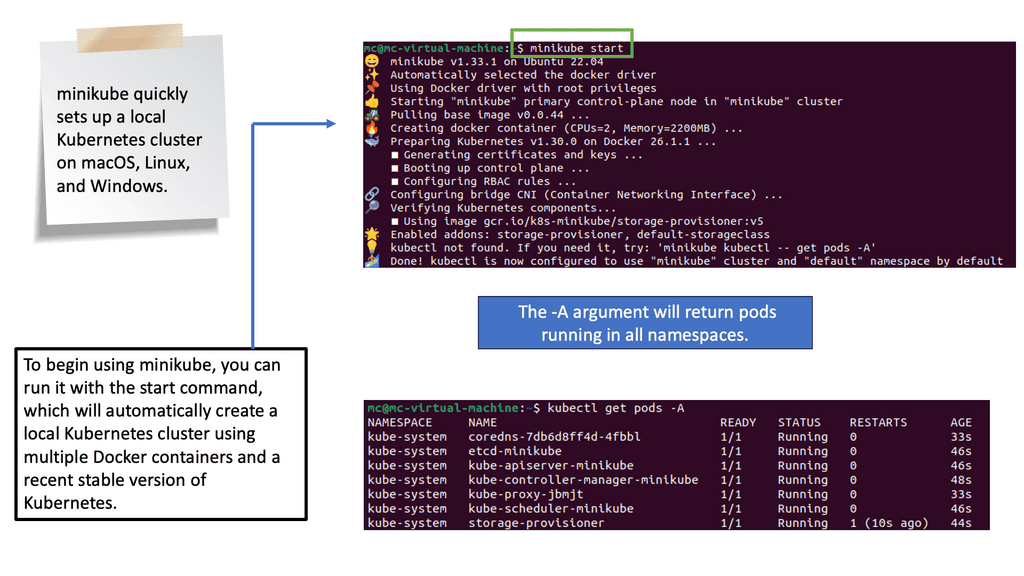
Note: Deploying Pods
Now that we have a basic understanding of pods let’s explore the process of deploying one. To deploy a pod, you must create a YAML file describing its specifications, including the container image, resource requirements, and any necessary environment variables. Once the YAML file is created, you can use the `kubectl` command-line tool to apply the configuration and create the pod. It’s essential to verify the pod’s status using `kubectl get pods` and ensure it runs successfully.
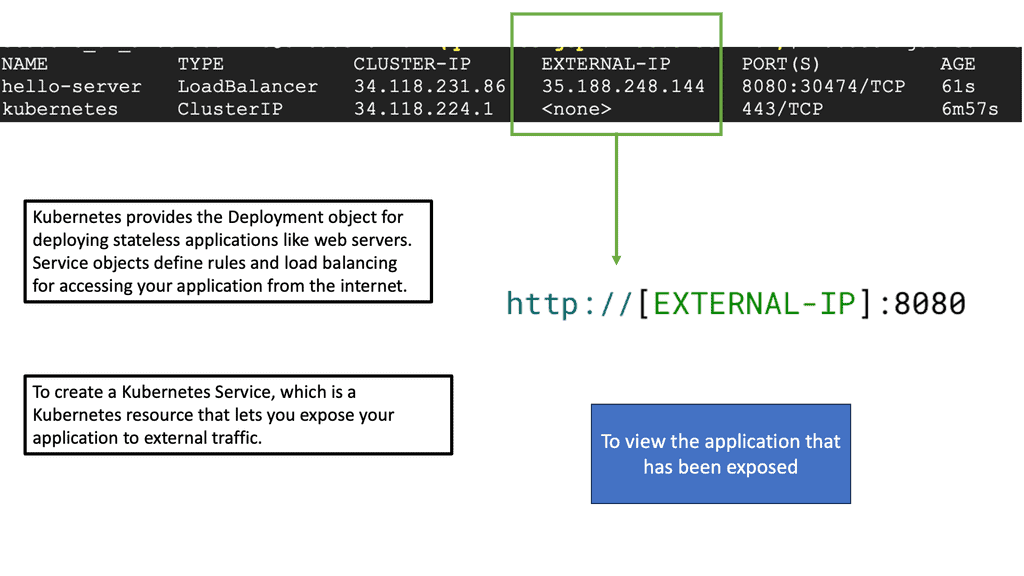
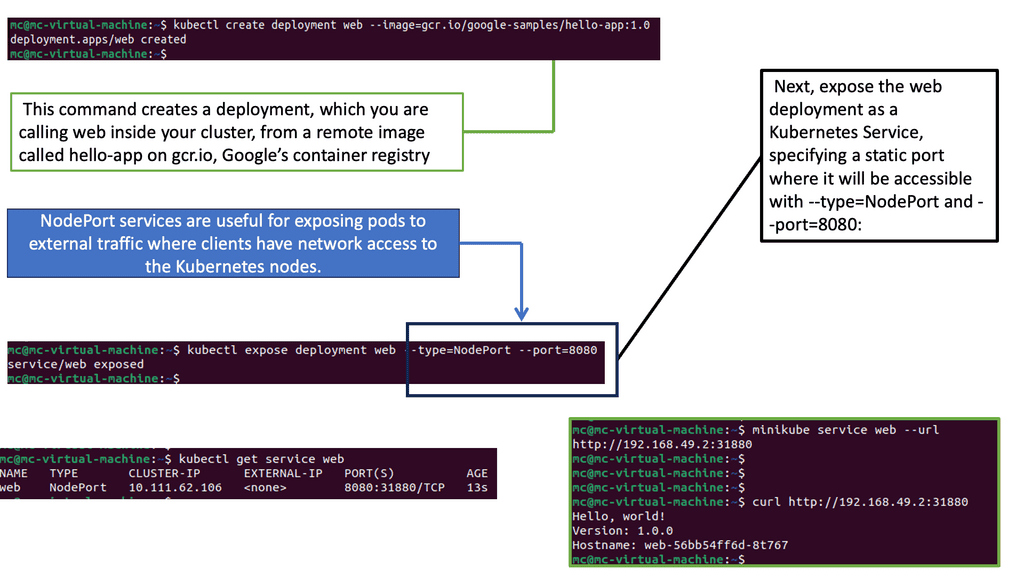
While pods enable the deployment of individual containers, services expose these pods to the external world. Services act as an abstraction layer, allowing applications to communicate with pods without knowing their specific IP addresses or ports. Kubernetes offers various services, such as ClusterIP, NodePort, and LoadBalancer, each catering to different networking requirements.
Note: YAML File Specifications
You must create another YAML file defining its specifications to deploy a service. This includes selecting the appropriate service type, specifying the target port and protocol, and associating it with the corresponding pod using labels. Once the YAML file is ready, you can use `kubectl` to create the service. By default, services are assigned a ClusterIP, which enables communication within the cluster. Depending on your needs, you may expose the service externally using NodePort or LoadBalancer.
Note: Kubernetes Scaling Abilities
One of Kubernetes’ key advantages is its ability to scale applications effortlessly. By adjusting the replica count in the deployment YAML file and applying the changes, Kubernetes automatically creates or terminates pods to maintain the desired replicas. Additionally, Kubernetes provides various commands and tools to monitor and manage deployments, allowing you to upgrade or roll back to previous versions easily.
Kubernetes Networking vs Docker Swarm
### Understanding Kubernetes Networking
Kubernetes, often hailed as the king of container orchestration, offers a robust and flexible networking model. At its core, Kubernetes assigns each pod its own IP address, providing a flat network structure. This means that Kubernetes does not require you to map ports between containers, simplifying communication. The Kubernetes network model supports various plugins through the Container Network Interface (CNI), allowing seamless integration with different cloud providers and on-premise systems. Moreover, Kubernetes supports complex networking policies, enabling fine-grained control over traffic flow and security.
### Docker Swarm’s Networking Simplicity
Docker Swarm, on the other hand, is known for its simplicity and ease of use. It provides an overlay network that enables services to communicate with each other across nodes seamlessly. Swarm’s networking is straightforward to set up and manage, making it appealing for smaller teams or projects with less complex networking needs. Docker Swarm also supports load balancing and service discovery out of the box. However, it lacks the extensive networking plugins and policy features available in Kubernetes, which might limit its scalability in larger, more complex environments.
### Performance and Scalability: A Comparative Analysis
When it comes to performance, both Kubernetes and Docker Swarm have their pros and cons. Kubernetes is designed for scalability, capable of handling thousands of nodes and pods. Its networking model is highly efficient, ensuring minimal latency in communication. Docker Swarm, while efficient for smaller clusters, might face challenges scaling to the level of Kubernetes. The simplicity of Swarm’s networking can become a bottleneck in environments that require more sophisticated networking configurations and optimizations. Thus, choosing between the two often depends on the scale and complexity of the deployment.
### Security Considerations
Security is a paramount concern in any networking setup. Kubernetes offers a range of security features, including network policies, secrets management, and role-based access control (RBAC). These features allow administrators to define and enforce security rules at a granular level. Docker Swarm, though simpler in its networking approach, provides basic security features such as mutual TLS encryption and node certificates. While adequate for many use cases, Swarm’s security features may not meet the needs of organizations with stricter compliance requirements.
Before you proceed, you may find the following posts helpful:
Google Cloud Data Centers
## Why Google Cloud for Kubernetes?
Google Cloud is a popular choice for running Kubernetes clusters due to its scalability, reliability, and integration with other Google Cloud services. Google Kubernetes Engine (GKE) allows users to quickly and easily deploy Kubernetes clusters, offering features like automatic scaling, monitoring, and seamless updates. With GKE, you can focus on developing your applications while Google handles the underlying infrastructure, ensuring your applications run smoothly.
## Setting Up Your First Kubernetes Cluster on Google Cloud
Deploying a Kubernetes cluster on Google Cloud involves several steps. First, you’ll need to set up a Google Cloud account and enable the Kubernetes Engine API. Then, using the Google Cloud Console or Cloud SDK, you can create a new Kubernetes cluster. Configuring your cluster involves selecting the appropriate machine types, defining node pools, and setting up networking and security policies. Once your cluster is set up, you can deploy applications, manage resources, and scale your infrastructure as needed.
## Best Practices for Managing Kubernetes Clusters
Effectively managing your Kubernetes clusters involves implementing several best practices. These include monitoring cluster performance using Google Cloud’s Stackdriver, automating deployments with CI/CD pipelines, and implementing robust security measures such as role-based access control (RBAC) and network policies. Additionally, regularly updating your clusters and applications ensures that you benefit from the latest features and security patches.

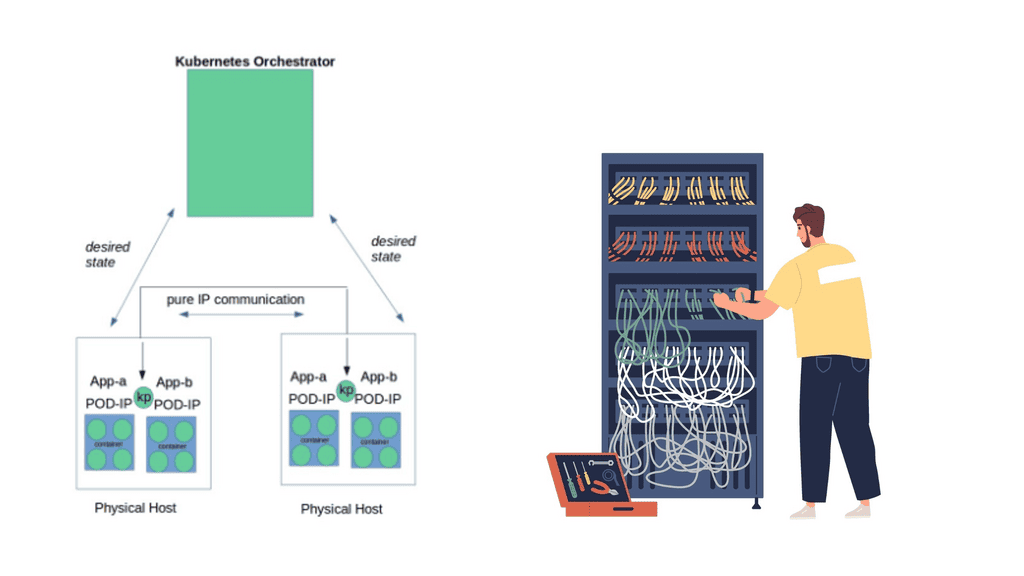
At a very high level, Kubernetes Networking 101 enables a group of hosts to be viewed as a single compute instance. The single compute instance, consisting of multiple physical hosts, is used to deploy containers. This offers an entirely different abstraction level to our single-container deployments.
Users start thinking about high-level application services and the concept of service design only. They are no longer concerned with individual container deployment, as the orchestrator looks after the deployment, scale, and management.
For example, if users specify to the orchestration system they want a specific type of application with defined requirements, now deploy it for me. The orchestrator manages the entire rollout, specifies the targeted hosts, and manages the container lifecycle. The user doesn’t get involved with host selection. This abstraction allows users to focus only on design and workload requirements – the orchestrator takes care of all the low-level deployment and management details.
1. Pods:
Pods are the fundamental building blocks of Kubernetes. They consist of one or more containers that share a common network namespace. Each pod receives a unique IP address, allowing containers within the pod to communicate via localhost. However, communication between different pods requires additional networking components.
2. Services:
Services provide a stable and abstracted network endpoint to access a set of pods. By grouping pods based on a standard label, services ensure that applications can discover and communicate with each other seamlessly. Kubernetes offers four types of services: ClusterIP, NodePort, LoadBalancer, and ExternalName. Each service type caters to specific use cases, providing varying levels of accessibility.
3. Ingress:
Ingress is a Kubernetes resource that enables inbound connections to reach services within the cluster. It acts as a traffic controller, routing external requests to the appropriate service based on rules defined in the Ingress resource. Additionally, Ingress supports TLS termination, allowing secure communication with services.
Networking Concepts:
To comprehend Kubernetes networking fully, it is essential to grasp critical concepts that govern its behavior.
1. Cluster Networking:
Cluster networking refers to the communication between pods running on different nodes within a Kubernetes cluster. Kubernetes leverages various networking solutions, such as overlay networks and software-defined networking (SDN) to establish node connectivity. Popular SDN solutions include Calico, Flannel, and Weave.
2. DNS Resolution:
Kubernetes provides a built-in DNS service that enables easy discovery of services within the cluster. Each service is assigned a DNS name, which can be resolved to its corresponding IP address. This allows applications to communicate with services using their DNS names, enhancing flexibility and decoupling.
3. Network Policies:
Network policies define rules that dictate how pods communicate with each other. Administrators can enforce fine-grained access control and secure application traffic using network policies. Policies can be based on various criteria, such as IP addresses, ports, and protocols.
GKE Network Policies
### Crafting Effective Network Policies
To create effective network policies, you must first grasp the structure and components that define them. Network policies in GKE are expressed in YAML format and consist of specifications that dictate how pods communicate with each other. This section will guide you through the essentials of crafting these policies, focusing on key elements such as pod selectors, ingress and egress rules, and the importance of defining explicit traffic paths.
### Implementing and Testing Your Policies
Once you have crafted your network policies, the next step is to implement and test them within your GKE environment. This section will provide a step-by-step guide on how to apply these policies and verify their effectiveness. We will cover common tools and commands used in testing, as well as strategies for troubleshooting and refining your policies to ensure they meet your desired outcomes.
### Best Practices for Network Policy Management
Managing network policies in a dynamic Kubernetes environment can be challenging. In this section, we’ll discuss best practices to streamline this process, including how to regularly audit and update your policies, integrate them with existing security frameworks, and utilize automation tools for enhanced management. Adopting these practices will help you maintain a secure and efficient network policy strategy in your GKE clusters.

Discussing Microservices
Distributed systems are more fine-grained now, with Kubernetes driving microservices. Microservices is a fast-moving topic involving the breaking down applications into many specific services. All services have their lifecycles, collaborating. Splitting the Monolith with microservices is not a new idea ( the term is ), but the emergence of new technologies has a profound effect.
The specific domains/containers require constant communication and access to each other’s services. Therefore, a strategy needs to be maintained to manage container interaction. For example, how do we scale containers? What’s the process for container failure? How do we react to container resource limits?
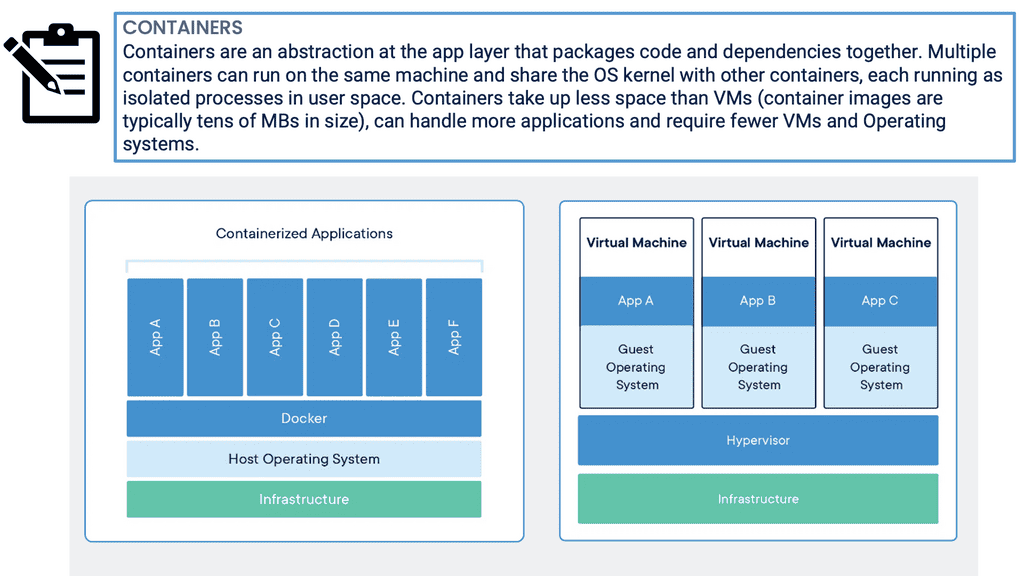
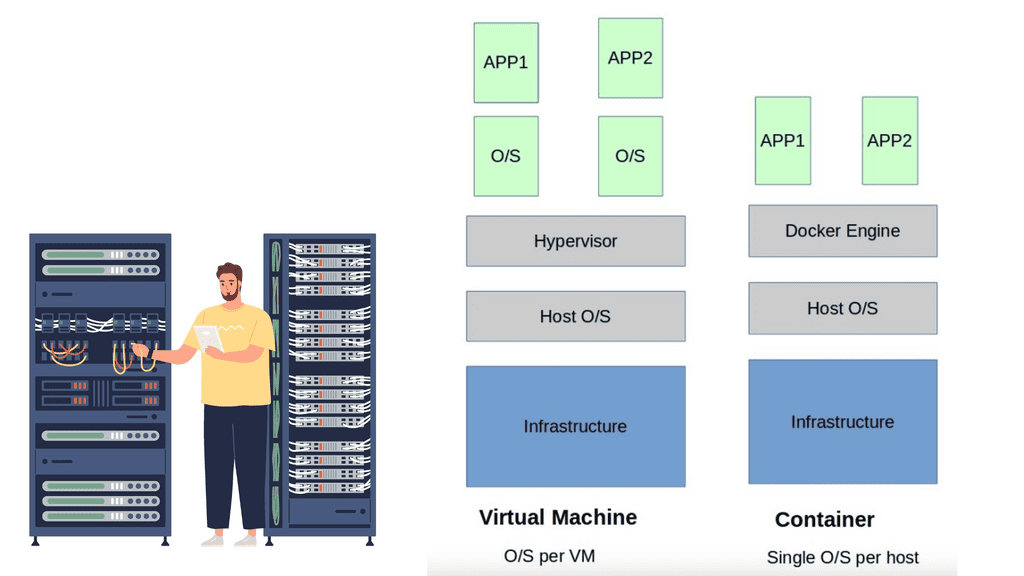
Although Docker does help with container management, Kubernetes orchestration works on a different scale and looks at the entire application stack, allowing management at a service/application level.
We need a management and orchestration system to utilize containers’ and microservices’ portability fully. Containers can’t just be thrown into a sea of computing and expect to tie themselves together and work efficiently.
A management tool is required to govern and manage the life of containers, where they are placed, and to whom they can talk. Containers have a complicated existence, and many pieces are used to patch up their communication flow and management. We have updates, high availability, service discovery, patching, security, and networking.
The most important aspect about Kubernetes or any content management system is that they are not concerned with individual container placement. Instead, the focus is on workload placement. Users enter high-level requirements, and the scheduler does the rest—where, when, and how many?
Kubernetes networking 101 and network proximity.
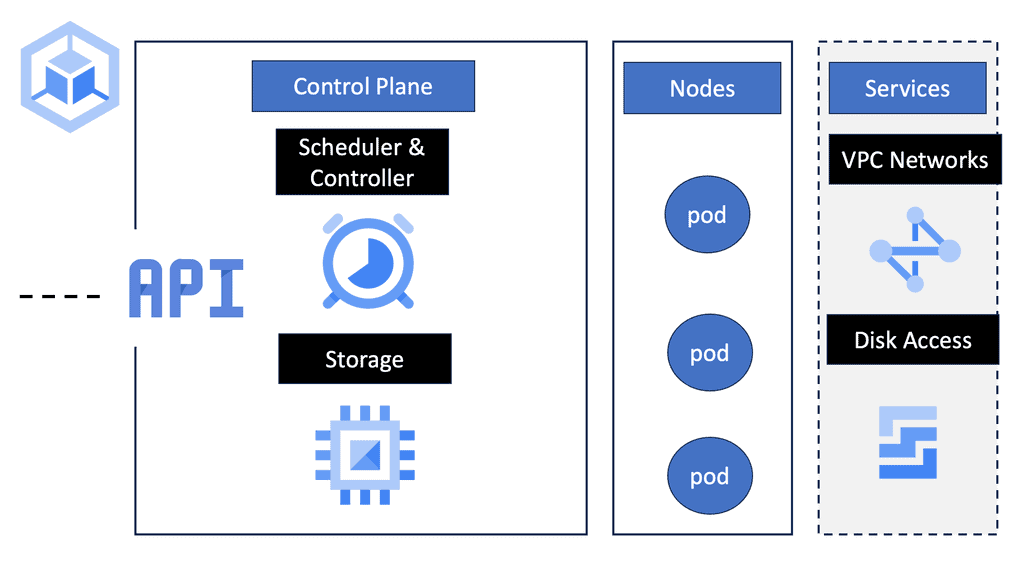
Looking at workloads to analyze placement optimizes application deployment. For example, some processes that are part of the same service will benefit from network proximity. Front-end tiers sending large chunks of data to a backend database tier should be close to each other, not trombone across the network Kubernetes host for processing.
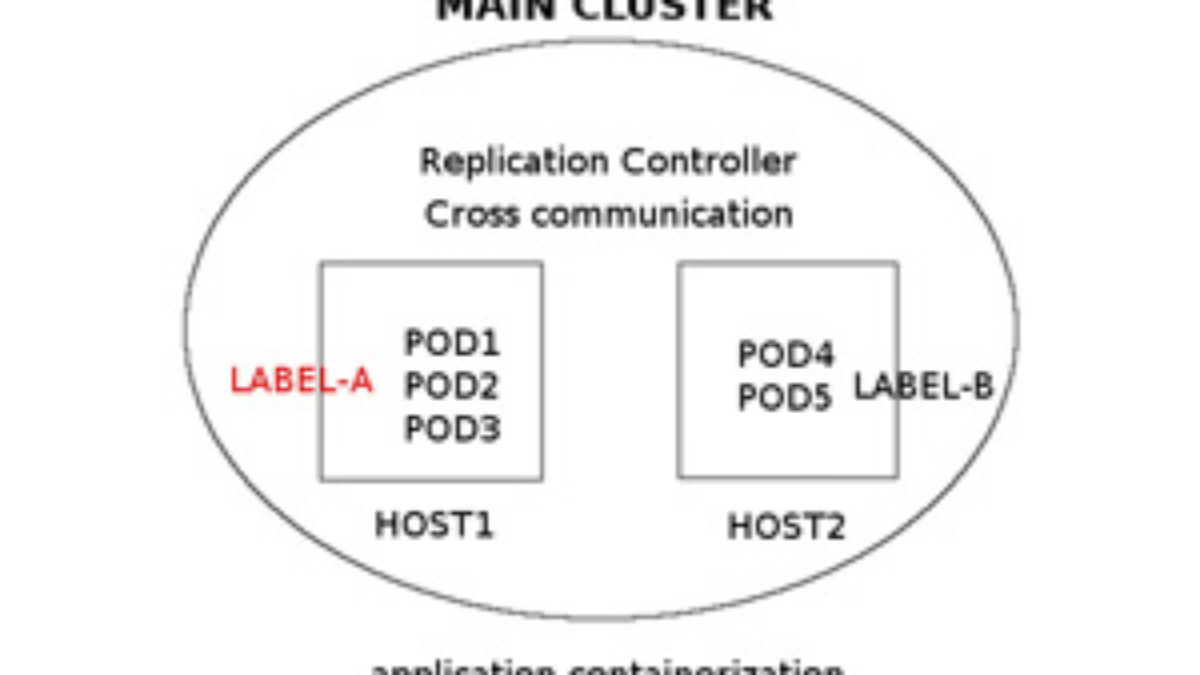
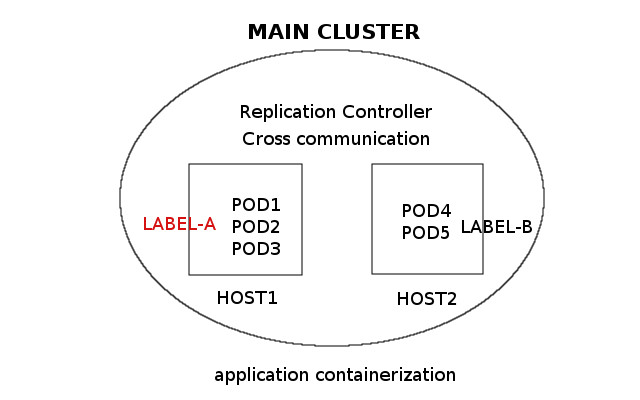
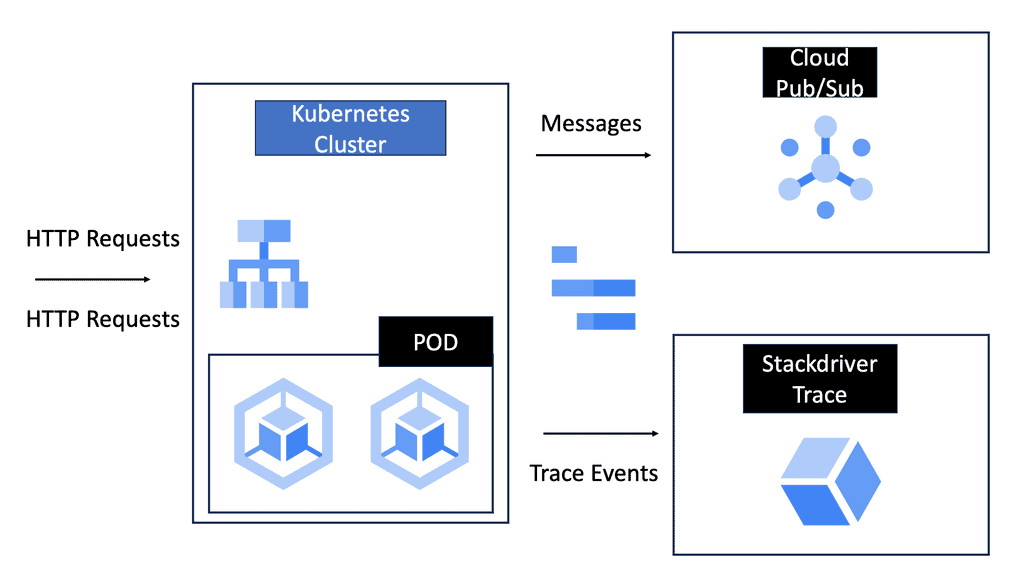
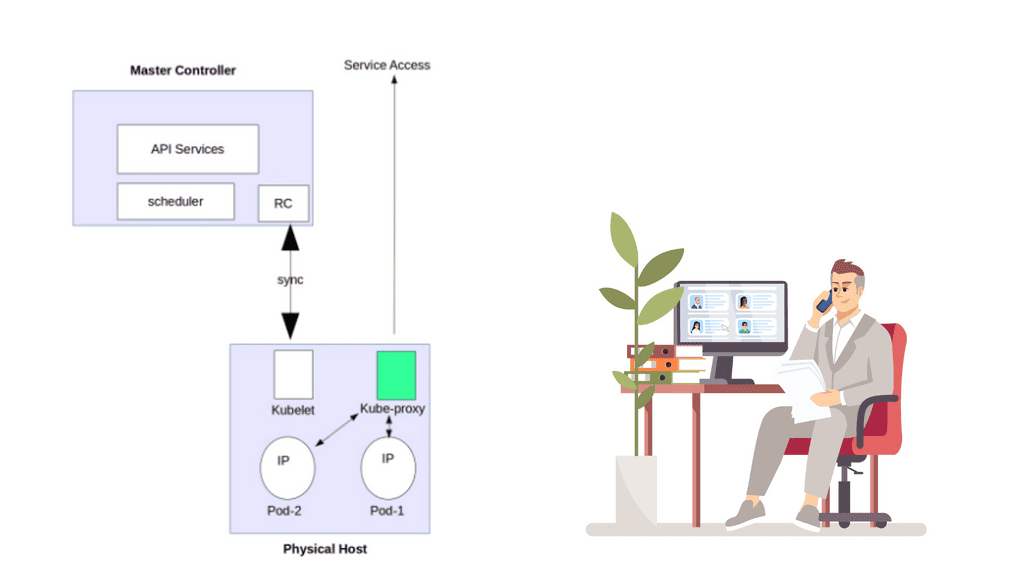
Likewise, when common data needs to be accessed and processed, it makes sense to put containers “close” to each other in a cluster. The following diagram displays the core Kubernetes architecture.
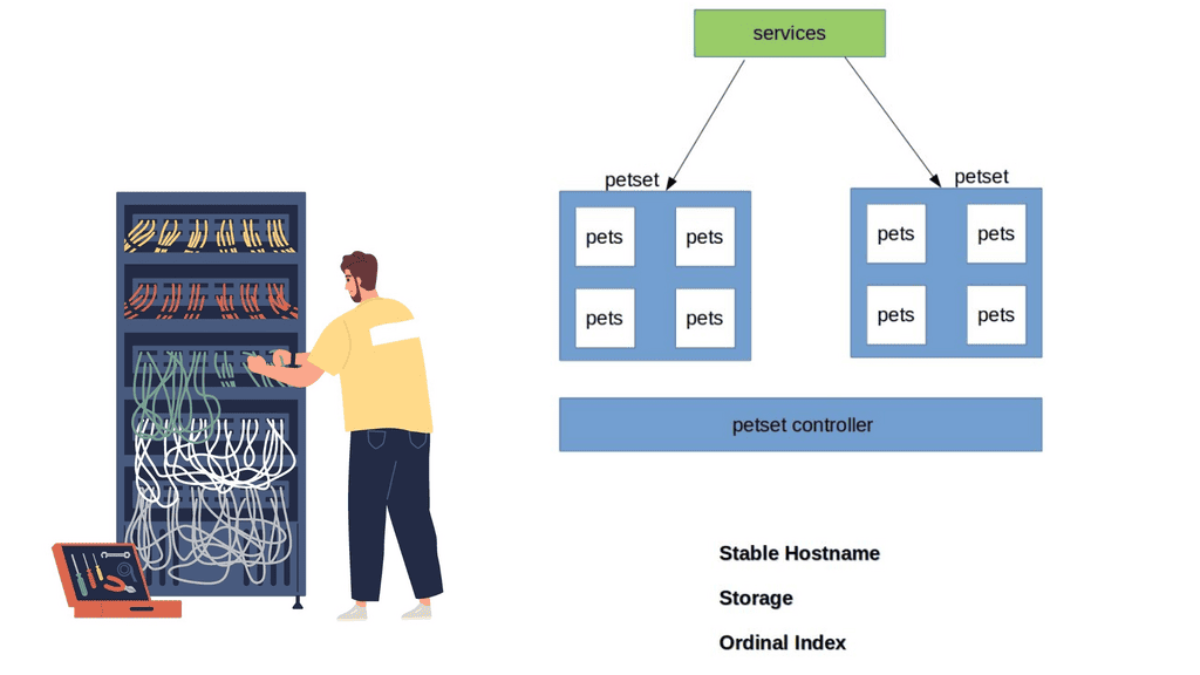
Kubernetes Networking 101: The Constructs
Kubernetes builds the application stack using four primary constructs: Pods, Services, Labels, and Replication Controllers. All constructs are configured and combined, creating a complete application stack with all management components—pods group similar containers on the same hosts.
Labels tag objects; replication controllers manage the desired state at a POD level, not container level, and services enable Pod-to-Pod communication. These constructs allow the management of your entire application lifecycle instead of individual application components. The construct definition is done through configuration files in YAML or JSON format.
The Kubernetes Pod
Pods are the smallest scheduling unit in Kubernetes and hold a set of closely related containers, all sharing fate and resources. Containers in a Pod share the same Kubernetes network namespace and must be installed on the same host. The main idea of keeping similar or related containers together is that processing is performed locally and does not incur any latency traversing from one physical host to another. As a result, local processing is always faster than remote processing.
Pods essentially hold containers with related pieces of the application stack. The critical point is that they are ephemeral and follow a specific lifecycle. They should come and go without service interruption as any service-destined traffic directed should be towards the “service” endpoint IP address, not the Pod IP address.
Even Though Pods have a pod-wide-IP address, service reachability is carried out with service endpoints. Services are not as temporary ( although they can be deleted ) and don’t go away as much as Pods. They act as the front-end VIP to back-end Pods ( more on later ). This type of architecture hammers home the level of abstraction Kubernetes seeks.
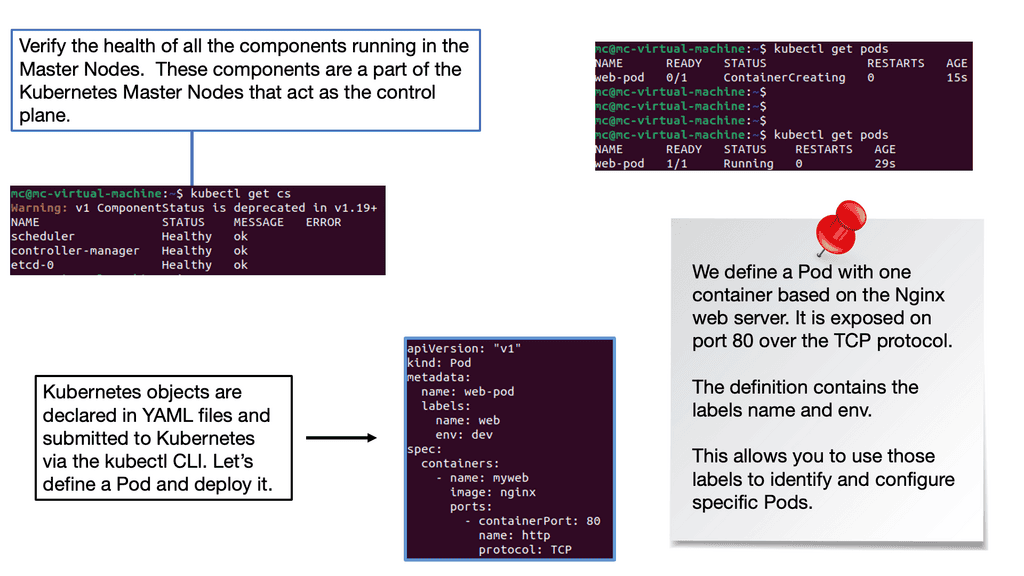
Pod definition file
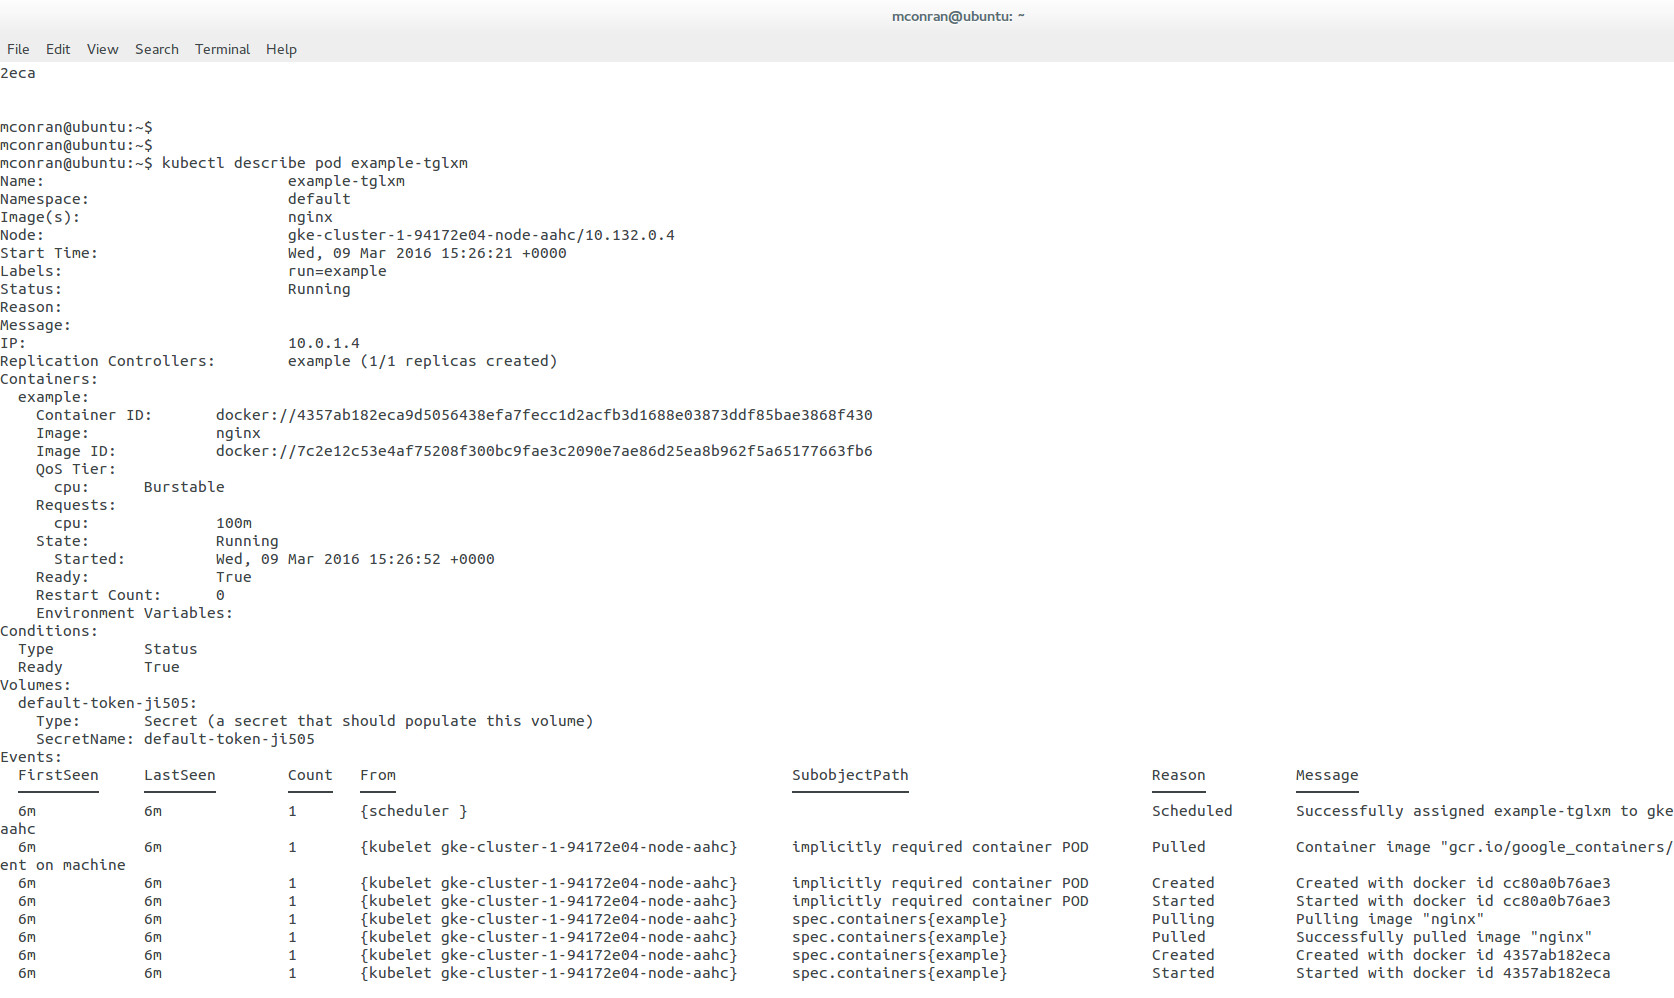
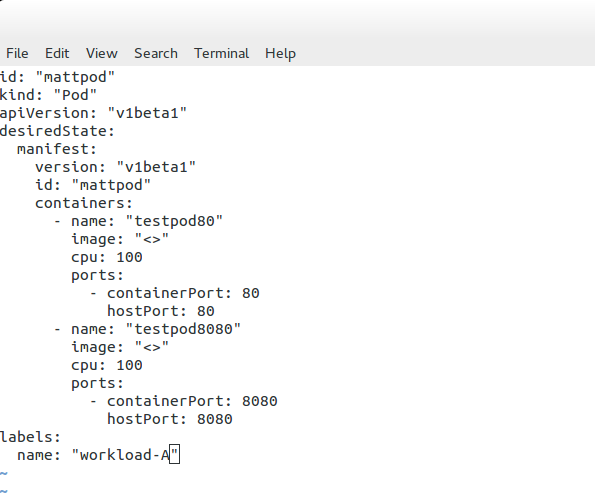
The following example displays a Pod definition file. We have basic configuration parameters, such as the Pod’s name and ID. Also, notice that the object type is set to “Pod.” This will be set according to the object we are defining. Later we will see this set as “service” for determining a service endpoint.
In this example, we define two containers – “testpod80” and “testpod8080”. We also have the option to specify the container image and Label. As Kubernetes assigns the same IP to the Pod where both containers live, we should be able to browse to the same IP but different port numbers, 80 or 8080. Traffic gets redirected to the respective container.
Kubernetes labels
Containers within a Pod share their network namespaces. All containers within can reach each other’s ports on localhost. This reduces the isolation between containers, but any more isolation would go against why we have Pods in the first place. They are meant to group “similar” containers sharing the same resource volumes, RAM, and CPU. For Pod segmentation, we have labels – a Kubernetes tagging system.
Labels offer another level of abstraction by tagging items as a group. They are essentially key-value pairs categorizing constructs. When we create Kubernetes constructs, we can set a label, which acts as a tag for that construct.
This means you can access a group of objects by specifying the label assigned to those objects. For example, labels distinguish containers as part of a web or database tier. The “selector” field tells Kubernetes which labels to use in finding Pods to forward traffic to.
Replication Controller
The replication controller ( RC ) manages the lifecycle and state of Pods. It ensures the desired state always matches the actual state. When you create an RC, you define how many copies ( aka replicas) of the Pod you want in the cluster.
The RC maintains that the correct numbers are running by creating or removing Pods at any time. Kubernetes doesn’t care about the number of containers running in a Pod; its only concern is the number of Pods. Therefore, it works at a Pod level.
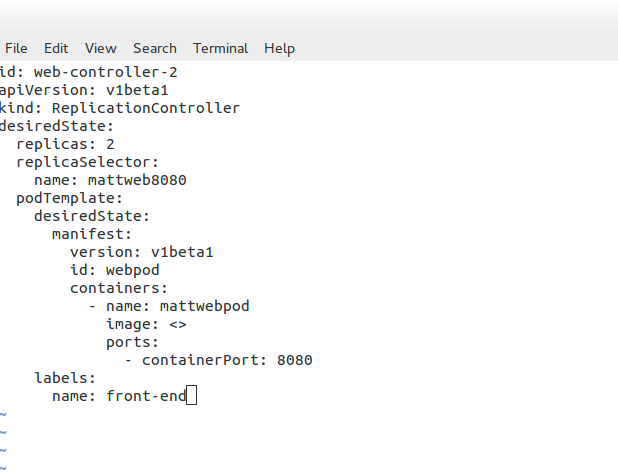
The following is an example of an RC service definition file. Here, you can see that the desired state of replicas is “2.” A replica of 2 means that the number of pods each controller should maintain is 2. Changing the number up or down will either increase or decrease the number of Pods the replication controller manages.
For example, if the RC notices too many, it will stop some from returning the replication controller to the desired state. The RC keeps track of the desired state and returns it to the state specified in the service definition file. We may also assign a label for grouping replication controllers.
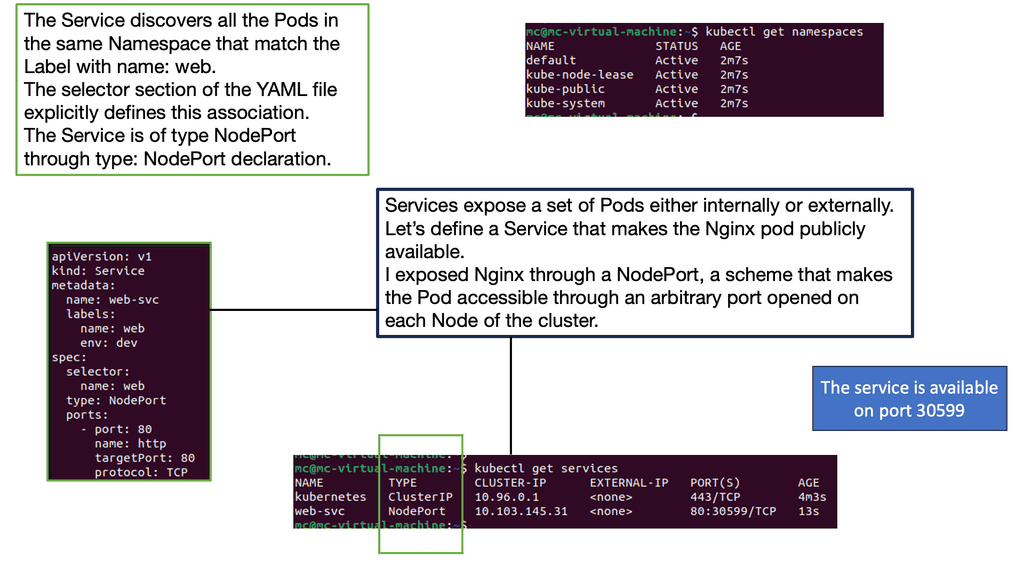
Kubernetes Services
Service endpoints enable the abstraction of services and the ability to scale horizontally. Essentially, they are abstractions defining a logical set of Pods. Services represent groups of Pods acting as one, allowing Pods to access services in other Pods without directing service-destined traffic to the Pod IP. Remember, Pods are short-lived!
The service endpoint’s IP address is from the “Portal Net” range defined on the API service. The address is local to the host, so ensure it doesn’t clash with the docker0 bridge IP address.
Pods are targeted by accessing a service that represents a group of Pods. A service can be viewed with a similar analogy to a load balancer, sitting in front of Pods accepting front-end service-destined traffic. Services act as the main hooking point for service / Pod interactions. They offer high-level abstraction to Pods and the containers within.
All traffic gets redirected to the service IP endpoint, which redirects it to the correct backend. Traffic hits the service IP address ( Portal Net ), and a Netfilter IPtable rules forward to a local host high port number.
The proxy service creates a high port number, which forms the basis for load balancing. The load balancing object then listens to that port. The Kub proxy acts as a full proxy, maintaining two different TCP connections.
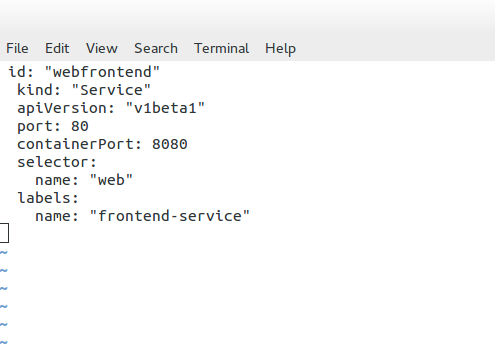
One separates the connection from the container to the proxy and another from the proxy to the load-balanced destination. The following is an example of a service definition file. The service listens on port 80 and sends traffic to the backend container port on 8080. Notice how the object kind is set to “service” and not “Pods” like in the previous definition file.
Kubernetes Networking 101 Model
The Kubernetes networking model details that each Pod should have a routable IP address. This makes communication between Pods easier by not requiring any NAT or port mappings we had with earlier versions of Docker networking.
With Kubernetes, for example, we can have a web server and database server placed in the same Pod and use the local interface for cross-communication. Furthermore, there is no additional translation, so performance is better than that of a NAT approach.
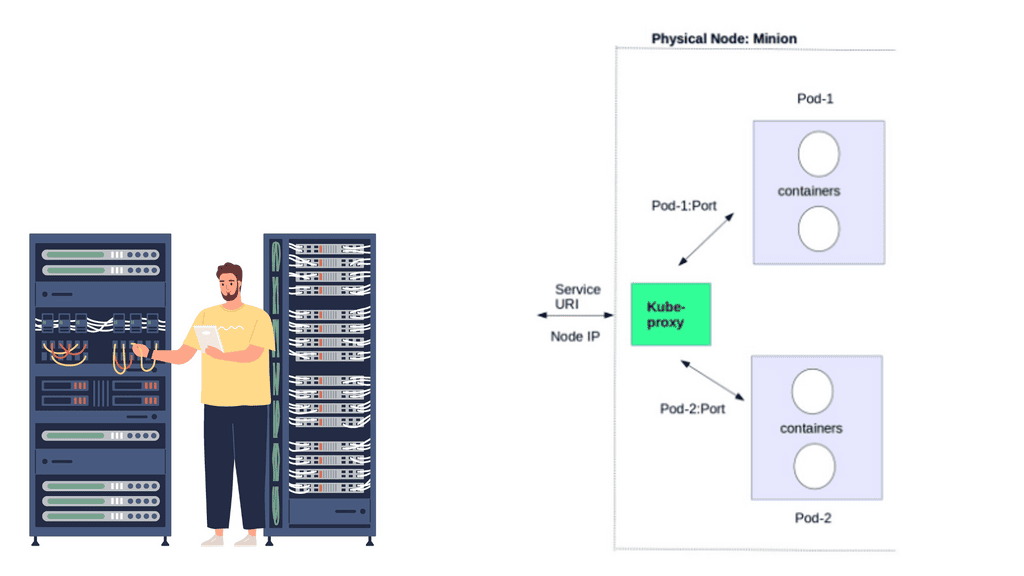
Kubernetes network proxy
Kubernetes fulfills service -> Pods integration by enabling a network proxy called the Kube-proxy on every node in a cluster. The network proxy is always there, even if Pods are not running. Its main task is to route traffic to the correct Pod and can do TCP, UDP stream forwarding, or round-robin TCP, UDP forwarding.
The Kube proxy captures service-destination traffic and proxies requests from the service endpoint back to the application’s Pod. The traffic is forwarded to the Pods on the target port defined in the definition file, a random port assigned during service creation.
To make all this work, Kubernetes uses IPtables and Virtual IP addresses.
For example, when using Kubernetes alongside OpenContrail, the Kube-proxy is disabled on all hosts, and the OpenContrail router module implements connectivity via overlays ( MPLS over UDP encapsulation ). Another vendor on the forefront is Midokura, the co-founder behind OpenStack Project Kuryr. This project aims to bring any SDN plugin (MidoNet, Dragon flow, OVS, etc.) to Containers—more on these another time.
Kubernetes Pod-IP approach
The Pods IP address is reachable by all other Pods and hosts in the Kubernetes cluster. The address is not usually routable outside of the cluster. This should not be too much of a concern as most traffic stays within application tiers inside the cluster. Mapping external load-balancers achieves any inbound external traffic to services in the cluster.
The Pod-IP approach assumes that all Pods can reach each other without creating specific links. They can access each other by IP rather than through a port mapping on the physical host. Port mappings hide the original address by performing a masquerade – Source NAT.
Like your home residential router hides local PC and laptop IP addresses from the public Internet, cross-node communication is much simpler, as every Pod has an IP address. There isn’t any port mapping or NAT like there is with default docker networking. If the Kube proxy receives traffic for a Pod, not on its host, it simply forwards the traffic to the correct pod IP for that service.
The IP per POD offers a simplified approach to K8 networking. A unique IP per host would potentially need port mappings on the host IP as the number of containers increases. Managing port assignment would become an operational and management burden, similar to earlier versions of Docker. Conversely, a unique IP per container would surely hit scalability limits.
Kubernetes PAUSE container
Kubernetes has what’s known as a PAUSE container, also referred to as a Pod infrastructure container. It handles the networking by holding the networking namespace and IP address for the containers on that Pod. Some refer to the PAUSE container as an implementation detail you can safely ignore.
Each container uses a Pod’s “mapped container” mode to connect to the pause container. The mapped container mode is implemented with a source and target container grouping. The source container is the user-created container, and the target container is the infrastructure pause container.
Destination Pod IP traffic first lands on the pause container and gets translated to the backend containers. The pause container and the user-built containers all share the same network stack. Remember we created a service destination file with two containers – port 80 and port 8080? It is the pause container that listens on these port numbers.
In summary, the Kubernetes model introduces three methods of communication.
- a) Pod-to-Pod communication directly by IP address. Kubernetes has a Pod-IP-wide metric simplifying communication.
- b) Pod-to-Service Communication – Clients’ traffic is directed to the virtual service IP, which is then intercepted by the kub-proxy process ( running on all hosts) and directed to the correct Pod.
- c) External-to-Internal Communication—External access is captured by an external load balancer that targets nodes in a cluster. The Kub proxy determines the correct Pod to send traffic to—more in a separate post.
Docker & Kubernetes networking comparison
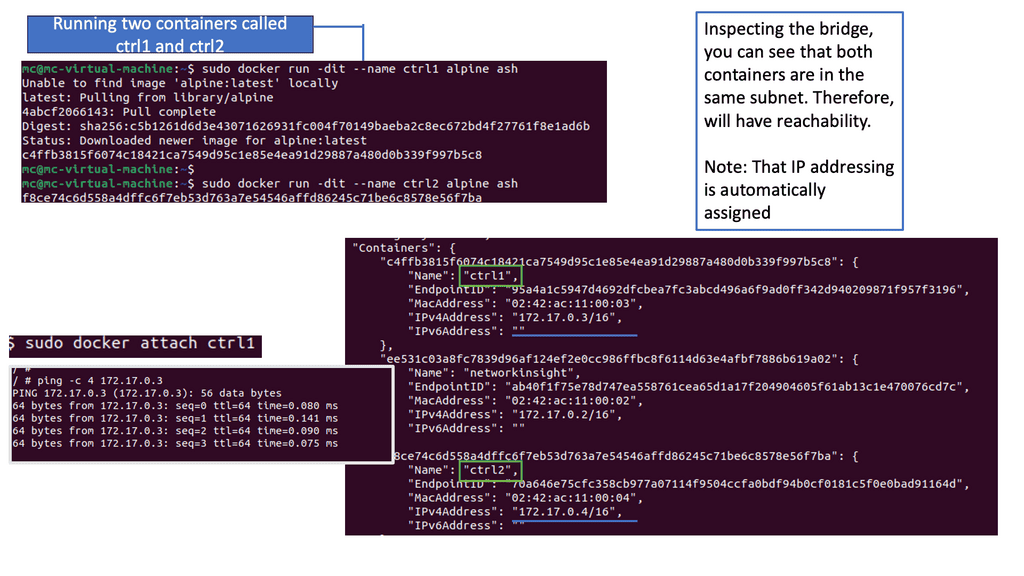
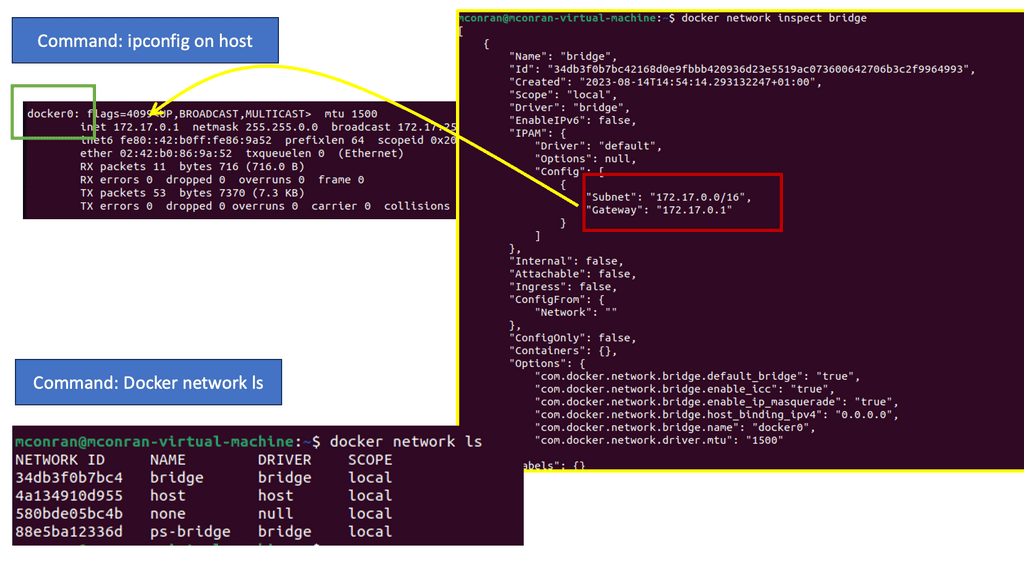
Docker uses host-private networking. The Docker engine creates a default bridge, and every container gets a virtual ethernet to that bridge. The veth acts like a pipe – one end is mapped to the docker0 bridge namespace and the other to the container’s Linux namespace. This provides connectivity between containers on the same Docker bridge.
All containers are assigned an address from the 172.17.42.0 range and 172.17.42.1 to the default bridge acting as the container gateway. Any off-host traffic requires port mappings and NAT for communication. Therefore, the container’s IP address is hidden, and the network would see the container traffic coming from the docker nodes’ physical IP address.
The effect is that containers can only talk to each other by IP address on the same virtual bridge. Any off-host container communication requires messy port allocations. Recently, there have been enhancements to docker networking and multi-host native connectivity without translations. Although there are enhancements to the Docker network, the NAT / Port mapping design is not a clean solution.
The K8 model offers a different approach, and the docker0 bridge gets a routable IP address. Any outside host can access that Pod by IP address rather than through a port mapping on the physical host. Kubernetes has no NAT for container-to-container or container-to-node traffic.
Understanding Kubernetes networking is crucial for building scalable and resilient applications within a containerized environment. By leveraging its flexible architecture and components like Pods, Services, and Ingress, developers can enable seamless container communication and ensure efficient network management.
Moreover, comprehending network concepts like cluster networking, DNS resolution, and network policies empowers administrators to establish robust and secure communication channels within the Kubernetes ecosystem. Embracing Kubernetes networking capabilities unlocks the full potential of this powerful container orchestration platform.
Closing Points on Kubernetes Networking 101
At the heart of Kubernetes networking lies a flat network structure. This unique model ensures that every pod, a basic Kubernetes unit, can communicate with any other pod without NAT (Network Address Translation). This design principle simplifies communication processes, eliminating complex network configurations. However, achieving this simplicity requires comprehending core concepts such as Network Policies, Services, and Ingress, which facilitate and control internal and external traffic.
Services in Kubernetes act as an abstraction layer over a set of pods, providing a stable endpoint for client communication. As pods can dynamically scale or change due to Kubernetes’ orchestration, services ensure that there is a consistent way to access these pods. Services can be of different types, including ClusterIP, NodePort, and LoadBalancer, each serving unique roles and use cases. Understanding how to configure and utilize these services effectively is key to maintaining robust and scalable applications.
Network Policies in Kubernetes provide a mechanism to control the traffic flow to and from pods. They allow you to define rules that specify which connections are allowed or denied, enhancing the security of your applications. By leveraging Network Policies, you can enforce stringent security measures, ensuring that only authorized traffic can interact with your application components. This section will delve into creating and applying Network Policies to safeguard your Kubernetes environment.
Ingress in Kubernetes serves as an entry point for external traffic into the cluster, providing HTTP and HTTPS routing to services within the cluster. It offers functionalities such as load balancing, SSL termination, and name-based virtual hosting. Properly configuring Ingress resources is essential for directing external traffic efficiently and securely to your services. This section will guide you through setting up and managing Ingress controllers and resources to optimize your application’s accessibility and performance.