
Understanding Kubernetes Fundamentals
Kubernetes has revolutionized the way organizations deploy and manage containerized applications. Its ability to automate and streamline container orchestration has made it the go-to solution for modern application development. By leveraging Kubernetes, organizations can achieve greater scalability, fault tolerance, and agility in their operations. As the containerization trend continues to grow, Kubernetes is poised to play an even more significant role in the future of software development and deployment.
A: ) Kubernetes, often abbreviated as K8s, is a container orchestration tool developed by Google. Its primary purpose is to automate the management and scaling of containerized applications. At its core, Kubernetes provides a platform for abstracting away the complexities of managing containers, allowing developers to focus on building and deploying their applications.
B: ) Kubernetes offers an extensive range of features that empower developers and operators alike. From automated scaling and load balancing to service discovery and self-healing capabilities, Kubernetes simplifies the process of managing containerized workloads. Its ability to handle both stateless and stateful applications makes it a versatile choice for various use cases.
C: ) To begin harnessing the power of Kubernetes, one must first understand its architecture and components. From the master node responsible for managing the cluster to the worker nodes that run the containers, each component plays a crucial role in ensuring the smooth operation of the system. Additionally, exploring various deployment options, such as using managed Kubernetes services or setting up a self-hosted cluster, provides flexibility based on specific requirements.
D: ) Kubernetes has gained widespread adoption across industries, serving as a reliable platform for running applications at scale. From e-commerce platforms and media streaming services to data analytics and machine learning workloads, Kubernetes proves its mettle by providing efficient resource utilization, high availability, and easy scalability. We will explore a few real-world examples that highlight the diverse applications of Kubernetes.
**Container-based applications**
Kubernetes is an open-source orchestrator for containerized applications. Google developed it based on its experience deploying scalable, reliable container systems via application-oriented APIs.
In 2014, Kubernetes was introduced as one of the world’s largest and most popular open-source projects. Most public clouds use this API to build cloud-native applications. Cloud-native developers can use it on all scales, from a cluster of Raspberry Pis to a data center full of the latest machines. This software can also be used to build and deploy distributed systems.
**How does Kubernetes work?**
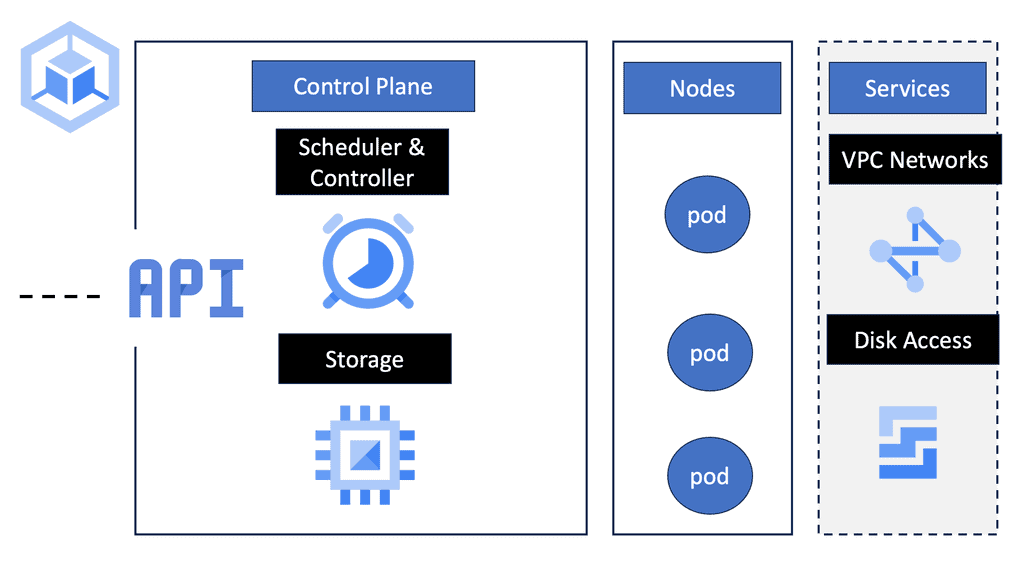
At its core, Kubernetes relies on a master-worker architecture to manage and control containerized applications. The master node acts as the brain of the cluster, overseeing and coordinating the entire system. It keeps track of all the resources and defines the cluster’s desired state.
The worker nodes, on the other hand, are responsible for running the actual containerized applications. They receive instructions from the master node and maintain the desired state. If a worker node fails, Kubernetes automatically redistributes the workload to other available nodes, ensuring high availability and fault tolerance.
GKE Google Cloud Data Centers
### Google Cloud: The Perfect Partner for Kubernetes
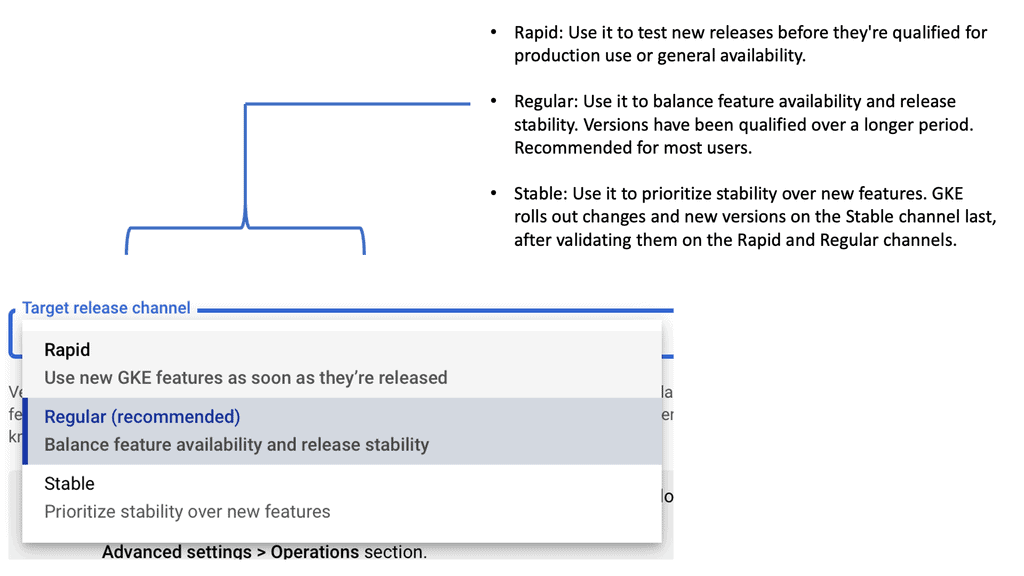
Google Cloud offers a seamless integration with Kubernetes through its Google Kubernetes Engine (GKE). This fully managed service simplifies the process of deploying, managing, and scaling containerized applications using Kubernetes. Google Cloud’s global infrastructure ensures high availability and reliability, making it an ideal choice for mission-critical applications. With GKE, you benefit from automatic updates, built-in security, and optimized performance, allowing your team to focus on delivering value without the overhead of managing infrastructure.
### Setting Up a Kubernetes Cluster on Google Cloud
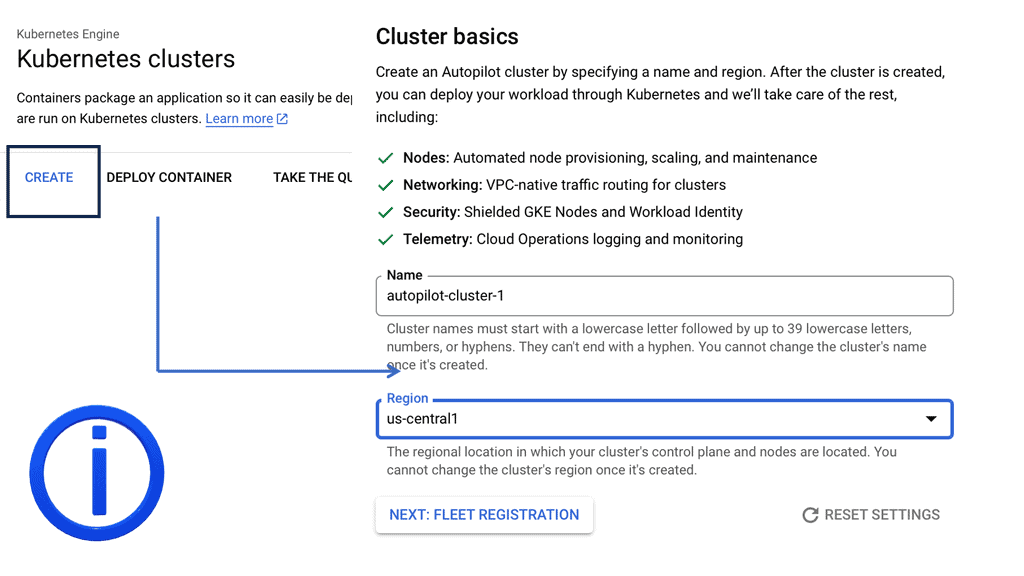
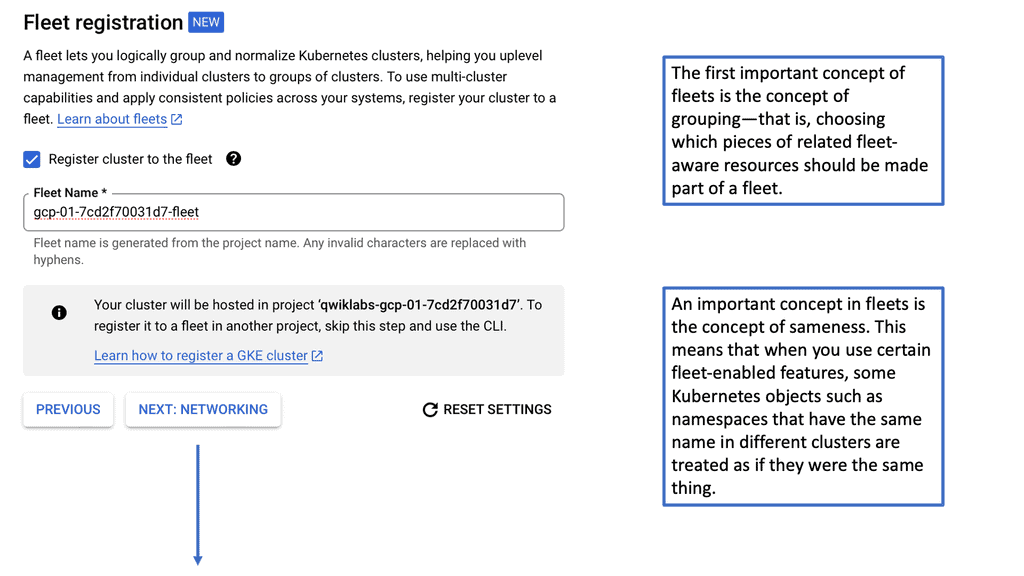
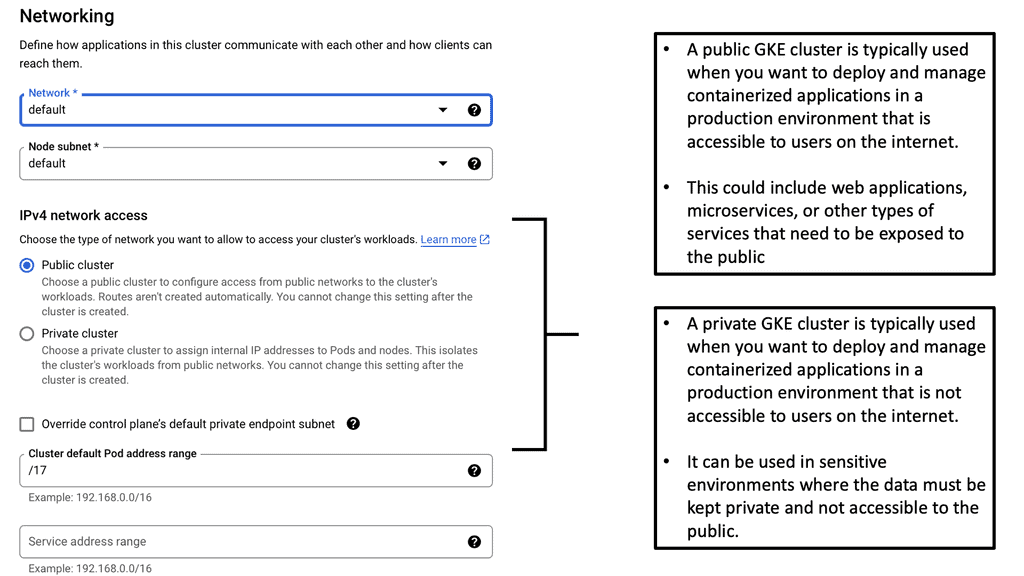
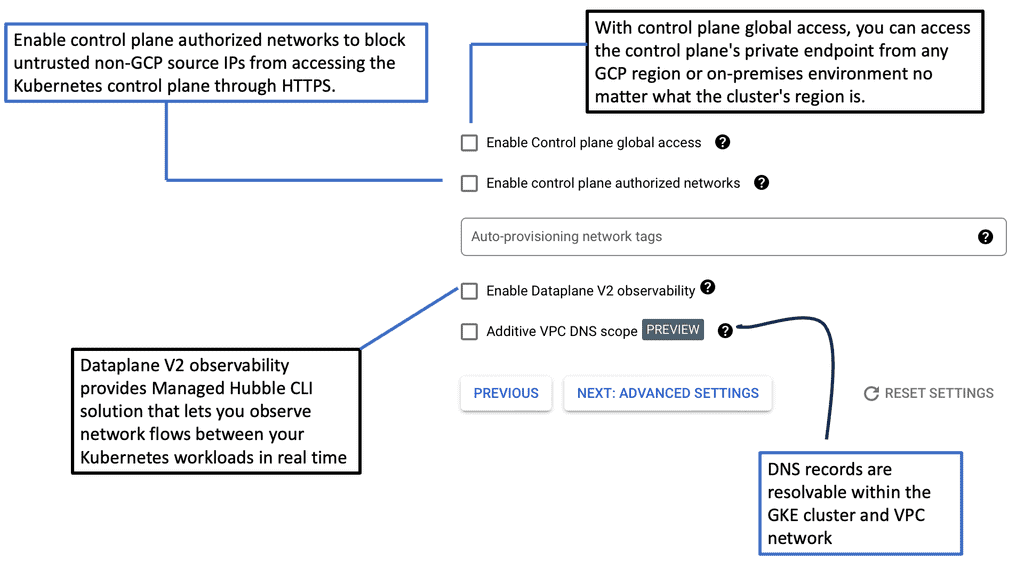
Creating a Kubernetes cluster on Google Cloud is straightforward. First, ensure that you have a Google Cloud account and the necessary permissions to create resources. Using the Google Cloud Console or the command line, you can easily create a GKE cluster. Google Cloud provides a range of configurations to suit different workloads, from small development clusters to large production-grade clusters. Once your cluster is set up, you can deploy your applications, take advantage of Google’s networking and security features, and scale your workloads as needed.
### Best Practices for Managing Kubernetes Clusters
Managing Kubernetes clusters effectively requires understanding best practices and using the right tools. Regularly update your clusters to benefit from the latest features and security patches. Monitor your cluster’s performance and resource usage to ensure optimal operation. Use namespaces to organize your resources and role-based access control (RBAC) to manage permissions. Google Cloud provides monitoring and logging services that integrate with Kubernetes, helping you maintain visibility and control over your clusters
 **Key Features and Benefits of Kubernetes**
1. Scalability: Kubernetes allows organizations to effortlessly scale their applications by automatically adjusting the number of containers based on resource demand. This ensures optimal utilization of resources and enhances performance.
2. Fault Tolerance: Kubernetes provides built-in mechanisms for handling failures and ensuring high availability. By automatically restarting failed containers or redistributing workloads, Kubernetes minimizes the impact of failures on the overall system.
3. Service Discovery and Load Balancing: Kubernetes simplifies service discovery by providing a built-in DNS service. It also offers load-balancing capabilities, ensuring traffic is evenly distributed across containers, enhancing performance and reliability.
4. Self-Healing: Kubernetes continuously monitors the state of containers and automatically restarts or replaces them if they fail. This self-healing capability reduces downtime and improves application reliability overall.
5. Infrastructure Agnostic: Kubernetes is designed to be infrastructure agnostic, meaning it can run on any cloud provider or on-premises infrastructure. This flexibility allows organizations to avoid vendor lock-in and choose the deployment environment that best suits their needs.
**Kubernetes Security Best Practices**
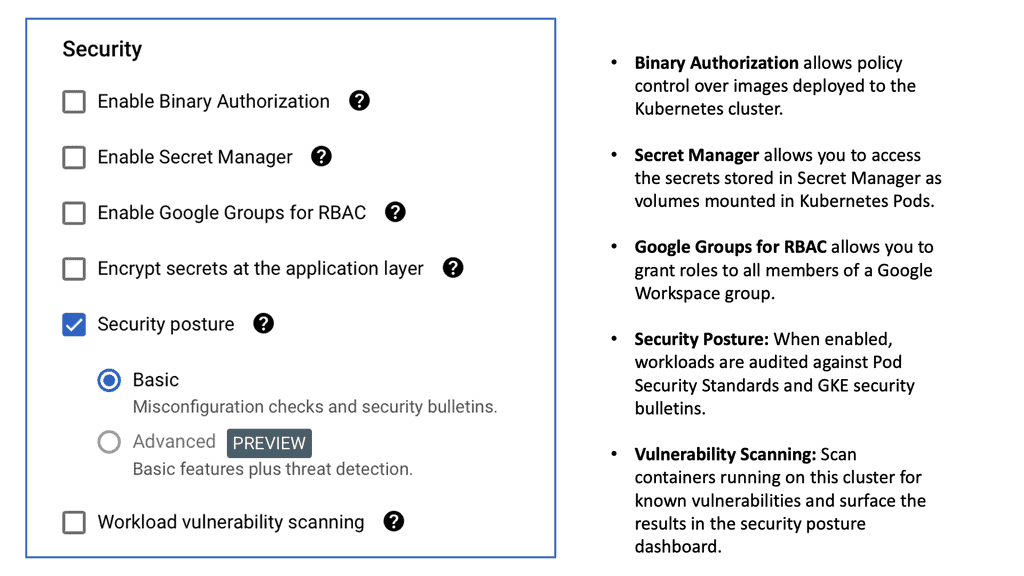
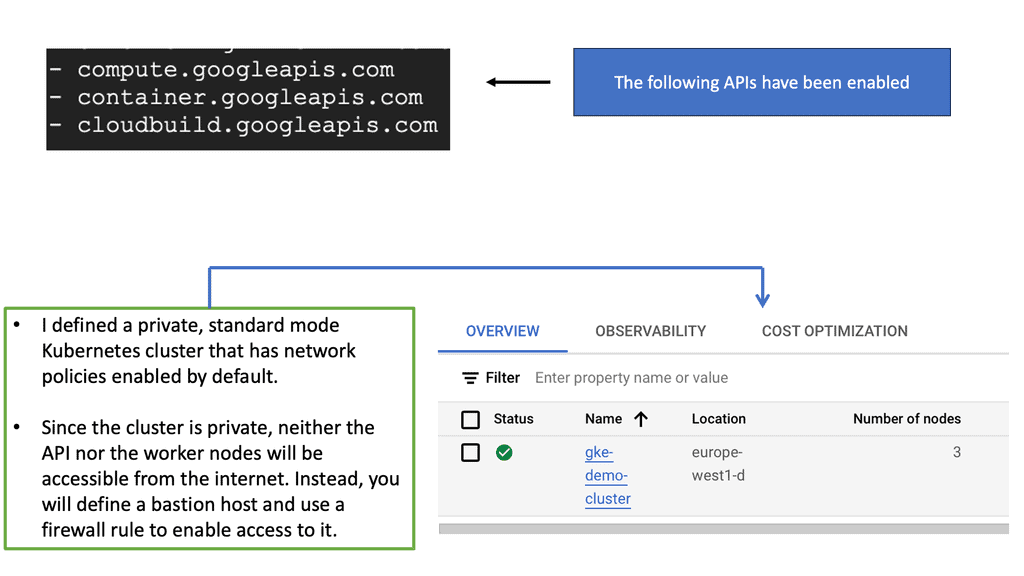
Security is a paramount concern when working with Kubernetes clusters. Ensuring your cluster is secure involves several layers, from network policies to role-based access control (RBAC). Implementing network policies can help isolate workloads and prevent unauthorized access.
Meanwhile, RBAC enables you to define fine-grained permissions, ensuring that users and applications only have access to the resources they need. Regularly updating your clusters and using tools like Google Cloud’s Binary Authorization can further enhance your security posture by preventing the deployment of untrusted container images.
GKE Network Policies
Understanding Kubernetes Networking
Kubernetes networking is the backbone of any Kubernetes cluster, facilitating communication both within the cluster and with external systems. It encompasses everything from service discovery to load balancing and network routing. In a GKE environment, Kubernetes networking is designed to be flexible and scalable, but with this flexibility comes the need for strategic security measures to protect your applications from unauthorized access.
### What are GKE Network Policies?
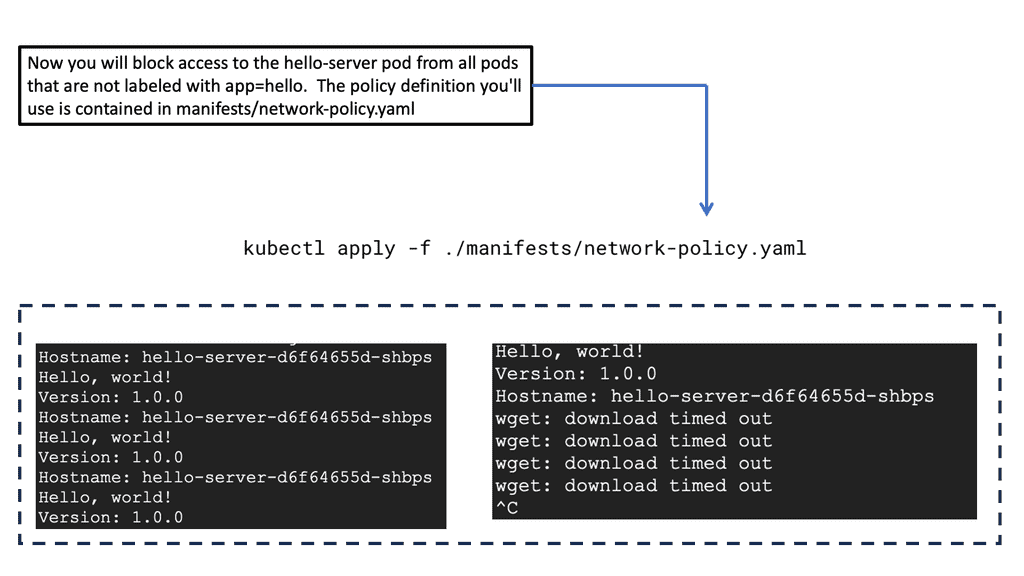
GKE Network Policies are a set of rules that control the communication between pods within a Kubernetes cluster. They define how groups of pods can interact with each other and with network endpoints outside the cluster. By default, all traffic is allowed, but Network Policies enable you to specify which pods can communicate, thereby minimizing potential vulnerabilities and ensuring that only authorized interactions occur.
### Implementing GKE Network Policies
To implement Network Policies in GKE, you need to define them using YAML files, which are then applied to your cluster. These policies use selectors to define which pods are affected and specify the allowed ingress and egress traffic. For instance, you might create a policy that allows only frontend pods to communicate with backend pods, or restrict traffic to a database pod to specific IP addresses. Implementing these policies requires a solid understanding of your application architecture and network requirements.
### Best Practices for Configuring Network Policies
When configuring Network Policies, it’s important to follow best practices to ensure optimal security and performance:
1. **Start with a Default Deny Policy:** Begin by denying all traffic and then explicitly allow necessary communications. This ensures that only intended interactions occur.
2. **Use Labels Wisely:** Labels are crucial for defining policy selectors. Be consistent and strategic with your labeling to simplify policy management.
3. **Regularly Review and Update Policies:** As your application evolves, so should your Network Policies. Regular audits can help identify and rectify any security gaps.
4. **Test Policies Thoroughly:** Before deploying Network Policies to production environments, test them in staging environments to avoid accidental disruptions.

What is Minikube?
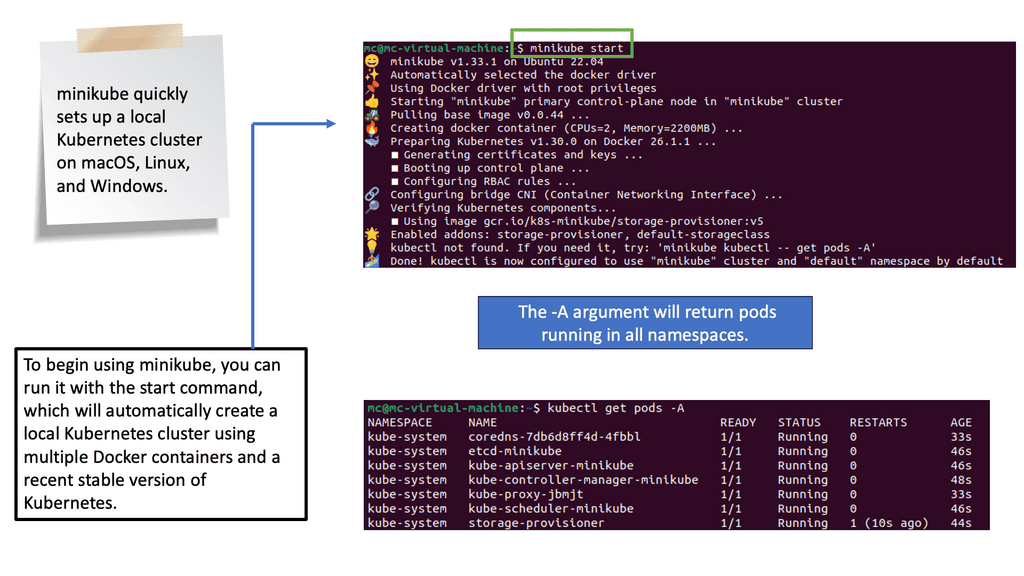
Minikube is a lightweight Kubernetes distribution that allows you to run a single-node cluster on your local machine. It provides a simple and convenient way to test and experiment with Kubernetes without needing a full-blown production environment.
Whether you are a developer, a tester, or simply an enthusiast, Minikube offers an easy way to deploy and manage test applications. Minikube will be installed on a local computer or remote server. Once your cluster is running, you’ll deploy a test application and explore how to access it via minikube.
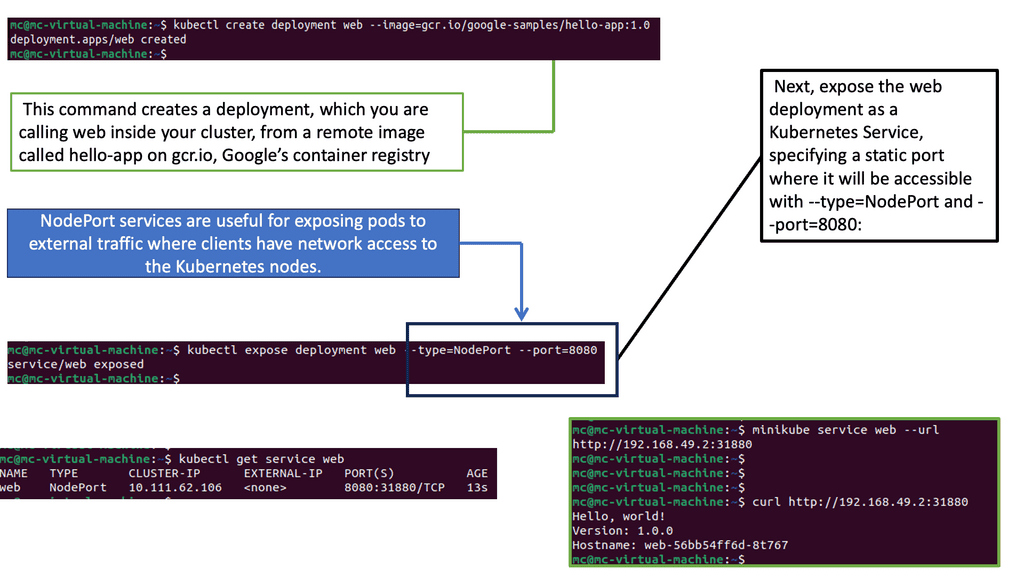
Note: NodePort access is a service type in Kubernetes that exposes an application running on a cluster to the outside world. It assigns a static port on each node, allowing external traffic to reach the application. This type of access is beneficial for testing applications before deploying them to production.
Reliable and Scalable Distributed System
You may wonder what we mean by “reliable, scalable distributed systems” as more services are delivered via APIs over the network. Many APIs are delivered by distributed systems, in which the various components are distributed across multiple machines and coordinated through a network.It is important that these systems are highly reliable because we increasingly rely on them (for example, to find directions to the nearest hospital).
Constant availabiity:
Regardless of how badly the other parts of the system fail, no part will fail. They must maintain availability during software rollouts and maintenance procedures. Due to the increasing number of people online and using these services, they must be highly scalable to keep up with ever-increasing usage without redesigning the distributed system that implements them. The capacity of your application will be automatically increased (and decreased) to maximize its efficiency.
Cloud Platform:
Cloud Platform has a ready-made GOOGLE CONTAINER ENGINE enabling the deployment of containerized environments with Kubernetes. The following post illustrates hands-on Kubernetes with PODS and LABELS. Pods & Labels are the main differentiators between Kubernetes and container scheduler such as Docker Swarm. A group of one or more containers is called a Pod, and containers in a Pod act together. Labels are assigned to pods for specific targeting and are organized into groups.
There are many reasons people come to use containers and container APIs like Kubernetes, but we believe they can all be traced back to one of these benefits:
- Development velocity
- Scaling (of both software and teams)
- Abstracting your infrastructure
- Efficiency
- Cloud-native ecosystem
Example: Pods and Services
Understanding Pods: Pods are the basic building blocks of Kubernetes. They encapsulate one or more containers and provide a cohesive unit for deployment. Each pod has its IP address and shares the same network namespace. Understanding how pods work is crucial for successful Kubernetes deployments. Creating a pod in Kubernetes involves defining a pod specification using YAML or JSON. This specification includes the container image, resource requirements, and environment variables.
Now that we have a pod specification, it’s time to deploy it in a Kubernetes cluster. We will cover different deployment strategies, including using the Kubernetes command-line interface (kubectl) and declarative deployment through YAML manifest files.
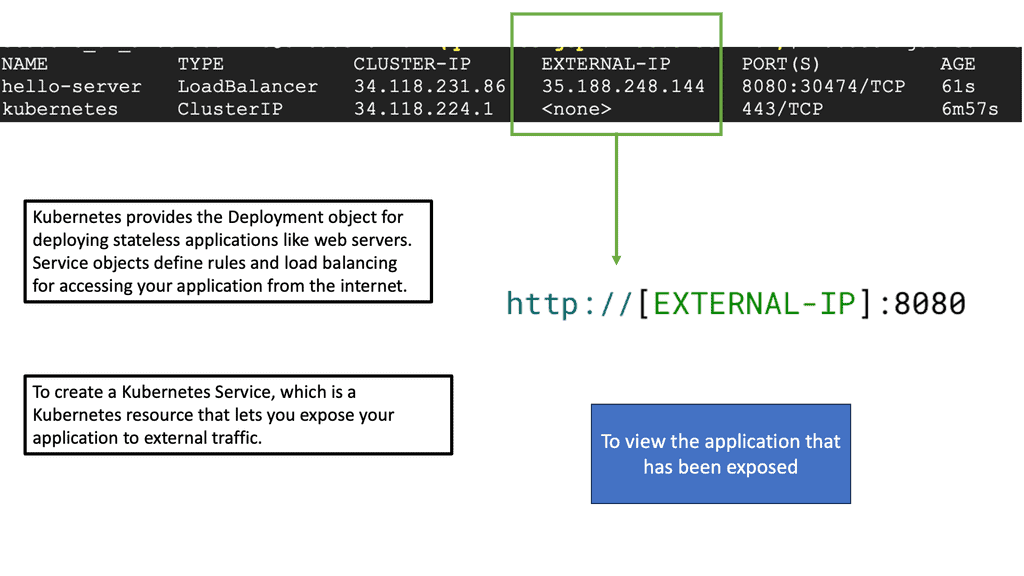
Introduction to Services: While pods provide individual deployment units, services act as a stable network endpoint to access the pods. They enable load balancing, service discovery, and routing traffic to the appropriate pods. Understanding services is essential for creating fully functional and accessible applications in Kubernetes.
Creating a service involves defining a service specification that specifies the port and target port and the type of service required. The different service types, such as ClusterIP, NodePort, and LoadBalancer, allow you to expose your pods to the outside world.
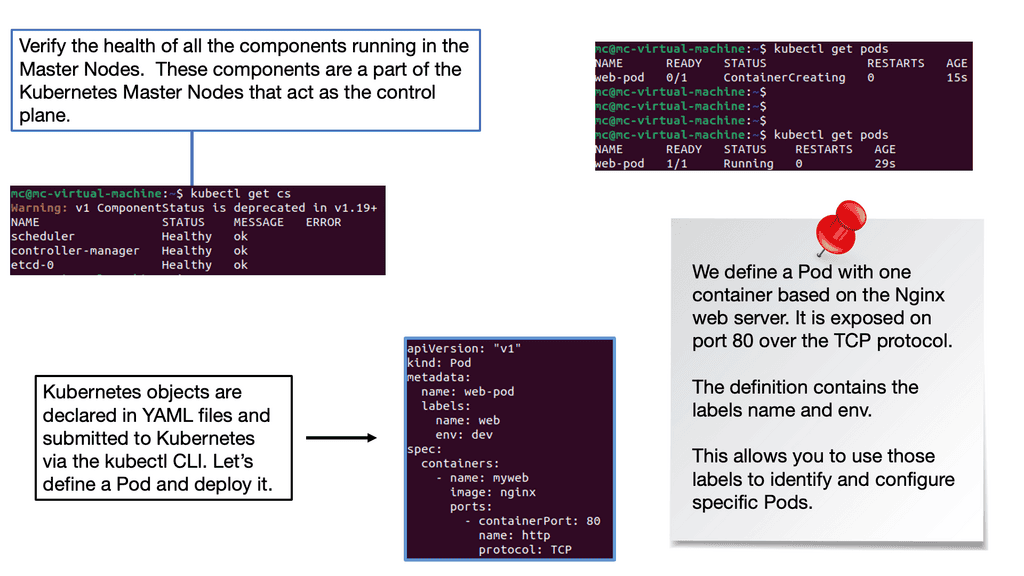
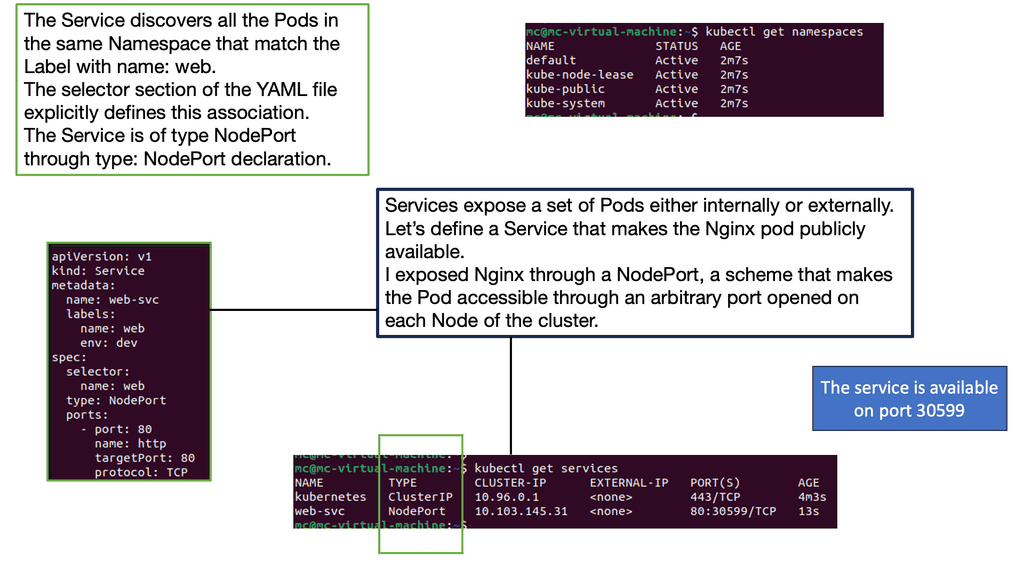
The Kubernetes networking model natively supports multi-host cluster networking. The work unit in Kubernetes is called a pod. A pod includes one or more containers, which are consistently scheduled and run “together” on the same node. This connectivity allows individual service instances to be separated into distinct containers. Pods can communicate with each other by default, regardless of which host they are deployed on.
Kubernetes Cluster Creation
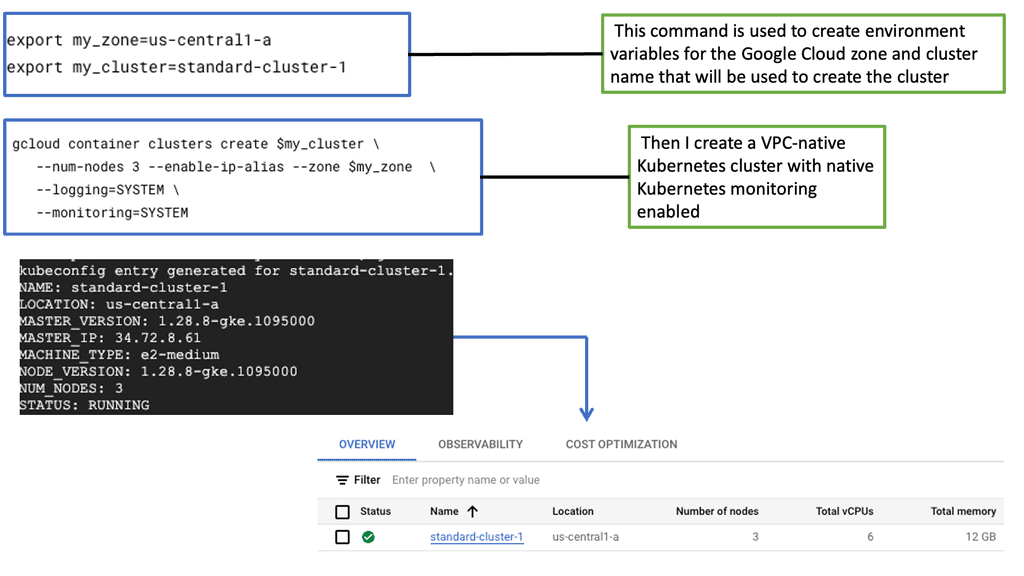
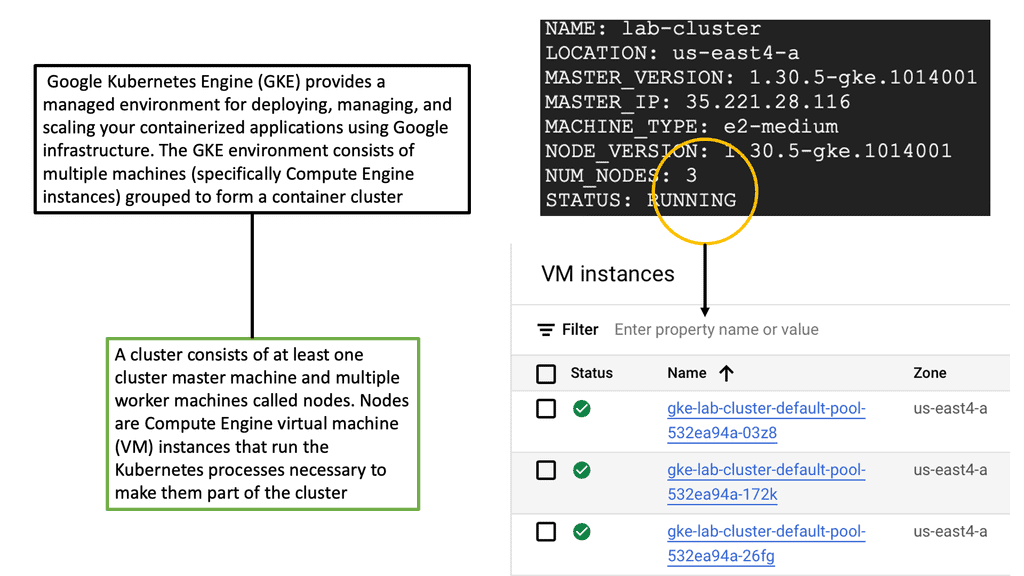
– The first step for Kubernetes basics and deploying a containerized environment is to create a Container Cluster. This is the mothership of the application environment. The Cluster acts as the foundation for all application services. It is where you place instance nodes, Pods, and replication controllers. By default, the Cluster is placed on a Default Network.
– The default container networking construct has a single firewall. Automatic routes are installed so that each host can communicate internally. Cross-communication is permitted by default without explicit configuration. Any inbound traffic sourced externally to the Cluster must be specified with service mappings and ingress rules. By default, it will be denied.
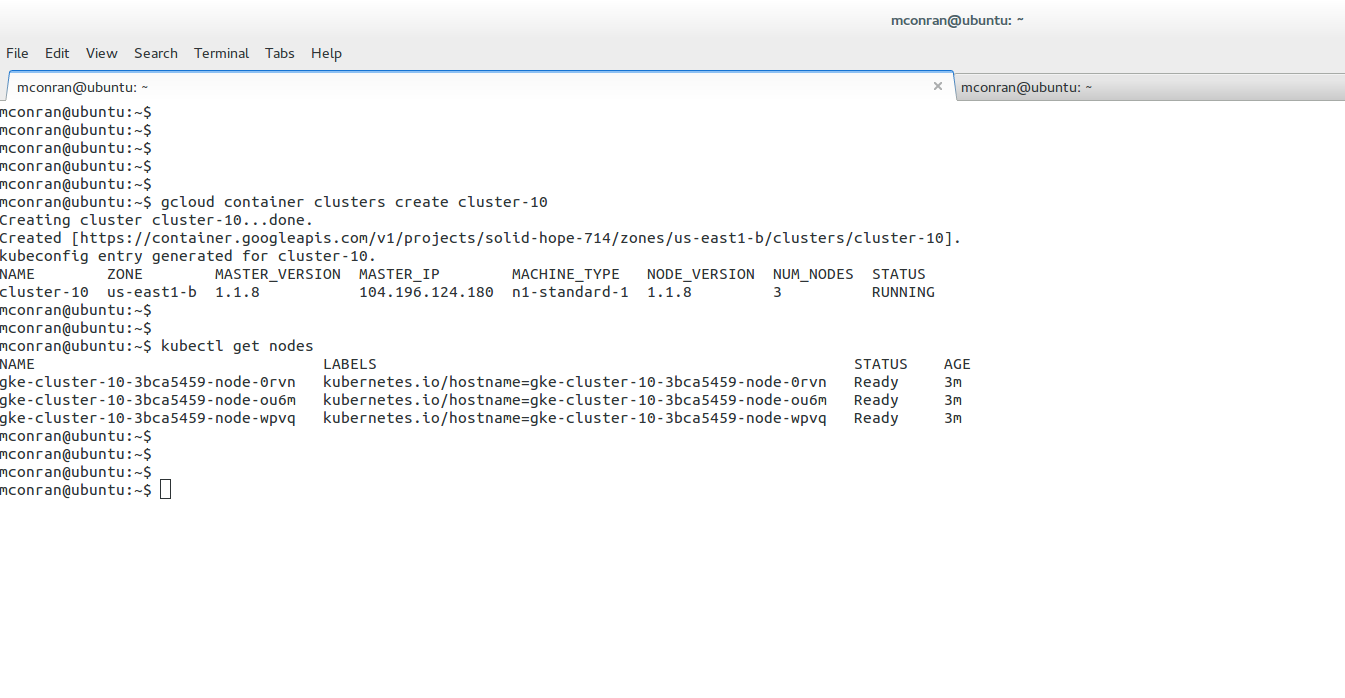
– Container Clusters are created through the command-line tool gcloud or the Cloud Platform. The following diagrams display the creation of a cluster on the Cloud Platform and local command line. First, you must fill out a few details, including the Cluster name, Machine type, and number of nodes.
– The scale you can build determines how many nodes you can deploy. Google currently has a 60-day free trial with $300 worth of credits.
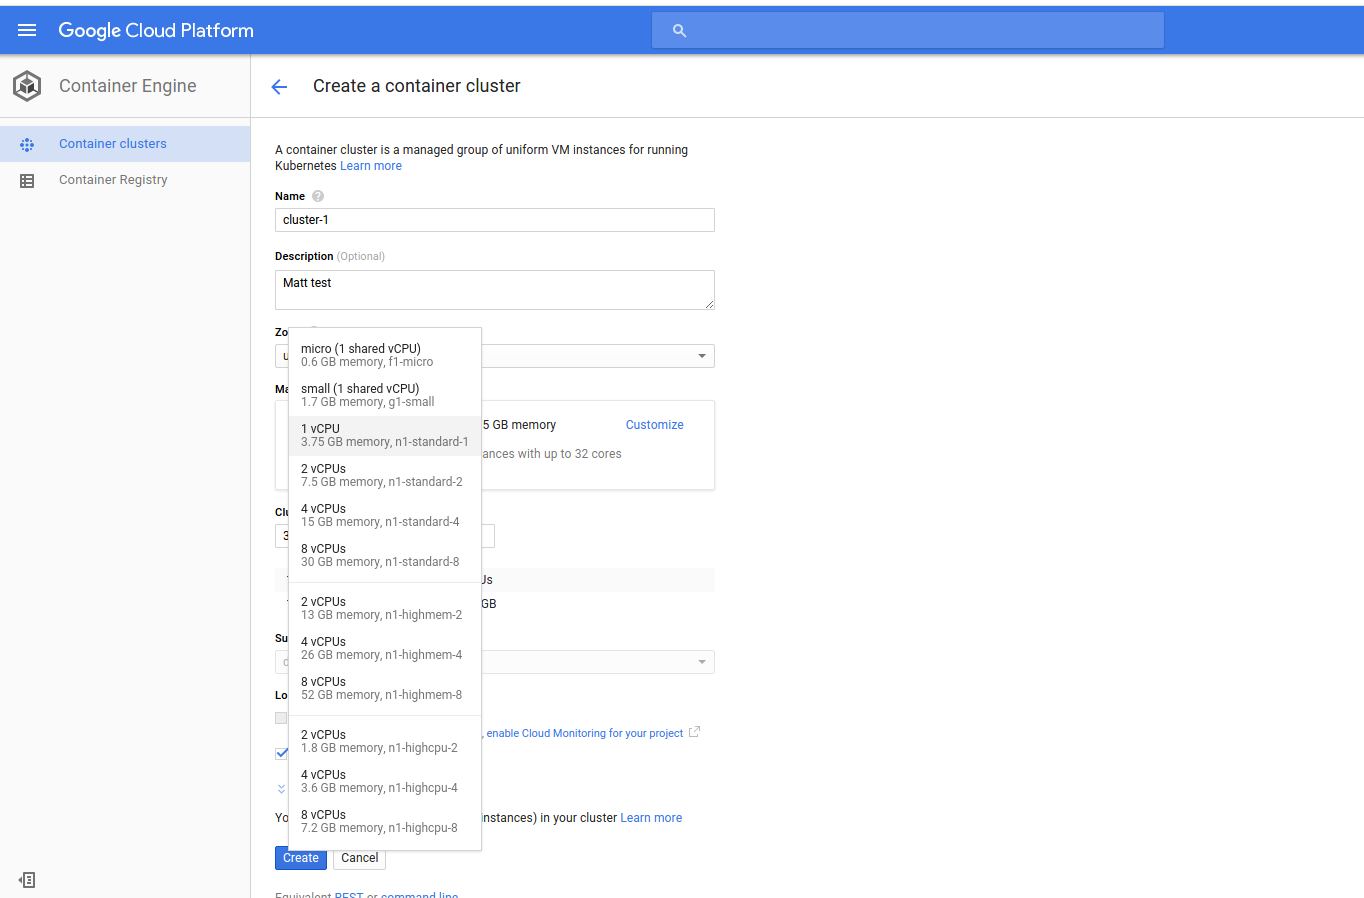
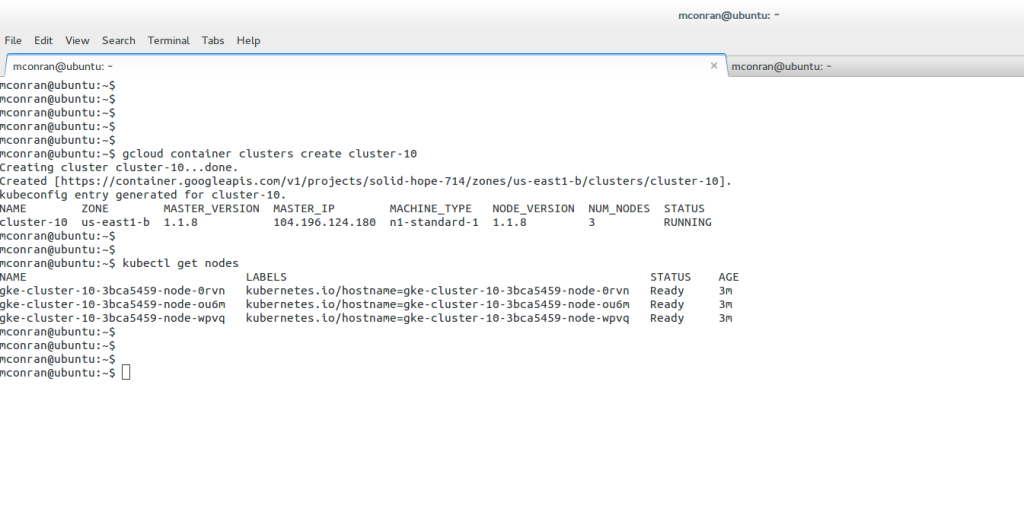
Once the Cluster is created, you can view the nodes assigned to it. For example, the extract below shows that we have three nodes with the status Ready.
 Kubernetes Networking 101
Hands-on Kubernetes: Kubernetes basics and Kubernetes cluster nodes
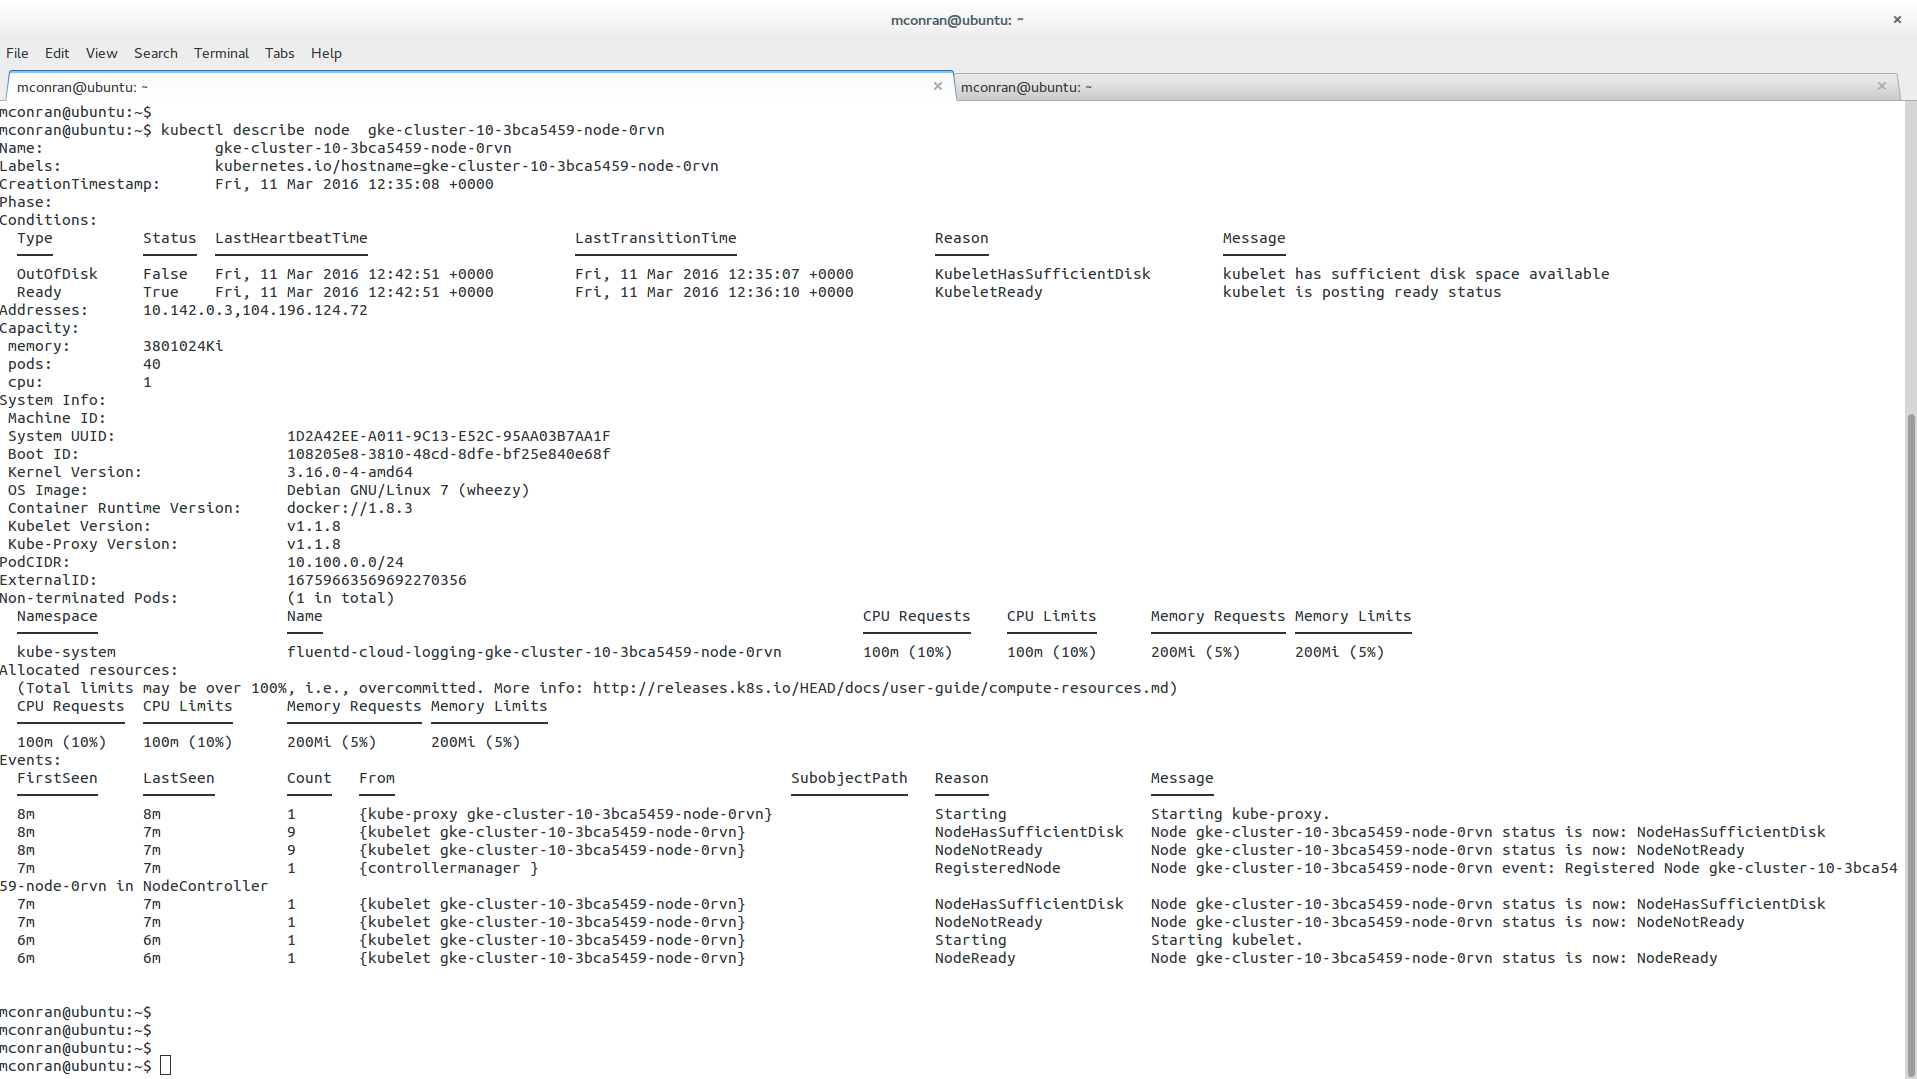
Nodes are the building blocks within a cluster. Each node runs a Docker runtime and hosts a Kubelet agent. The docker runtime is what builds and runs the Docker containers. The type and number of node instances are selected during cluster creation.
Select the node instance based on the scale you would like to achieve. After creation, you can increase or decrease the size of your Cluster with corresponding nodes. If you increase instances, new instances are created with the same configuration as existing ones. When reducing the size of a cluster, the replication controller reschedules the Pods onto the remaining instances.
Once created, issue the following CLI commands to view the Cluster, nodes, and other properties. The screenshot above shows a small cluster machine, “n1-standard-1,” with three nodes. If unspecified, these are the default. Once the Cluster is created, the kubectl command creates and manages resources.
Hands-on Kubernetes: Container creation
Once the Cluster is created, we can continue to create containers. Containers are isolated units sealing individual application entities. We have the option to develop single-container Pods or multi-container Pods. Single-style Pods have one container, and multi-containers have more than one container per Pod.
A replication controller monitors Pod activity and ensures the correct number of Pod replicas. It constantly monitors and dynamically resizes. Even within a single container Pod design, a replication controller is recommended.
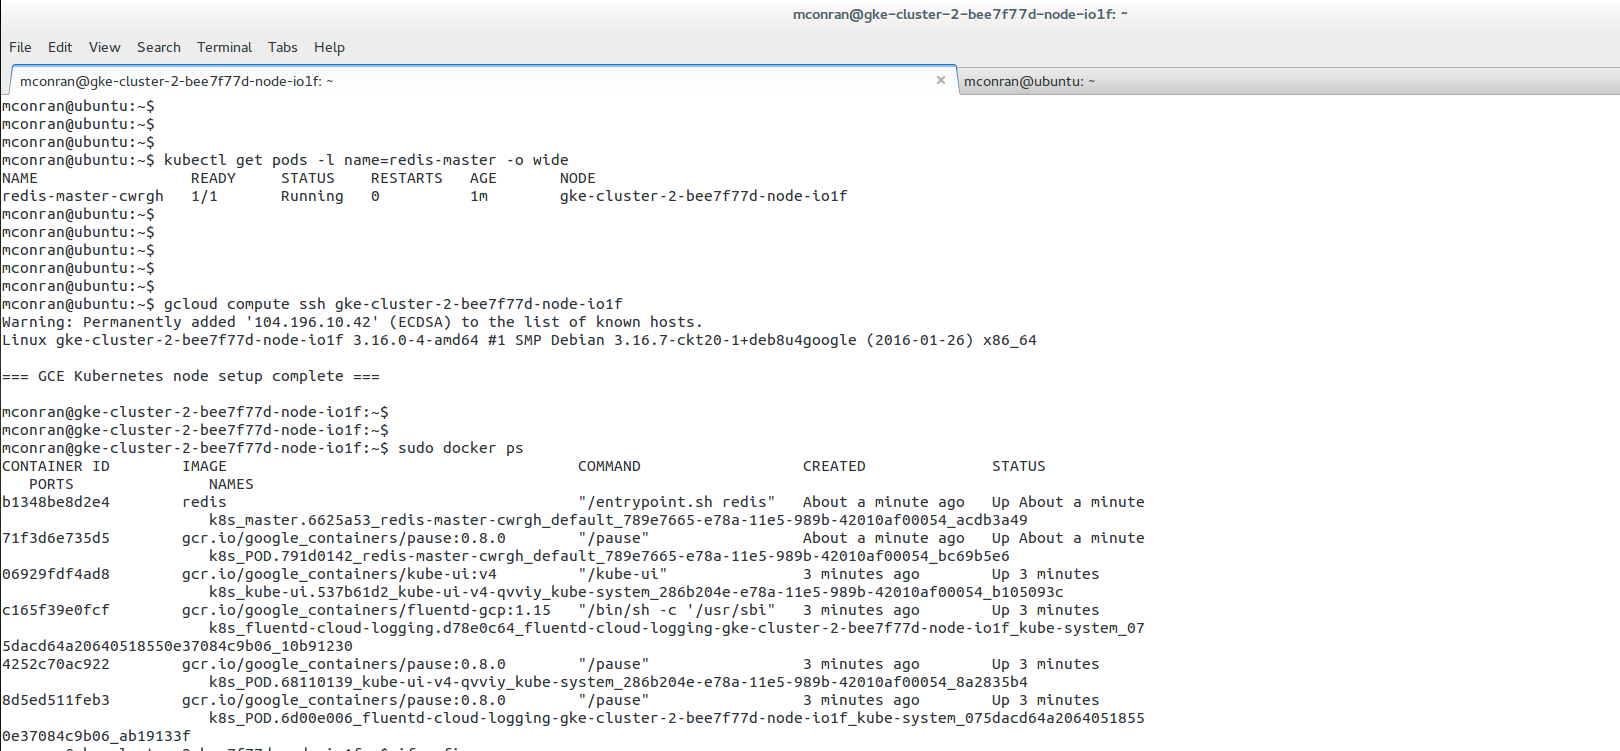
When creating a Pod, the pod’s name will be applied to the replication controller. The following example displays the creation of a container from the docker image. We proceed to SSH to the container and view instances with the docker ps command.
A container’s filesystem lives as long as the container is active. You may want container files to survive a restart or crash. For example, if you have MYSQL, you may wish to these files to be persistent. For this purpose, you mount persistent disks to the container.
Persistent disks exist independently of your instance, and data remains intact regardless of the instance state. They enable the application to preserve the state during restarting and shutting down activities.
Hands-on Kubernetes: Service and labels
An abstraction layer proves connectivity between application layers to interact with Pods and Containers with use services. Services map ports on a node to ports on one or more Pods. They provide a load-balancing style function across pods by identifying Pods with labels.
With a service, you tell the pods to proxy by identifying each Pod with a label key pair. This is conceptually similar to an internal load balancer.
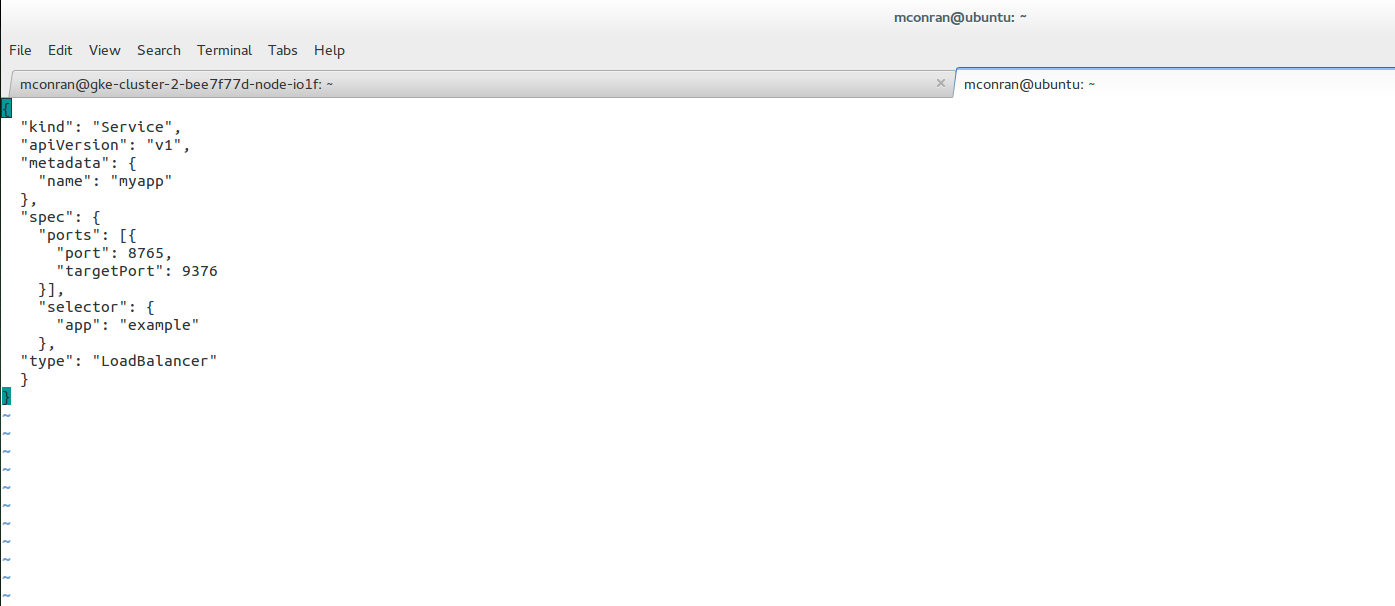
The critical values in the service configuration file are the ports field, selector, and label. The port field is the port exposed on the cluster node, and the target port is the port exposed on the Pod. The selector is the label-value pair that highlights which Pods to target.
All Pods with this label are targeted. For example, a service named my app resolves to TCP port 9376 on any Pod with the app=example label. The service can be accessed through port 8765 on any of the nodes’ IP addresses.
Service Abstraction
For service abstraction to work, the Pods we create must match the label and port configuration. If the correct labels are not assigned, nothing works. A flag also specifies a load-balancing operation. This uses a single IP address to spray traffic to all NODES.
The type Load Balancer flag creates an external IP on which the Pod accepts traffic. External traffic hits a public IP address and forwards to a port. The port is the service port to expose the cluster IP, and the target port is the port to target the pods. Ingress rules permit inbound connections from external destinations to each Cluster. Ingress is a collection of rules.
Understanding GKE-Native Monitoring
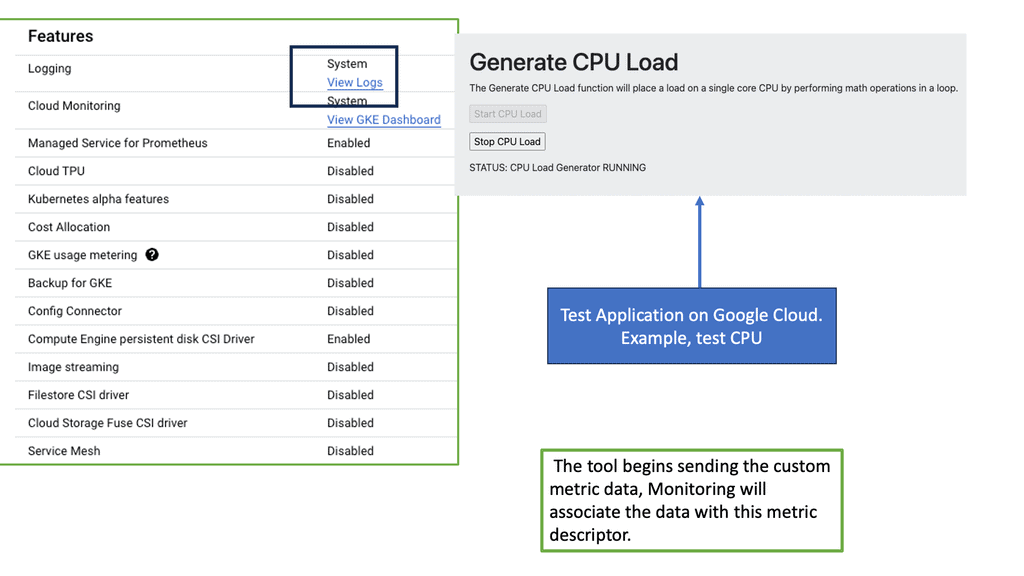
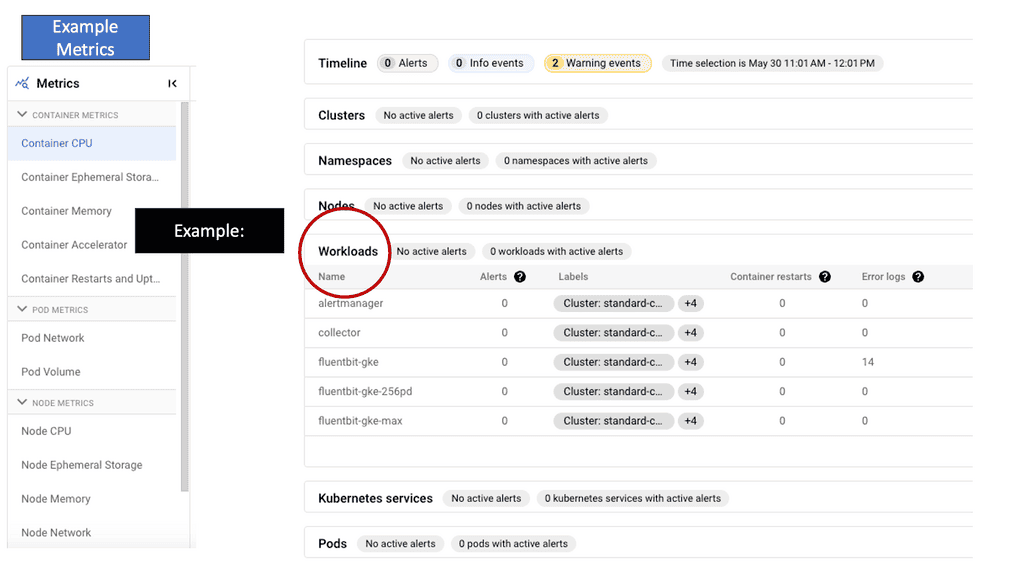
GKE-Native Monitoring equips developers and operators with a comprehensive set of tools to monitor the health and performance of their GKE clusters. Leveraging Kubernetes-native metrics provides real-time visibility into cluster components, pods, nodes, and containers.
With customizable dashboards and predefined metrics, GKE-Native Monitoring allows users to gain deep insights into resource consumption, latency, and error rates, facilitating proactive monitoring and alerting.
GKE-Native Logging
In addition to monitoring, GKE-Native Logging enables centralized collection and analysis of logs generated by applications and infrastructure components within a GKE cluster. Utilizing the power of Google Cloud’s Logging service provides a unified view of logs from various sources, including application logs, system logs, and Kubernetes events. With advanced filtering, searching, and log exporting capabilities, GKE-Native Logging simplifies troubleshooting, debugging, and compliance auditing processes.